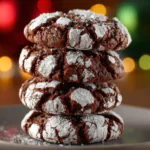
Introduction
Chocolate thumbprint cookies have a special place in the world of baking, blending the richness of cocoa with a delightful filling. These cookies offer a combination of textures, from the soft and chewy bite to the smooth, gooey center that awaits inside each thumbprint. Their charming appearance makes them a hit at any gathering.
At In Bloom Bakery, these cookies are more than a dessert; they represent creativity and love for sweets. The simplicity in their making allows even novice bakers to shine. Grab your apron, and let’s dive into a recipe that’s as enjoyable to make as it is to eat.
Ingredients
- 1 cup unsalted butter, softened
Butter creates a rich flavor and tender texture in cookies. Its fat content helps to keep the cookies soft, preventing them from turning too hard after baking. - 1 cup granulated sugar
Sugar not only sweetens the cookies but also contributes to their texture. It helps achieve a nice spread while baking, making the cookies pleasingly chewy. - 1 cup brown sugar, packed
Brown sugar adds moisture and a subtle caramel flavor, enhancing depth in taste. It also affects the cookie's chewiness, making them softer. - 2 large eggs
Eggs act as a binding agent, bringing the ingredients together and adding moisture. They also contribute to the overall structure of the cookies. - 2 teaspoons vanilla extract
Vanilla extract enhances the overall flavor profile, providing a warm, aromatic note that complements the chocolate perfectly. - 2 ¾ cups all-purpose flour
Flour is the primary structure-building ingredient, giving the cookies their shape. Different flour types can alter the texture and density of the final product. - ¾ cup unsweetened cocoa powder
Cocoa powder is essential for imparting the deep chocolate flavor these cookies are known for. It balances the sweetness and provides a rich color. - 1 teaspoon baking soda
Baking soda is a leavening agent that helps the cookies rise slightly, creating a nice, airy texture. - ½ teaspoon salt
Salt enhances the sweetness and balances flavors. It also heightens the overall taste experience. - 1 cup chocolate jam or your favorite filling
The filling creates the signature thumbprint effect and adds moisture and sweetness, which elevates the cookie to an indulgent level.
Directions & Preparation
Step 1: Preheat the oven to 350°F (175°C).
Preheating the oven is crucial to ensure that the cookies bake evenly and get the right texture. If the oven isn’t at the right temperature, the cookies can spread too much or not rise properly.
Step 2: In a large bowl, cream together the softened butter, granulated sugar, and brown sugar until light and fluffy.
This step involves beating the sugars into the butter, which incorporates air into the mixture. The result is a light and fluffy cookie base that will expand slightly while baking.
Step 3: Add the eggs one at a time, followed by the vanilla extract, mixing well after each addition.
Incorporating the eggs one at a time ensures they emulsify thoroughly into the batter. This contributes to the moisture level and binding of the ingredients, leading to a unified dough.
Step 4: In another bowl, combine the flour, cocoa powder, baking soda, and salt. Gradually add this dry mixture to the wet ingredients, mixing until just combined.
Mixing the dry ingredients separately helps distribute the cocoa powder, baking soda, and salt evenly, preventing clumps from forming in the cookie dough. Overmixing at this stage can lead to tough cookies.
Step 5: Chill the dough for at least 30 minutes to firm it up, making it easier to handle and shape.
Chilling the dough is a critical step that helps prevent the cookies from spreading too much during baking. It also allows the flavors to meld together.
Step 6: Scoop tablespoons of dough and roll them into balls. Place them on a baking sheet lined with parchment paper, spacing them about 2 inches apart.
Forming the dough into balls helps create a uniform appearance and encourages even baking. Be mindful of spacing to allow the cookies to expand without merging.
Step 7: Using your thumb, make an indentation in the center of each ball. Fill the indentations with about 1 teaspoon of chocolate jam.
The thumbprint is key to the cookie's name and texture. It should be deep enough to hold the filling without breaking the cookie apart. Adding the jam allows it to melt slightly during baking.
Step 8: Bake in the preheated oven for 10-12 minutes, until the edges are firm but the centers still appear soft.
Monitoring the cookies closely as they bake can prevent overcooking. The centers will firm up as they cool, creating that perfect chewy texture.
Step 9: Remove from the oven and let the cookies cool on the baking sheet for 5 minutes, then transfer them to a wire rack to cool completely.
Cooling the cookies on the baking sheet allows them to set while still soft. Moving them afterward to a wire rack promotes even cooling, preventing sogginess on the bottom.

The Richness of Chocolate
Chocolate thumbprint cookies stand out in the world of desserts, primarily due to the deep, rich flavor of cocoa. Each bite envelops you in a chocolatey embrace, balanced perfectly by the sweetness of the filling. This flavor combination not only satisfies cravings but also serves as a delightful treat at any occasion, from casual gatherings to festive celebrations.
Perfecting the Thumbprint
Creating the perfect thumbprint is an art that can elevate your cookies from good to extraordinary. The indentation should be deep enough to hold the filling without compromising the structure of the cookie. Using the right technique ensures that the thumbprint remains intact during baking, resulting in a beautiful presentation and a delicious surprise with every bite.
Choosing Your Filling
While chocolate jam is a classic choice for thumbprint cookies, the filling can be varied based on personal preference. Fruit jams, nut butters, or even ganache can add unique flavors and textures. Choosing a contrasting filling not only adds complexity but also enhances the visual appeal, making each cookie a small work of art.
FAQs
What happens if my cookie dough is too dry?
If your dough is too dry, try adding a teaspoon of milk or water at a time until the dough comes together. Be careful not to overmix.
Can I use a different type of jam for the filling?
Yes, you can experiment with various jams like raspberry, apricot, or even homemade options for a personalized touch.
How do I prevent my cookies from spreading too much while baking?
Ensure your dough is sufficiently chilled before baking and avoid using too much sugar, as it can contribute to excess spreading.
What if my thumbprint cookies are too crumbly?
If the cookies are crumbly, it could be due to too much flour. Try reducing the flour slightly in your next batch to achieve a softer texture.
Can I double the recipe for a larger gathering?
Absolutely! Just ensure your mixing bowl is big enough to handle the increased quantity, and keep an eye on baking times.
How can I make sure the jam doesn't overflow during baking?
Leave enough space in the thumbprint for the filling and avoid overfilling. It's better to add less and adjust as needed after the first batch.
Conclusion
Chocolate thumbprint cookies are a timeless classic that brings joy with every bite. Their combination of chocolatey goodness and gooey filling creates a delightful experience for all who indulge. Whether enjoyed with a cup of coffee or served at special occasions, they are sure to impress.
This recipe is not only easy to follow, but it also invites creativity. Customize your cookies with fillings that excite your taste buds, and share them with loved ones for a memorable treat. Happy baking!
Recipe Card

Crispy Meat Pies Filled with Flaky Goodness
Ingredients
Method
- Prepare the pastry dough.
- Cook the filling mixture.
- Roll out the dough.
- Assemble the pies.
- Prepare for baking.
- Bake the pies.
- Cool and serve.
Notes
Additional serving suggestions: pair with a crisp salad, garlic bread, or roasted seasonal vegetables for balance.
For make-ahead, prep components separately and assemble just before heating to preserve texture.
Taste and adjust with acid (lemon/vinegar) and salt right at the end to wake up flavors.


