Introduction
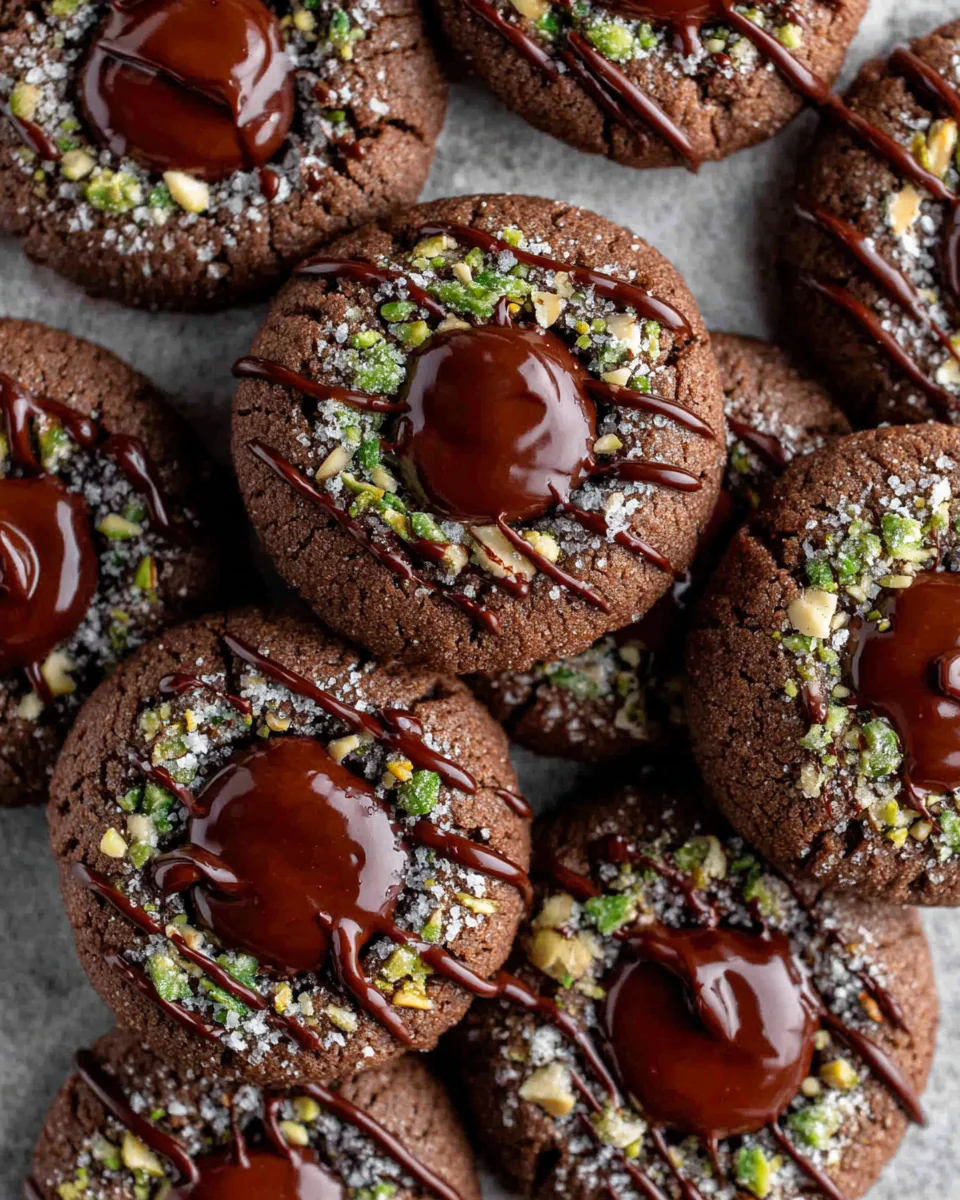
Chocolate thumbprint cookies are a beloved treat, combining a rich chocolate base with a sweet jam filling that always pleases the palate. These delightful cookies, perfect for any occasion, are both fun to make and irresistible to eat. Their unique texture and flavor make them a standout choice for cookie platters, gifts, or just a cozy evening at home.
In this recipe, the ingredients come together to create a tender, melt-in-your-mouth cookie that's rich in chocolate flavor. The thumbprint technique gives you an opportunity to be creative with fillings, whether you prefer classic fruit jams or something more unusual like chocolate ganache or peanut butter. Let's dive into this delicious experience.
Ingredients
- 1 cup all-purpose flour
Flour provides the structure to the cookies. It interacts with the fats and liquids to create the base that holds the cookies together and gives them a tender crumb. - 1/2 cup unsweetened cocoa powder
Cocoa powder adds the essential chocolate flavor to the cookies. It also contributes to the dark color and a slight bitterness that balances the sweetness. - 1/2 teaspoon baking powder
Baking powder serves as a leavening agent. It helps the cookies rise slightly during baking, resulting in a lighter texture. - 1/4 teaspoon salt
Salt enhances the overall flavor of the cookies, bringing out the sweetness and chocolate richness. A small amount makes a big difference! - 1/2 cup unsalted butter, softened
Butter is crucial for adding rich flavor and moisture. The creaming process with sugar incorporates air, helping to create a light and tender cookie. - 1/2 cup granulated sugar
Granulated sugar sweetens the cookies and contributes to the texture. It helps achieve a chewy consistency when combined with butter. - 1/4 cup brown sugar
Brown sugar adds both sweetness and moisture to the dough. Its molasses content also deepens the flavor and helps the cookies stay soft. - 1 large egg
Eggs bind the ingredients together and add richness to the dough. They also help in leavening the cookies, making them more airy. - 1 teaspoon vanilla extract
Vanilla extract complements the chocolate flavor and enhances the overall taste of the cookies with its warm aroma. - 1/2 cup jam or preserves (your choice)
Jam or preserves fill the thumbprint indentation, adding a burst of flavor and a contrasting texture. Choose your favorite fruit or opt for more adventurous flavors.
Directions & Preparation
Step 1: Preheat your oven to 350°F (175°C).
Preheating the oven ensures that the cookies bake evenly and cook properly from the moment they go in. A steady temperature allows the butter to melt and the sugars to caramelize correctly.
Step 2: In a bowl, whisk together flour, cocoa powder, baking powder, and salt.
Whisking these dry ingredients together ensures they are thoroughly combined, which helps to evenly distribute the leavening agents. This step prevents clumps, leading to a more uniform texture in the final cookies.
Step 3: In a separate bowl, cream together the softened butter, granulated sugar, and brown sugar.
Creaming introduces air into the butter and sugars, resulting in a light and fluffy mixture. This step also aids in emulsifying the fats with the sugars, creating a smooth dough and contributing to the cookies' tenderness.
Step 4: Add the egg and vanilla extract to the butter mixture, and beat until well combined.
Incorporating the egg and vanilla at this point enriches the dough's flavor. The egg serves as a binding agent, while the vanilla adds aromatic notes, enhancing the chocolate profile.
Step 5: Gradually mix in the dry ingredients until just combined.
Mixing just until combined prevents overworking the dough, which can lead to tough cookies. A gentle approach at this stage ensures a tender texture in the final baked product.
Step 6: Form tablespoon-sized balls of dough and place them on a parchment-lined baking sheet, spacing them a few inches apart.
Shaping the dough into uniform balls helps them bake evenly. The spacing allows for expansion during baking, preventing the cookies from merging together.
Step 7: Use your thumb to create an indentation in the center of each cookie ball.
The thumbprint is essential for holding the jam filling. Pressing down firmly but not too deeply ensures the cookie retains its shape once baked, creating a functional space for the jam.
Step 8: Fill each indentation with your chosen jam or preserves, about 1/2 teaspoon per cookie.
The filling adds moisture and flavor to the cookies. Choosing a jam with vibrant flavors can elevate the overall taste experience, contrasting nicely with the chocolate cookie.
Step 9: Bake the cookies in the preheated oven for 10-12 minutes, or until set but still soft.
Baking until just set is key to maintaining a chewy texture with a soft center. Overbaking can lead to dry cookies, so keeping an eye on them will help achieve the perfect result.
Step 10: Remove from the oven and allow cookies to cool on the baking sheet for 5 minutes before transferring them to a wire rack to cool completely.
Cooling on the baking sheet allows for carryover cooking, helping them firm up slightly. Transferring them afterward prevents steam buildup, ensuring a crisp exterior.

Exploring Jam Combinations for Unique Flavors
While traditional jam fillings work beautifully, experimenting with different flavors can raise the bar for these cookies. Consider indulgent options like Nutella or chocolate ganache for a decadent twist. A zesty lemon curd or a rich caramel sauce can also shine as fillings, introducing new flavor dimensions that will entice every palate.
Baking Tips for Perfect Thumbprint Cookies
Consistency is crucial when making thumbprint cookies. Ensure your dough isn't too sticky or too dry to achieve the right shape during baking. Adjusting your flour slightly can help with that. Another tip is to chill your cookie dough for about 30 minutes before baking; this can enhance the structure and provide a firmer form when pressing the thumbprint.
Chocolate Thumbprint Cookies: A Versatile Treat
These cookies are perfect for any occasion, from holiday gatherings to casual get-togethers. They present beautifully on cookie platters and make fantastic gifts when packed in decorative boxes. Their versatility means you can customize them for different themes or seasons, letting your creativity shine with various jams, toppings, or even drizzles of chocolate.
FAQs
What if my cookie dough is too dry?
If the dough feels too dry and crumbly, try adding a teaspoon of milk or melted butter to the mixture. This should help it come together more smoothly.
Can I use alternative fillings besides jam?
Absolutely! Nutella, chocolate ganache, or even peanut butter can be used as fillings for a fun twist on the classic thumbprint.
What should I do if my cookies spread too much while baking?
If your cookies spread excessively, they may be too warm before going into the oven. Chill the shaped and filled cookies for at least 30 minutes before baking.
How can I adjust the flavor of the cookie dough?
To modify the flavor, consider adding a teaspoon of instant espresso powder or a pinch of cinnamon to enhance the chocolate flavor.
What if the jam bubbles over during baking?
If the jam bubbles over, it’s often because too much was added. A little overflow is fine, but try to keep it at about 1/2 teaspoon per cookie to avoid mess.
Can I double this recipe?
Yes, doubling the recipe is straightforward. Just ensure you have enough baking sheets and space in your oven for the increased quantity.
Conclusion
Chocolate thumbprint cookies are a delightful treat that melds the rich flavors of chocolate with the sweet surprise of your chosen jam. Their easy preparation and endless customization options make them a favorite among home bakers.
As you gather your ingredients and prepare to bake, don’t forget that the best part of making these cookies lies in the joy of sharing them with friends and family. With each bite, these cookies are sure to bring smiles and satisfaction.
Recipe Card

Crispy Meat Pies Filled with Flaky Goodness
Ingredients
Method
- Prepare the pastry dough.
- Cook the filling mixture.
- Roll out the dough.
- Assemble the pies.
- Prepare for baking.
- Bake the pies.
- Cool and serve.
Notes
Additional serving suggestions: pair with a crisp salad, garlic bread, or roasted seasonal vegetables for balance.
For make-ahead, prep components separately and assemble just before heating to preserve texture.
Taste and adjust with acid (lemon/vinegar) and salt right at the end to wake up flavors.

