Introduction
As the holiday spirit fills the air, there’s nothing quite like baking a batch of Christmas cookies to create warm memories. This particular recipe, dubbed Christmas Kitchen Sink Cookies, is designed to embrace creativity in your baking. It’s a beautiful medley of flavors and textures, perfect for using up ingredients you might have lying around.
The charm of Kitchen Sink Cookies is that they tend to include a myriad of additions, making each bite a delightful surprise. Dried fruits, nuts, chocolate chips, and spices come together in a vibrant collection, ensuring that each cookie is unique. These cookies are not just a delicious treat; they're also a festive way to showcase your baking skills and enjoy some family bonding time in the kitchen.
Ingredients
- 2 cups all-purpose flour
All-purpose flour is the foundation of your cookie dough, providing structure and stability. It absorbs moisture, allowing your cookies to hold their shape and giving them the desired chewiness. - 1 teaspoon baking soda
Baking soda acts as a leavening agent, helping the cookies rise slightly while baking. This results in a light and chewy texture rather than a dense one, enhancing the overall mouthfeel. - 1 teaspoon salt
Salt is a crucial flavor enhancer that balances the sweetness of the cookies. It also strengthens the gluten structure in the dough, contributing to a better texture. - 3/4 cup unsalted butter, softened
Butter provides moisture and richness that creates a tender cookie. When creamed with sugar, it introduces air into the mixture, contributing to a light, fluffy consistency. - 1 cup brown sugar
Brown sugar adds sweetness and moisture, resulting in a rich flavor and chewy texture. The molasses in brown sugar gives the cookies a deeper taste and helps them retain moisture. - 1/2 cup granulated sugar
Granulated sugar adds sweetness and promotes crispiness on the cookie edges. Its fine texture helps achieve a light, airy dough when creamed with butter. - 2 large eggs
Eggs not only provide moisture but also help bind the ingredients together. They contribute to the overall structure of the cookie and add richness. - 2 teaspoons vanilla extract
Vanilla extract adds a warm, sweet aroma that enhances the flavor profile of the cookies. It rounds off the sweetness and balances the flavors beautifully. - 1 cup chocolate chips
Chocolate chips provide indulgent sweetness and a delightful melty texture within the cookie. They create pockets of rich chocolate flavor in every bite. - 1/2 cup chopped nuts (walnuts or pecans)
Nuts bring a satisfying crunch and nutty flavor that contrasts wonderfully with the softness of the cookie. They also add healthy fats and protein, making the cookies more filling. - 1/2 cup dried cranberries or raisins
Dried fruits contribute natural sweetness and chewiness, providing bursts of flavor with every bite. They also add festive color to your cookie dough. - 1/2 teaspoon ground cinnamon
Cinnamon introduces warm, spicy notes that are reminiscent of the holiday season. It enhances the overall flavor complexity of the cookies.
Directions & Preparation
Step 1: Preheat your oven to 350°F (175°C).
Preheating the oven is crucial for achieving the perfect bake. By allowing your oven to reach the desired temperature beforehand, you ensure that the cookies will spread and rise evenly, resulting in a desirable texture and color.
Step 2: In a bowl, whisk together flour, baking soda, salt, and cinnamon.
Whisking these dry ingredients together helps to distribute the leavening agent (baking soda) and the spices evenly throughout the flour. This step prevents clumping and ensures that every cookie is flavored consistently.
Step 3: In a separate bowl, cream together softened butter, brown sugar, and granulated sugar until light and fluffy.
Creaming butter and sugars incorporates air into the mixture, giving your cookies a lighter texture. It also helps to dissolve the sugars fully, contributing to a smoother dough and a well-distributed sweetness.
Step 4: Add eggs and vanilla extract to the butter mixture, mixing until well combined.
Incorporating eggs and vanilla adds moisture and flavor depth to the dough. Ensure everything is well combined for a uniform cookie dough, which is essential for baking efficiency.
Step 5: Gradually mix the dry ingredients into the wet ingredients until just combined.
Mixing the dry ingredients in gradually helps prevent flour clumping and overmixing, which can lead to tough cookies. Stop mixing as soon as you can no longer see dry flour for a tender, chewy texture.
Step 6: Fold in the chocolate chips, nuts, dried cranberries, and additional mix-ins of your choice.
Gently folding in your mix-ins ensures they are evenly distributed without overworking the dough. Each cookie will showcase a variety of flavors and textures, making your Kitchen Sink Cookies a delightful surprise.
Step 7: Drop tablespoon-sized balls of dough onto a parchment-lined baking sheet, spacing them about 2 inches apart.
Spacing your cookie dough properly allows for adequate spreading while baking. This ensures your cookies don’t merge together and maintain their individual shapes. Using a parchment-lined sheet also prevents sticking and helps with easy removal.
Step 8: Bake in the preheated oven for 10-12 minutes, or until golden brown around the edges.
Monitoring the baking time is essential to ensure your cookies are perfectly golden. Remove them when the edges look slightly darker but the center looks soft; they will firm up as they cool.
Step 9: Let the cookies cool on the baking sheet for 5 minutes before transferring them to a wire rack.
Cooling on the baking sheet allows the cookies to firm up, making them easier to transport. Transferring them too early may result in breaking, while cooling completely on a wire rack allows for even air circulation.

Creative Mix-Ins to Consider
One of the joys of Christmas Kitchen Sink Cookies is their versatility. Beyond chocolate chips and nuts, consider incorporating pretzels for a salty crunch, or shredded coconut for a tropical flair. Experimenting with various ingredients not only keeps the cookies interesting but also allows you to customize them based on your preferences or what you have on hand.
Gift-Worthy Packaging Ideas
These cookies make fantastic holiday gifts when packaged thoughtfully. Consider using festive tins or clear cellophane bags tied with colorful ribbons. Including a handwritten recipe card or a personal note can add a special touch that elevates your gift from simple to cherished. Such packaging treats not only delight the recipients but also show how much you care.
Pairing Suggestions for Your Cookies
While these cookies are delicious on their own, they can be even more delightful when paired with complementary treats. Consider serving them with a glass of cold milk, spiced holiday tea, or a cup of rich hot chocolate. Adding a fruit platter or a cheese board can create an inviting dessert spread, making your holiday gatherings even more festive and enjoyable.
FAQs
Why did my cookies turn out too flat?
Flat cookies can result from too warm butter, insufficient flour, or not enough baking soda. Ensure your butter is softened, not melted, and accurately measure your flour for optimal texture.
Can I replace the butter with coconut oil?
Yes, you can substitute coconut oil for butter, but keep in mind that cookies may have a different texture and flavor. Coconut oil can lead to a slightly healthier option with a hint of coconut taste.
What if my dough is too crumbly?
If your dough feels too crumbly, it may need more moisture. Adding a teaspoon of milk or an extra egg can help bind the dough together, making it easier to scoop and shape.
Can I use freshly chopped fruit instead of dried fruit?
While you can use fresh fruit, it's best to stick with dried fruits to maintain the right texture. Fresh fruits may introduce too much moisture, affecting the overall consistency of your cookies.
How can I ensure my cookies are chewy?
To achieve a chewier cookie, focus on not overbaking them. Remove the cookies from the oven when they appear slightly underbaked, and allow them to cool on the baking sheet to finish setting.
What should I do if my cookie dough seems too wet?
If your dough feels overly wet, sprinkle in a little more flour until you achieve the desired consistency. Keep in mind that the dough should be soft but not sticky.
Conclusion
Christmas Kitchen Sink Cookies invite creativity into your baking while spreading holiday cheer. Embrace the flexibility of this recipe to tailor it to your tastes and available ingredients, making each batch uniquely yours.
Whether shared at gatherings, gifted, or enjoyed at home, these cookies are bound to become a festive favorite. So gather your loved ones, fill your kitchen with laughter, and start baking!
Recipe Card
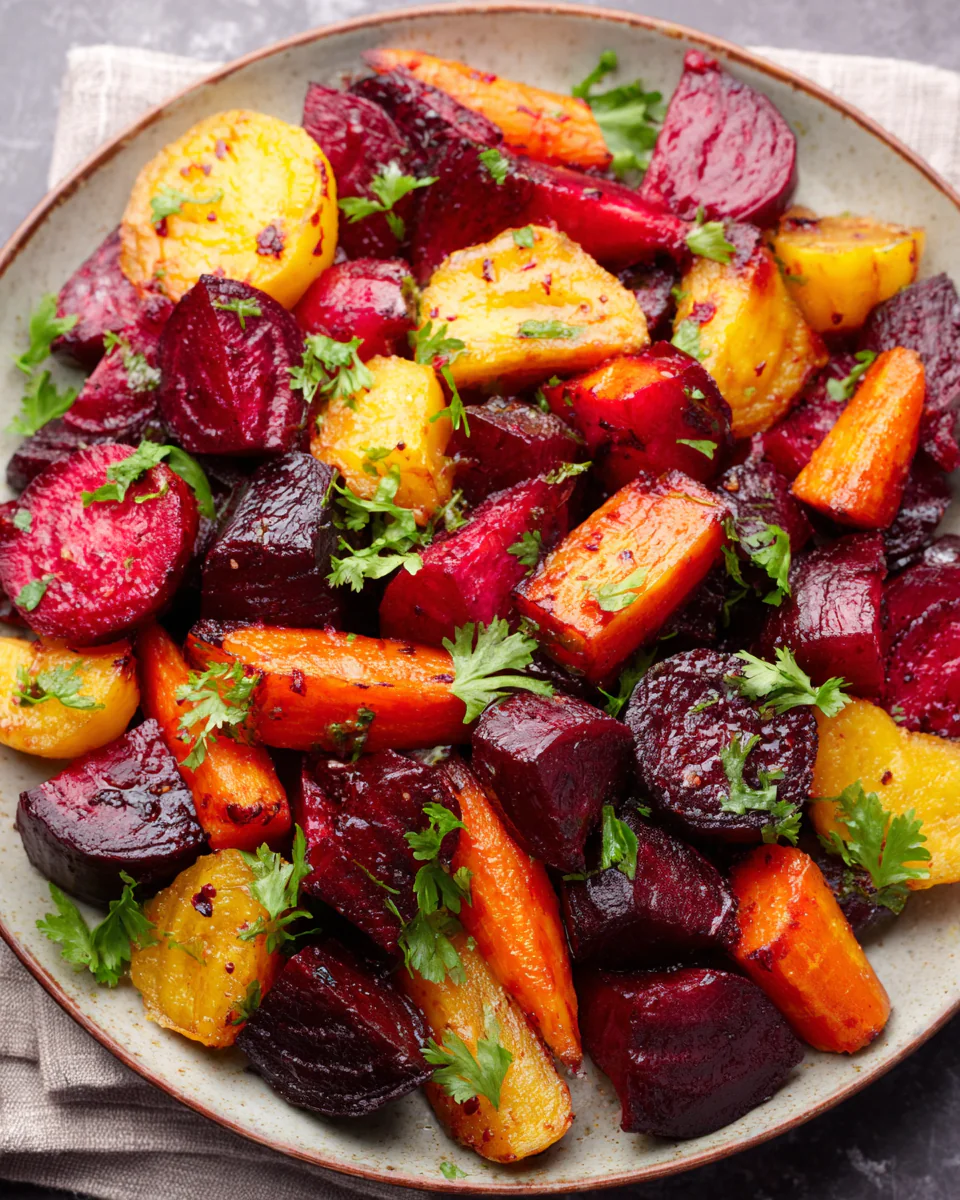
Savory Honey Roasted Beets and Carrots Delight
Ingredients
Method
- Preheat your oven to 400°F (200°C).
- Prepare the beets and carrots by peeling and chopping them.
- In a large mixing bowl, combine the cubed beets and sliced carrots.
- Drizzle the honey and olive oil over the vegetables, then season with salt and pepper.
- Toss everything together until the beets and carrots are well coated.
- Spread the coated vegetables on a parchment-lined baking sheet.
- Roast in the preheated oven for about 30-40 minutes, stirring halfway.
- Check for doneness; they should be fork-tender and caramelized.
- Remove from oven and garnish with fresh herbs, if desired.
Tried this recipe?
Let us know how it was!Notes
Additional serving suggestions: pair with a crisp salad, garlic bread, or roasted seasonal vegetables for balance.
For make-ahead, prep components separately and assemble just before heating to preserve texture.
Taste and adjust with acid (lemon/vinegar) and salt right at the end to wake up flavors.

