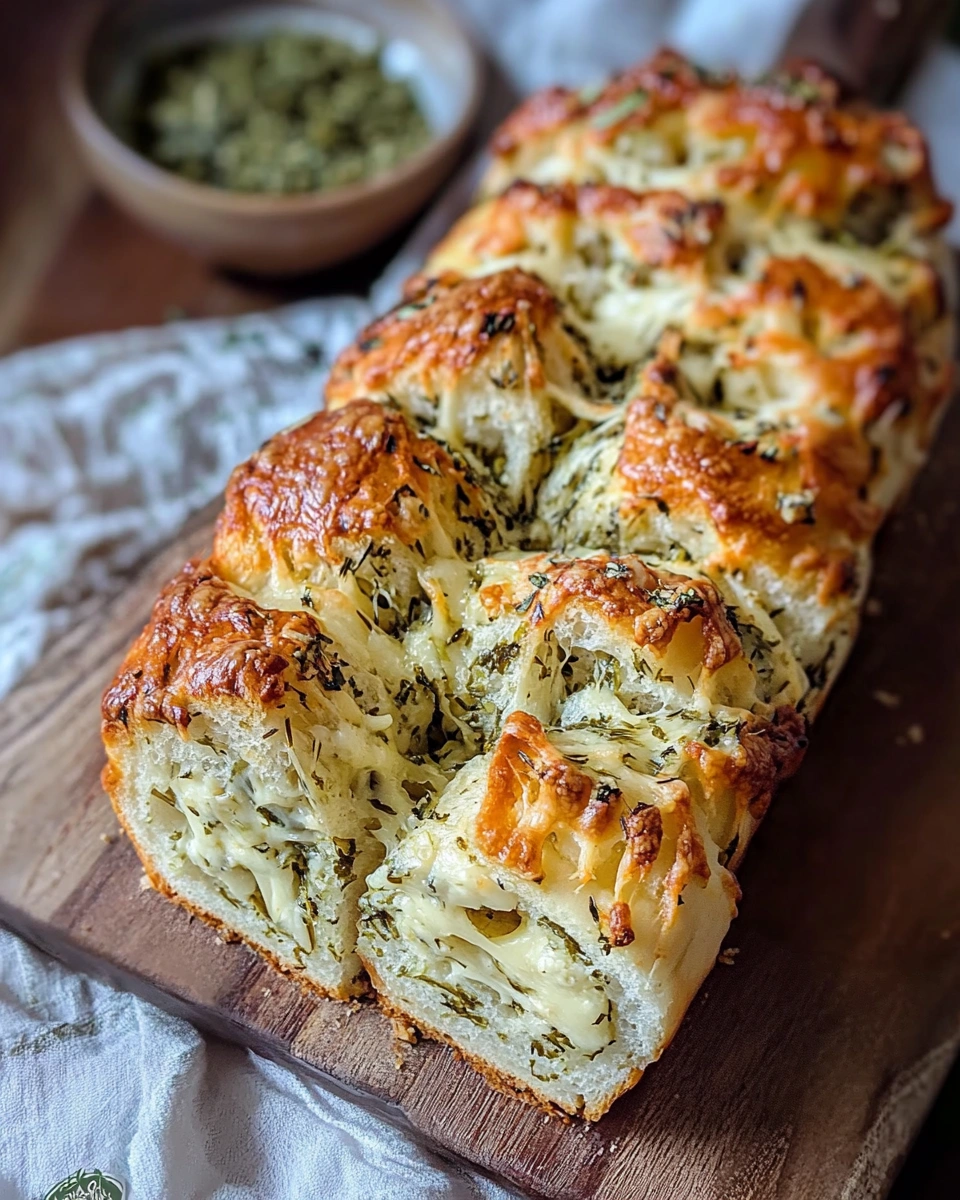
There’s nothing quite like Herb and Cheese Pull-Apart Bread when you’re looking to impress your guests or satisfy your own cravings for a warm, cheesy, and flavorful treat. Imagine golden-brown bread with gooey cheese melting in every crevice, perfectly complemented by fragrant herbs. It’s the kind of dish that brings people together, making it ideal for family dinners, gatherings, or as a side to any main dish.
Whether you’re a seasoned cook or just beginning your culinary journey, this recipe for Herb and Cheese Pull-Apart Bread is easy to follow and delivers a delightful result. Let’s dive into the details of how to make this cheesy masterpiece that’s sure to become a staple in your kitchen.
What Makes Herb and Cheese Pull-Apart Bread Special?
Pull-apart bread is one of those recipes that has become a crowd favorite because of its simplicity and versatility. With its gooey cheese, aromatic herbs, and perfectly crisped bread, it hits all the right notes when it comes to flavor and texture. The beauty of this recipe lies in the combination of fresh ingredients, like rosemary, thyme, and parsley, paired with the rich, creamy mozzarella and Parmesan cheese.
Another fantastic feature is how easy it is to make. You don’t need to be an expert baker to create this irresistible dish. The bread is already made for you, and you only need to fill it with the right ingredients, bake, and enjoy. Whether you’re serving it at a casual dinner party, a holiday feast, or as an afternoon snack, Herb and Cheese Pull-Apart Bread will undoubtedly steal the spotlight.
Ingredients You’ll Need for Herb and Cheese Pull-Apart Bread
To make this cheesy pull-apart bread, you’ll need a few key ingredients, all of which are easy to find at your local grocery store:
- 1 loaf of French bread or Italian bread (about 8-10 inches) – This will serve as the base of your pull-apart bread. Choose a loaf that is sturdy enough to hold all the gooey cheese and herbs.
- 1 cup shredded mozzarella cheese – The star of the show when it comes to meltability. It makes the bread stretchy and cheesy in all the right ways.
- ½ cup grated Parmesan cheese – For a savory and slightly tangy contrast to the mozzarella. This adds depth and richness to the flavor.
- 4 tbsp unsalted butter, melted – This will help bind the herbs and cheese together, giving the bread that buttery flavor.
- 2 tbsp olive oil – For extra richness and a slight fruity flavor that balances the richness of the butter.
- 2 tbsp fresh parsley, chopped – Fresh parsley provides a fresh, vibrant note to the bread and adds color.
- 1 tbsp fresh rosemary, chopped (or 1 tsp dried rosemary) – The earthy, woodsy flavor of rosemary pairs perfectly with the cheese and butter.
- 1 tbsp fresh thyme leaves – Thyme adds a savory, slightly minty taste that complements the other herbs.
- 2 cloves garlic, minced – A must for flavor! Garlic brings warmth and depth to the dish.
- ¼ tsp salt – To bring out the flavors and balance the richness of the cheese and butter.
- ¼ tsp black pepper – For a little kick and to enhance the other flavors.

Step-by-Step Guide to Making Herb and Cheese Pull-Apart Bread
Step 1: Preheat the Oven
The first step in making Herb and Cheese Pull-Apart Bread is to get your oven ready. Preheat it to 350°F (175°C). This will ensure that the bread bakes evenly, allowing the cheese to melt perfectly.
While the oven is heating up, line a baking sheet with parchment paper or aluminum foil to make clean-up easier after baking.
Step 2: Prepare the Bread
Now, take your loaf of French bread or Italian bread and cut it into 1-inch slices, making sure not to cut all the way through. The key here is to leave the bottom of the loaf intact, which helps the bread stay together as you stuff it with all the flavorful ingredients. You should create a grid-like pattern by cutting in both directions—vertically and horizontally—so that each piece of bread can be easily pulled apart.
Step 3: Make the Herb-Butter Mixture
In a small bowl, combine the melted butter, olive oil, minced garlic, parsley, rosemary, thyme, salt, and pepper. Stir everything together until the mixture is well combined. The garlic will infuse the butter with a rich aroma, while the herbs will add their distinctive fragrances and flavors. This herb-butter mixture will be what brings your pull-apart bread to life!
Step 4: Stuff the Bread with the Herb-Butter Mixture
Take a spoon and carefully spoon the herb-butter mixture into the cracks of the bread. Make sure to get the mixture into every pocket so that the flavors seep into each bite. Once the butter is distributed, sprinkle the shredded mozzarella cheese and grated Parmesan cheese between the slices of bread. This will ensure that each piece is loaded with cheese, so every pull-apart section is as cheesy as can be.
Step 5: Wrap & Bake the Bread
Now it’s time to bake your creation! Wrap the loaf tightly in aluminum foil to lock in the flavors and moisture. This will help the cheese melt evenly and the bread to stay soft. Place the wrapped bread on your prepared baking sheet and bake it in the oven for 15 minutes.
After 15 minutes, unwrap the foil to allow the top of the bread to get crispy and golden. Continue baking the bread for an additional 10-15 minutes, or until the cheese is fully melted and the bread is golden on the edges.
Step 6: Serve the Herb and Cheese Pull-Apart Bread
Once the bread is done, remove it from the oven and allow it to cool for a couple of minutes. This will make it easier to pull apart without burning your fingers! Garnish with a little extra fresh parsley for color, and serve warm.
Why You’ll Love Herb and Cheese Pull-Apart Bread
Herb and Cheese Pull-Apart Bread is more than just a side dish—it’s an experience! Here’s why it’s so loved:
- Cheese Galore: The mozzarella and Parmesan create a beautifully melty, cheesy center in every bite. It’s perfect for cheese lovers!
- Perfectly Balanced Flavors: The combination of fresh herbs like rosemary, thyme, and parsley, along with garlic and butter, creates a flavor profile that’s both comforting and aromatic.
- Easy to Make: While this bread may sound gourmet, it’s incredibly simple to make. Just a few steps and a bit of patience, and you’ll have a bread that’s perfect for any occasion.
- Great for Sharing: The pull-apart nature of the bread makes it perfect for gatherings. It’s an appetizer that encourages people to gather around and enjoy it together.
- Versatile: You can easily adjust the herbs and cheeses to suit your taste. Want more garlic? Add more! Prefer a different cheese? Go for it! This bread is as customizable as you want it to be.
FAQs About Herb and Cheese Pull-Apart Bread
1. Can I use a different type of bread? Yes! While French bread or Italian bread are ideal for this recipe, you can use any hearty, crusty bread that will hold its shape when cut into slices. Sourdough or ciabatta would also work wonderfully.
2. Can I prepare Herb and Cheese Pull-Apart Bread ahead of time? Absolutely! You can prepare the bread and stuff it with the herb-butter mixture a few hours before baking. Simply wrap it tightly in foil and refrigerate until you’re ready to bake it. When you’re ready, pop it in the oven and bake as directed.
3. Can I make this dish vegetarian? Yes! This recipe is already vegetarian. There are no meat ingredients, so it’s perfect for vegetarians or anyone looking for a meat-free meal option.
4. What can I serve with Herb and Cheese Pull-Apart Bread? This bread pairs well with a variety of dishes. It’s fantastic as an appetizer with soup, like tomato soup or cream of mushroom. You can also serve it alongside a fresh salad or as a side dish to your main entrée.
Conclusion
Herb and Cheese Pull-Apart Bread is the perfect blend of cheesy, buttery, and herb-infused goodness. With its simple ingredients and easy preparation, it’s a must-try recipe for anyone who loves flavorful, comforting bread. Whether you’re serving it at a gathering, for dinner, or as a snack, it’s sure to be a hit. So go ahead, indulge in this warm, melty bread—you deserve it!
Print
Herb and Cheese Pull-Apart Bread: Cheesy, Flavorful, and Easy to Make
Ingredients
-
1 loaf of French bread or Italian bread (about 8–10 inches)
-
1 cup shredded mozzarella cheese
-
½ cup grated Parmesan cheese
-
4 tbsp unsalted butter, melted
-
2 tbsp olive oil
-
2 tbsp fresh parsley, chopped
-
1 tbsp fresh rosemary, chopped (or 1 tsp dried rosemary)
-
1 tbsp fresh thyme leaves
-
2 cloves garlic, minced
-
¼ tsp salt
-
-
¼ tsp black pepper
Instructions
-
Preheat the Oven:
-
Preheat oven to 350°F (175°C).
-
Line a baking sheet with parchment paper or aluminum foil.
-
-
Prepare the Bread:
-
Cut the loaf of bread into 1-inch slices, making sure not to cut all the way through (leave the bottom of the loaf intact so the bread stays together).
-
Make cuts in both directions to form a grid pattern, creating square “pockets.”
-
-
Make the Herb-Butter Mixture:
-
In a small bowl, combine the melted butter, olive oil, garlic, parsley, rosemary, thyme, salt, and pepper. Stir well.
-
-
Stuff the Bread:
-
Carefully spoon the herb-butter mixture into the cracks of the bread, making sure the butter gets into all the pockets.
-
Sprinkle the shredded mozzarella and grated Parmesan cheese between the cuts, distributing evenly throughout the loaf.
-
-
Wrap & Bake:
-
Wrap the bread tightly in foil and bake for 15 minutes.
-
After 15 minutes, unwrap the bread, and bake for an additional 10-15 minutes uncovered, until the cheese is fully melted and the bread is golden and crispy on the edges.
-
-
Serve:
-
Remove from the oven and let cool for a couple of minutes before pulling apart.
-
Garnish with additional fresh parsley, if desired, and serve warm.
-


