Introduction to Banana Pudding Ice Cream Bars
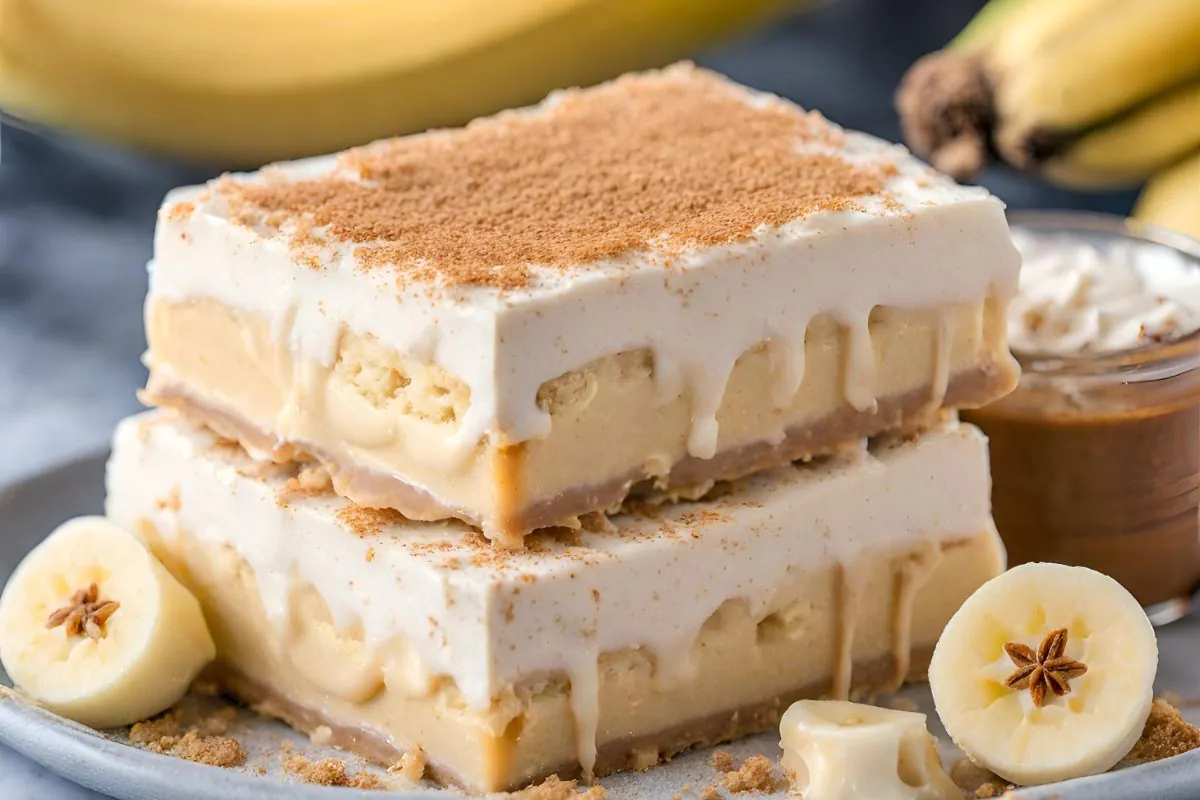
Ah, the sweet symphony of flavors in a Banana Pudding Ice Cream Bar! It’s like a delightful dance of creamy, fruity, and crunchy elements, all coming together in a frozen treat that’s just too good to resist. Let’s dive into the world of this scrumptious dessert, shall we? Whether you call them Banana Ice Cream Bars, Homemade Banana Pudding Bars, or Banana Pudding Frozen Treats, these delectable delights are sure to satisfy your craving for a delightful frozen indulgence.
A Sweet Symphony of Flavors
Banana pudding ice cream bars are more than just a dessert; they’re a celebration of flavors and textures. Imagine the creamy richness of banana pudding, the crispness of a buttery crust, and the cool, refreshing touch of ice cream. It’s a combo that’s hard to beat and even harder to put down!
A Brief Stroll Down Memory Lane
The journey of banana pudding ice cream bars is as rich as its taste. Rooted in the classic Southern dessert – banana pudding – these bars have evolved into a frozen delight, perfect for those warm summer days or as a comforting treat any time of the year. It’s a modern twist on a traditional favorite, blending nostalgia with contemporary culinary trends.
The Popularity of Banana Pudding Ice Cream Bars
Why are these bars so popular, you ask? Well, they tick all the right boxes! They’re easy to make, incredibly delicious, and have that ‘wow’ factor that makes them a hit at any gathering. Plus, they’re versatile – you can tweak the recipe to suit your taste buds or dietary needs.
Detailed Ingredients

Let’s roll up our sleeves and gather the ingredients for our banana pudding ice cream bars. The beauty of this recipe lies in its simplicity and the symphony of flavors each ingredient brings to the table.
The Foundation: Nilla Wafer Crust
- Nilla Wafers: These classic cookies create a crust that’s both sweet and slightly salty, offering a delightful crunch.
- Butter: A good quality butter, like Challenge Butter, churned fresh daily, adds richness and binds the crust together. Remember, the quality of butter can make or break your crust!
The Creamy Middle: Banana Pudding Filling
- Bananas: The star of the show! Ripe bananas give that unmistakable, natural banana flavor.
- Cream Cheese: For that creamy, velvety texture, full-fat cream cheese works wonders.
- Instant Banana Pudding Mix: This brings the classic banana pudding flavor with minimal effort.
- Milk: Whole milk lends creaminess to the pudding, making it lusciously smooth.
- Vanilla Extract: A dash of vanilla enhances the overall flavor profile.
The Icy Top: Ice Cream Layer
- Heavy Cream: It’s all about that rich, creamy texture that only heavy cream can provide.
- Sugar: Just enough to sweeten the deal without overpowering the banana flavor.
- Vanilla Wafers: Crushed wafers sprinkled on top add a delightful crunch.
Variations and Substitutions
- Dairy-Free Alternatives: You can easily swap out dairy ingredients for their plant-based counterparts. Almond milk and coconut cream are great options.
- Gluten-Free Options: Opt for gluten-free cookies for the crust if you’re catering to a gluten-sensitive audience.
- Sugar Alternatives: Feel free to experiment with different sweeteners like honey or agave nectar.
With these ingredients at hand, you’re all set to create a dessert that’s not just a treat for the taste buds but also a feast for the eyes. Stay tuned for the next part, where we’ll dive into the step-by-step process of crafting these heavenly bars.
In the meantime, if you’re craving more homemade dessert ideas, why not explore our Banana Pudding Fudge Recipe? It’s another perfect blend of sweetness and banana goodness!
Step-by-Step Making Banana Pudding Ice Cream Bars
Now that we’ve got our ingredients ready, let’s get into the nitty-gritty of making these heavenly banana pudding ice cream bars. Follow these steps, and you’ll be on your way to dessert paradise!
Preparing the Base: Nilla Wafer Crust
- Crush the Nilla Wafers: Begin by finely crushing the Nilla wafers. You can use a food processor or put them in a ziplock bag and roll them with a rolling pin.
- Mix with Melted Butter: Combine the crushed wafers with melted butter. The butter acts as a binding agent and gives the crust its rich flavor.
- Press into Pan: Transfer this mixture to a lined baking dish and press it down firmly to form an even layer. This will be the foundation of your bars.
Making the Banana Pudding Filling
- Whip the Cream Cheese: Start by whipping the cream cheese until it’s smooth and fluffy. This ensures a creamy texture for the filling.
- Prepare the Pudding: In a separate bowl, mix the instant banana pudding mix with milk and a dash of vanilla extract. Let it sit until it thickens.
- Combine and Layer: Gently fold the pudding into the whipped cream cheese. Spread this mixture over the crust in the baking dish.
Assembling the Ice Cream Bars
- Prepare the Ice Cream Layer: In a bowl, whip the heavy cream with sugar until it forms soft peaks. This will be your homemade ice cream layer.
- Layering: Spoon the ice cream mixture over the banana pudding layer. Ensure it’s smooth and even.
- Add Crunch: Sprinkle crushed vanilla wafers on top for that extra crunch.
Freezing and Final Touches
- Freeze: Cover the dish with cling film and freeze for at least 6 hours, or until firm.
- Serve: Once set, cut into bars and serve immediately. You can garnish with banana slices or a dollop of whipped cream for an extra touch of indulgence.
Voilà! Your banana pudding ice cream bars are ready to be devoured. Remember, the key to perfect bars is patience – let them set properly in the freezer for the best texture.
Nutritional Information
When indulging in a dessert like banana pudding ice cream bars, it’s helpful to have a peek at the nutritional landscape. This treat, while undeniably delicious, comes with its share of calories and sugars, but also offers some nutritional benefits.
A Closer Look at Calories and Nutrients
Each bar typically contains about 200-300 calories. These calories mainly come from the sugars and fats present in the ingredients like butter, cream, and sugar. While these elements contribute to the delectable taste and texture of the bars, they also add to the calorie count.
Fats: The Creamy Contributors
The fats in these bars largely come from high-quality butter and cream. Using a premium butter like Challenge Butter, known for its natural and fresh ingredients, adds richness while ensuring you’re using the best for your dessert. Remember, the type of fat used can significantly impact both the flavor and nutritional profile of the bars.
Sugars: Sweetness with a Side of Caution
The bars contain both natural sugars from the bananas and added sugars from the recipe. While they are essential for the sweet taste we love, moderation is key, especially for those monitoring their sugar intake.
Proteins and Other Nutrients
Proteins are present in minimal amounts, primarily coming from the dairy ingredients. However, the bananas do add some dietary fiber and essential vitamins, making these bars a tad more nutritious than your average dessert.
Healthier Alternatives for a Guilt-Free Indulgence
For those looking to enjoy this treat with a health-conscious twist, consider these alternatives:
- Low-Fat Dairy Options: Swap out full-fat dairy products with their low-fat counterparts to reduce calorie and fat content.
- Natural Sweeteners: Replace refined sugars with natural sweeteners like honey or maple syrup.
- Whole Grain Crust: Use whole grain cookies for the crust to add fiber and reduce processed carbohydrate intake.
Incorporating these healthier options not only makes the dessert more nutritious but also adds new dimensions to its flavor profile.
For those who love experimenting with unique dessert ideas, why not take a culinary detour and explore the Sweet Potato Dump Cake: A Delightful Twist on Classic Desserts? It’s another creative way to enjoy sweet treats with a nutritious twist!
FAQs about Banana Pudding Ice Cream Bars
Diving into the world of banana pudding ice cream bars, you might have a few questions up your sleeve. Let’s address some common queries and sprinkle in some tips to ensure your dessert-making journey is as smooth as the creamy layers of these delightful bars.
Common Questions and Answers about Banana Pudding Ice Cream Bars
- Q: Can I make these bars dairy-free?
- A: Absolutely! Swap out the dairy ingredients with almond milk, coconut cream, and dairy-free whipped cream. The key is to maintain the creamy consistency while catering to dietary preferences.
- Q: How long can I store Banana Pudding Ice Cream Bars in the freezer?
- A: Ideally, they should be consumed within a week for the best flavor and texture. However, they can last up to a month in the freezer. Just ensure they’re stored in an airtight container to prevent freezer burn.
Tips for Perfect Banana Pudding Ice Cream Bars
- Layering Technique: For a firm base, freeze the crust before adding the pudding layer. This prevents the layers from mixing and maintains a distinct texture.
- Banana Ripeness: Use ripe bananas for a deeper, natural banana flavor. The riper the banana, the sweeter and more pronounced its taste.
- Serving Suggestions: Serve these bars chilled. They pair wonderfully with a hot beverage, like coffee or tea, creating a delightful contrast. For an extra touch of elegance, garnish with a sprinkle of cinnamon or a drizzle of caramel sauce.
Troubleshooting Common Issues
- Soft Crust: If the crust is too soft, try freezing it for a longer period before adding the pudding layer.
- Texture Variations: For a lighter pudding layer, consider using a hand mixer to incorporate more air into the mixture.
Serving and Storage
Best Ways to Serve Banana Pudding Ice Cream Bars
Serving banana pudding ice cream bars is an art in itself. These delightful treats are best served chilled, straight from the freezer. They make a perfect dessert for warm summer evenings or as a special treat during family gatherings. For an extra touch of elegance, consider garnishing with a light dusting of cinnamon or a drizzle of caramel sauce. The contrast of the cold ice cream bar with a warm beverage like coffee or tea creates a symphony of temperatures and flavors, elevating the overall dessert experience.
Storage Tips for Banana Pudding Ice Cream Bars
Proper storage is key to maintaining the quality and flavor of your banana pudding ice cream bars. Here are some tips to ensure they stay as delicious as the day you made them:
- Airtight Containers: Store the bars in an airtight container to prevent freezer burn and preserve freshness.
- Layer Separation: Use parchment paper between layers of bars to prevent them from sticking together.
- Optimal Freezer Temperature: Keep your freezer at a consistent temperature to ensure the bars remain firm and retain their texture.
Shelf Life Considerations
While these bars can be stored in the freezer for up to a month, they are best enjoyed within a week of preparation. Over time, the flavors may begin to diminish, and the texture may change.
For those who enjoy exploring the world of homemade desserts, why not try making Banana Pudding Fudge? It’s a delightful mix of creamy banana and rich fudge, offering another perfect blend of sweetness for dessert lovers.
Banana Pudding Ice Cream Bars: The Conclusion
As we wrap up our journey through the delightful world of banana pudding ice cream bars, it’s clear that this dessert is more than just a sweet treat. It’s a fusion of classic flavors, a testament to culinary creativity, and a perfect example of how traditional recipes can be transformed into something extraordinary.
Reflecting on the Dessert Journey
From the crunchy Nilla wafer crust to the creamy banana pudding and the rich ice cream layer, each component of these bars plays a crucial role in creating a harmonious blend of flavors and textures. This dessert not only satisfies the sweet tooth but also brings back nostalgic memories of classic banana pudding, all while introducing a refreshing twist with the ice cream element.
The Joy of Homemade Desserts
Making banana pudding ice cream bars at home is an enjoyable experience that allows for customization and experimentation. Whether you’re a seasoned baker or a novice in the kitchen, the process of creating these bars is straightforward and rewarding. The joy of sharing these homemade treats with family and friends adds to the overall satisfaction of the dessert-making experience.
A Final Encouragement
If you haven’t yet tried making these bars, I encourage you to give it a go. Gather your ingredients, follow the steps, and get ready to indulge in a dessert that’s sure to become a new favorite. Remember, cooking and baking are not just about following a recipe; they’re about adding your own touch, experimenting with flavors, and most importantly, having fun.
Looking Forward to More Sweet Adventures
As we conclude, let’s look forward to more sweet adventures in the kitchen. Whether it’s trying new recipes, tweaking old ones, or simply enjoying the fruits of your labor, the world of homemade desserts is full of possibilities and delights waiting to be discovered.

