Introduction
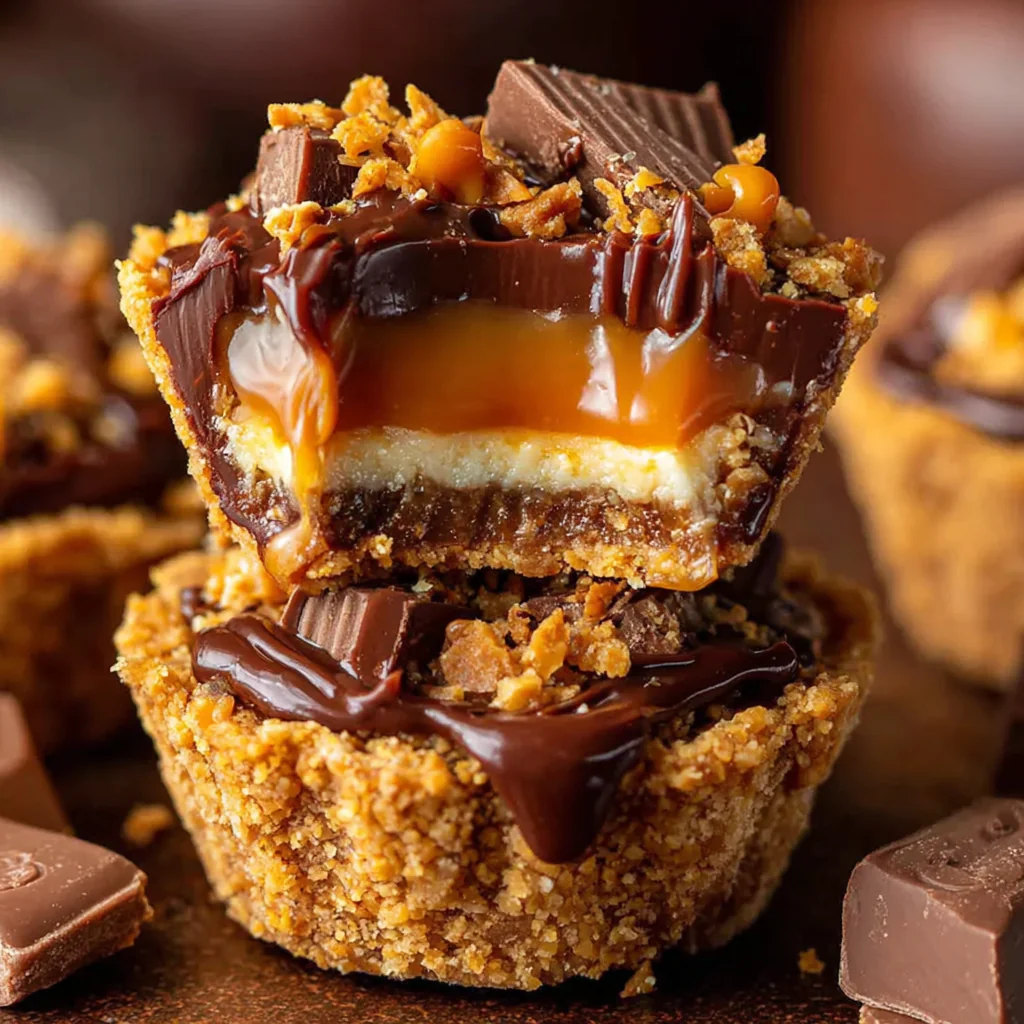
If you’re craving a dessert that perfectly balances creamy, crunchy, and caramel goodness, these Butterfinger Caramel Crunch Mini Pies are your answer. Each bite delivers a smooth, velvety caramel-cream filling combined with bits of crispy Butterfinger candy, all nestled in a buttery graham cracker crust. They’re easy to make, require no baking, and look adorable when served individually. Whether you’re hosting a party, preparing a family treat, or looking for a sweet ending to dinner, these mini pies will disappear in no time.
Ingredients
For the Filling:
- 1 (8 oz) package cream cheese, softened
- 1 cup powdered sugar
- ½ cup caramel sauce (plus extra for drizzle)
- 1 (8 oz) tub whipped topping (like Cool Whip), thawed
- 1 cup crushed Butterfinger candy bars (about 4 bars)
For the Crust:
- 12 mini graham cracker pie crusts
For Garnish (optional):
- Extra whipped topping
- Crushed Butterfinger bits
- Drizzle of caramel sauce
Directions and Preparation Method
Step 1: Prepare the Creamy Filling
In a large mixing bowl, beat the softened cream cheese using a hand mixer or stand mixer until it becomes smooth and lump-free. Cream cheese is the foundation of this dessert, giving it a velvety, rich texture.
Step 2: Add Sweetness and Flavor
Add in the powdered sugar and caramel sauce. Mix until well combined, forming a silky, sweet caramel-infused base. The powdered sugar ensures a smooth texture while the caramel brings in that irresistible buttery sweetness.
Step 3: Fold in the Whipped Topping
Using a spatula, gently fold the whipped topping into the caramel-cream cheese mixture. This step is key for achieving a light and fluffy consistency. Avoid overmixing to keep the airiness intact.
Step 4: Add the Crunch
Stir in the crushed Butterfinger candy bars. These crunchy peanut-buttery bits add both texture and flavor, creating a delightful contrast to the smooth filling. Save a handful of crumbs for garnish.
Step 5: Fill the Mini Crusts
Spoon the filling evenly into each of the 12 mini graham cracker crusts. Use the back of a spoon or a piping bag for a neat finish.
Step 6: Chill to Set
Place the mini pies in the refrigerator for at least 2 hours. This allows the filling to firm up and the flavors to meld beautifully.
Step 7: Garnish and Serve
Before serving, drizzle each pie with caramel sauce and top with a dollop of whipped topping. Sprinkle reserved Butterfinger bits on top for that irresistible crunch.
Prep and Nutrition Details
Prep Time: 15 minutes
Chill Time: 2 hours
Total Time: 2 hours 15 minutes
Kcal: Approx. 320 per pie
Servings: 12 mini pies
Why You’ll Love These Mini Pies
- No Baking Required: Perfect for busy days when you want a dessert without turning on the oven.
- Individual Portions: Great for parties, gatherings, or just portion control.
- Texture Heaven: Creamy filling meets crunchy Butterfinger bits.
- Kid-Friendly: Both the taste and presentation appeal to all ages.
Tips for Perfect Results
- Use Softened Cream Cheese: This prevents lumps in your filling and ensures a smooth, creamy texture.
- Don’t Overmix: When folding in whipped topping, be gentle to keep the airy texture.
- Chill Long Enough: Two hours is the minimum, but overnight chilling enhances flavor and texture.
- Make Ahead: These mini pies can be prepared a day in advance and stored in the fridge until serving.
- Customize: Try using crushed Reese’s, Snickers, or even Kit-Kats for variation.
Variations
- Butterfinger Pie Bars: Instead of mini crusts, press graham cracker crust into an 8×8 pan and layer the filling, then cut into squares.
- Chocolate Drizzle: For a richer flavor, drizzle melted chocolate instead of caramel on top.
- Salted Caramel Twist: Sprinkle a pinch of sea salt on top for that sweet-salty magic.
- Frozen Treat: Pop them in the freezer for 30 minutes before serving for a semi-frozen texture.
Storing Instructions
- Refrigerator: Keep covered in the fridge for up to 4 days.
- Freezer: Wrap each pie in plastic wrap and store in an airtight container for up to 2 months. Thaw in the fridge before serving.
- Avoid Room Temperature: The dairy base makes it best to keep these pies chilled until ready to enjoy.
Frequently Asked Questions (FAQs)
Q1: Can I use homemade whipped cream instead of Cool Whip?
Yes! Use about 2 cups of homemade whipped cream. Beat 1 cup of heavy whipping cream with 2 tablespoons of sugar until stiff peaks form. Fold it in just like Cool Whip.
Q2: What if I don’t have mini pie crusts?
You can make one large 9-inch graham cracker crust instead and fill it with the same mixture. Slice into wedges to serve.
Q3: Can I make these pies ahead of time?
Absolutely. These are perfect for make-ahead desserts. Just store them covered in the fridge and garnish right before serving.
Q4: How do I crush the Butterfinger bars easily?
Place the candy bars in a ziplock bag and crush with a rolling pin or the back of a spoon. You can leave some bigger chunks for extra crunch.
Q5: Are these mini pies suitable for kids?
Yes! They’re sweet, fun-sized, and safe for kids to enjoy. You can even let kids decorate their own mini pie with toppings.
Q6: Can I substitute the caramel sauce?
If you don’t have caramel, try dulce de leche or butterscotch topping. It’ll still taste amazing with Butterfinger candy.
Q7: How do I prevent soggy crusts?
If preparing in advance, line the crust with a thin layer of melted chocolate and let it set before adding filling. This creates a moisture barrier.
Q8: Can I freeze them fully prepared?
Yes, but freeze before garnishing. Wrap individually, and when ready to serve, thaw slightly and add toppings for a fresh finish.
Q9: How long should they chill?
Two hours is enough for the filling to firm up, but chilling overnight enhances texture and flavor.
Q10: What’s the best way to serve them?
Serve chilled straight from the fridge. Add whipped topping, caramel drizzle, and Butterfinger bits just before serving for a beautiful presentation.
Expert Tips
- Presentation Idea: Serve on a dessert tray lined with crushed Butterfinger crumbs for a fancy touch.
- Flavor Boost: Add a teaspoon of vanilla or a pinch of sea salt to the filling for extra depth.
- Balance Sweetness: The caramel and candy make this rich; pair with black coffee or unsweetened tea for a balanced dessert.
Health and Nutritional Information
Each mini pie (approx. 320 kcal) provides:
- Carbohydrates: 32g
- Fat: 18g
- Protein: 4g
- Sugar: 25g
While indulgent, these pies are meant as a delightful treat. To make a lighter version, use light cream cheese and sugar-free caramel sauce.
Serving Suggestions
- Serve with coffee or espresso for adults.
- Add a scoop of vanilla ice cream for a decadent dessert plate.
- Decorate with crushed nuts or shaved chocolate for added elegance.
- For holidays, top with themed sprinkles — gold for Christmas, hearts for Valentine’s Day, etc.
Conclusion
The Butterfinger Caramel Crunch Mini Pies are a dream come true for dessert lovers who crave creamy sweetness with a satisfying crunch. They combine the flavors of caramel, cream cheese, and the signature Butterfinger crunch into one perfect, bite-sized dessert. Best of all, they’re simple to make, require no baking, and can be made ahead for any special occasion.
So next time you’re looking to impress your guests or treat your family, whip up these mini pies — they’re guaranteed to be a showstopper!