Introduction
There’s something irresistible about the combination of juicy ground beef, smoky turkey bacon, and gooey melted cheddar cheese all wrapped up in one bite-sized creation. These Cheddar-Stuffed BBQ Turkey Bacon Bombs are not just a meal—they’re a showstopper that will impress family, friends, and even picky eaters. Perfect for game-day parties, backyard gatherings, or a fun dinner idea, these flavorful bombs pack a punch of savory goodness and BBQ sweetness in every bite.
This article will guide you step by step through the process of making these bacon-wrapped treasures. Along the way, you’ll find useful tips, detailed preparation methods, frequently asked questions, and suggestions to help you make them your own. Whether you’re a beginner in the kitchen or a seasoned home cook, this recipe is approachable, customizable, and guaranteed to leave everyone asking for seconds.
Ingredients with Quantities
To make around 6–8 bombs, you’ll need the following ingredients:
- 1 lb ground beef (lean or regular, depending on preference)
- 1/2 teaspoon garlic powder
- 1/2 teaspoon onion powder
- 1/2 teaspoon salt
- 1/4 teaspoon black pepper
- 4 oz cheddar cheese, cut into small cubes
- 10–12 slices turkey bacon (enough to wrap each beef ball)
- 1/2 cup BBQ sauce (your favorite brand)
- Toothpicks, for securing the bacon
Optional Garnishes: Fresh parsley, chopped chives, or a sprinkle of shredded cheese for presentation.
Directions and Preparation Method
Step 1: Prepare the Oven
Preheat your oven to 400°F (200°C). For best results, line a baking sheet with foil and place a wire rack on top. This setup allows fat to drip away, ensuring the bombs cook evenly and crisp up nicely.
Step 2: Season the Ground Beef
In a large bowl, combine the ground beef with garlic powder, onion powder, salt, and black pepper. Mix until the seasonings are evenly distributed throughout the beef. Be careful not to overwork the mixture, as this can make the beef tough once cooked.
Step 3: Shape the Meatballs with Cheddar Centers
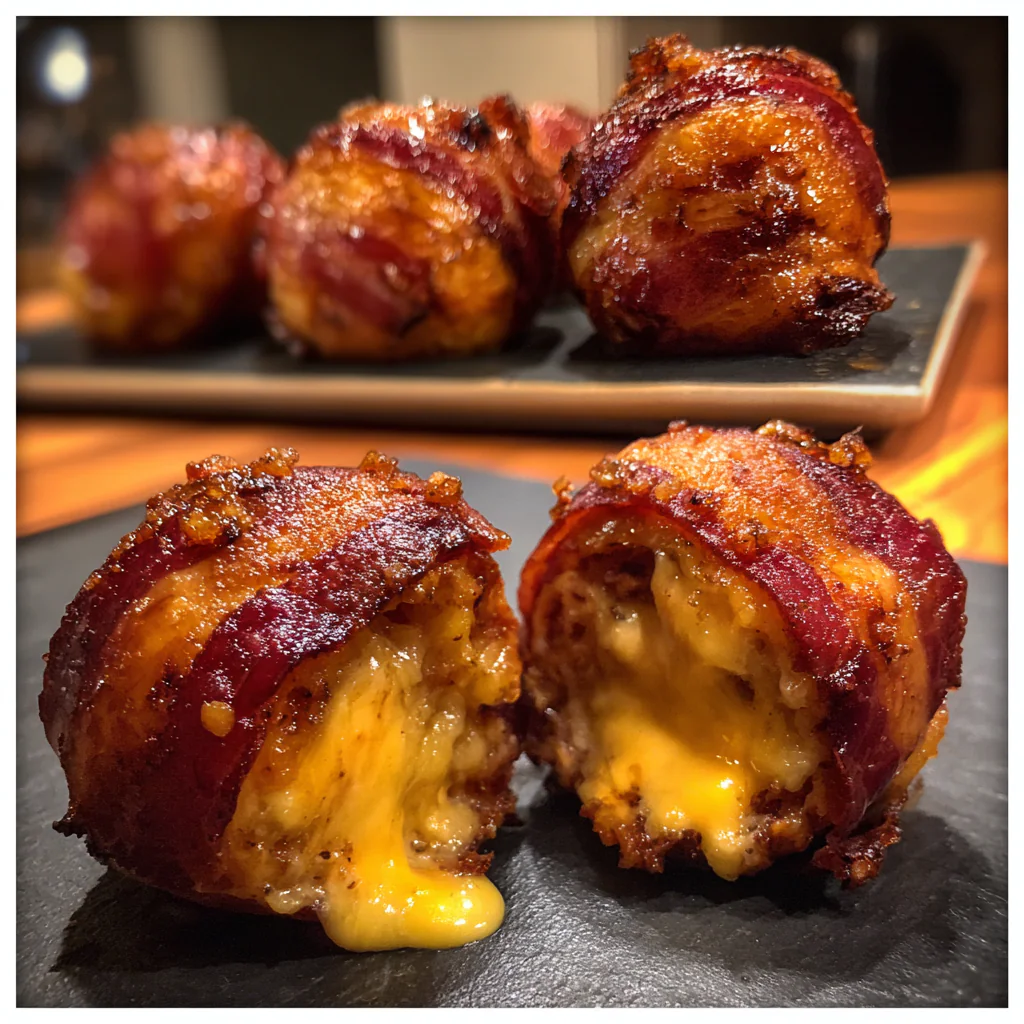
Take a small portion of the beef mixture—about the size of a golf ball—and flatten it in the palm of your hand. Place a cube of cheddar cheese in the center, then mold the beef around it to fully encase the cheese. Ensure there are no gaps; otherwise, the cheese may ooze out during baking. Continue until all the beef is used.
Step 4: Wrap with Turkey Bacon
Take a slice of turkey bacon and carefully wrap it around each beef ball. Depending on the size, you may need more than one slice to fully cover the ball. Secure the ends with toothpicks to hold everything together. The bacon not only adds flavor but also helps lock in the juiciness of the beef.
Step 5: Bake the Bacon Bombs
Place the prepared bombs on the wire rack (or directly on the foil-lined baking sheet if you don’t have one). Bake for 20–25 minutes, or until the turkey bacon is crisp and the beef is cooked through. The internal temperature of the beef should reach 160°F (71°C).
Step 6: Add the BBQ Glaze
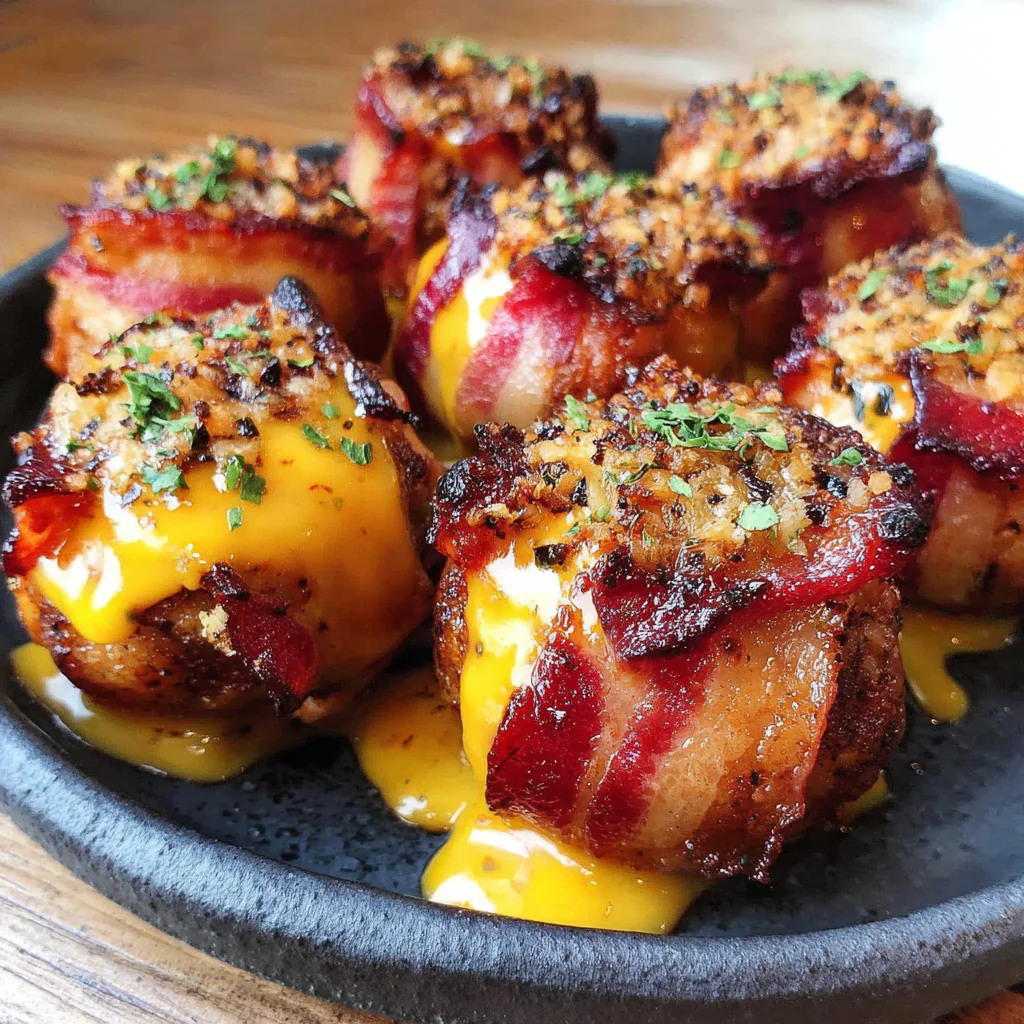
About five minutes before the bombs are finished, remove them from the oven and brush generously with BBQ sauce. Return them to the oven to let the sauce caramelize and become sticky. This final step transforms the bombs into finger-licking bites of smoky-sweet perfection.
Step 7: Serve and Enjoy
Allow the bombs to cool slightly before serving. Remove the toothpicks carefully. Garnish with chopped parsley or extra shredded cheese if desired. Serve warm with extra BBQ sauce on the side for dipping.
Why You’ll Love Cheddar-Stuffed BBQ Turkey Bacon Bombs
1. A Flavor Explosion in Every Bite
Each bomb delivers a combination of textures and tastes: smoky turkey bacon on the outside, tender seasoned beef in the middle, and gooey cheddar cheese melting at the core. Add in the BBQ glaze, and you’ve got the perfect balance of savory, smoky, creamy, and sweet.
2. Perfect for Any Occasion
These bacon bombs are ideal for entertaining. They’re bite-sized, portable, and easy to eat with your hands. Whether you’re hosting a football watch party, a backyard barbecue, or just want a fun weeknight dinner, they fit the bill.
3. Family-Friendly and Customizable
Kids love the cheesy center, while adults appreciate the smoky, saucy layers. You can adjust the seasonings, swap out the cheese, or even experiment with different sauces to make them your own.
Tips for Perfect Bacon Bombs
- Cheese Choice Matters: Cheddar is classic, but you can try pepper jack for heat, mozzarella for extra gooeyness, or gouda for a smoky twist.
- Don’t Skip the Toothpicks: These are essential to keep the bacon in place during cooking. Just remember to remove them before serving!
- Bake on a Rack if Possible: Elevating the bombs ensures the heat circulates evenly and prevents sogginess.
- Brush with Sauce Twice: For an extra sticky glaze, brush once halfway through cooking and again near the end.
- Make Ahead Friendly: You can assemble the bombs a few hours ahead of time and refrigerate until ready to bake.
Serving Suggestions
- As an Appetizer: Arrange them on a platter with dipping sauces such as ranch, spicy mayo, or extra BBQ sauce.
- As a Main Dish: Pair with mashed potatoes, coleslaw, roasted vegetables, or a fresh garden salad.
- Game-Day Snack: Serve alongside chips, nachos, or sliders for a crowd-pleasing party spread.
- Meal Prep Idea: Cook a batch and store leftovers in the fridge for easy reheating throughout the week.
Frequently Asked Questions (FAQs)
Q1: Can I use regular bacon instead of turkey bacon?
Yes! Regular pork bacon works just as well and will give the bombs a richer, smokier flavor. Just keep in mind that pork bacon may render more fat, so baking on a wire rack is highly recommended.
Q2: Can I grill these instead of baking them?
Absolutely. Place them on indirect heat on the grill and cook until the beef is done and the bacon is crispy. Brush with BBQ sauce during the last few minutes for that caramelized finish.
Q3: How can I prevent the cheese from leaking out?
Make sure the beef completely seals the cheese cube inside. Using chilled cheese helps it hold its shape longer during cooking.
Q4: Can I make them ahead of time?
Yes, you can assemble the bombs up to a day in advance and store them in the refrigerator. When ready, bake as directed. You can also freeze uncooked bombs for later use.
Q5: What dipping sauces go best with these bombs?
BBQ sauce is the classic choice, but ranch dressing, honey mustard, buffalo sauce, or spicy aioli are also excellent options.
Q6: How do I store and reheat leftovers?
Store cooled leftovers in an airtight container in the refrigerator for up to 3 days. To reheat, bake at 350°F until warmed through, or microwave briefly (though the bacon won’t be as crisp).
Q7: Can I make these bombs low-carb or keto-friendly?
Yes! The recipe is already fairly low-carb since it uses turkey bacon and beef. Simply choose a low-sugar BBQ sauce or make your own keto-friendly version.
Q8: Can I make mini versions for parties?
Definitely. Use smaller portions of beef and cheese to create bite-sized bombs. Adjust the cooking time slightly, as mini bombs will cook faster.
Conclusion
Cheddar-Stuffed BBQ Turkey Bacon Bombs are the ultimate comfort food indulgence—simple to prepare, endlessly versatile, and bursting with flavor. From the crispy bacon exterior to the molten cheese interior, every bite delivers satisfaction. Whether you’re serving them as an appetizer, a fun dinner, or a party snack, these bombs are guaranteed to win over your crowd.
The best part? They’re customizable to your taste preferences. Try different cheeses, experiment with sauces, or even switch up the protein with ground turkey or chicken. No matter how you make them, these bacon-wrapped beauties will always hit the spot.
So next time you want a dish that’s easy, impressive, and downright delicious, give these Cheddar-Stuffed BBQ Turkey Bacon Bombs a try. They’ll quickly become a favorite in your recipe collection.