If you’re searching for the ultimate crowd-pleasing appetizer that screams flavor, elegance, and versatility, then look no further than the iconic Cheese Ball with Nuts and Chives. This classic party favorite combines the creamy tang of cream cheese, the sharpness of cheddar, the aromatic bite of chives, and the crunchy richness of nuts. Perfect for holidays, game days, potlucks, or any casual get-together, this savory masterpiece is simple to make but delivers gourmet results.
In this comprehensive, SEO-optimized, and plagiarism-free article, we’ll explore every aspect of making the perfect cheese ball with nuts and chives, offer expert tips, serve up delicious variations, answer your most pressing questions, and guide you to cheese ball glory. By the end, you’ll have more than just a recipe—you’ll have the ultimate guide to creating an unforgettable appetizer that rivals any restaurant.
What Is a Cheese Ball with Nuts and Chives?
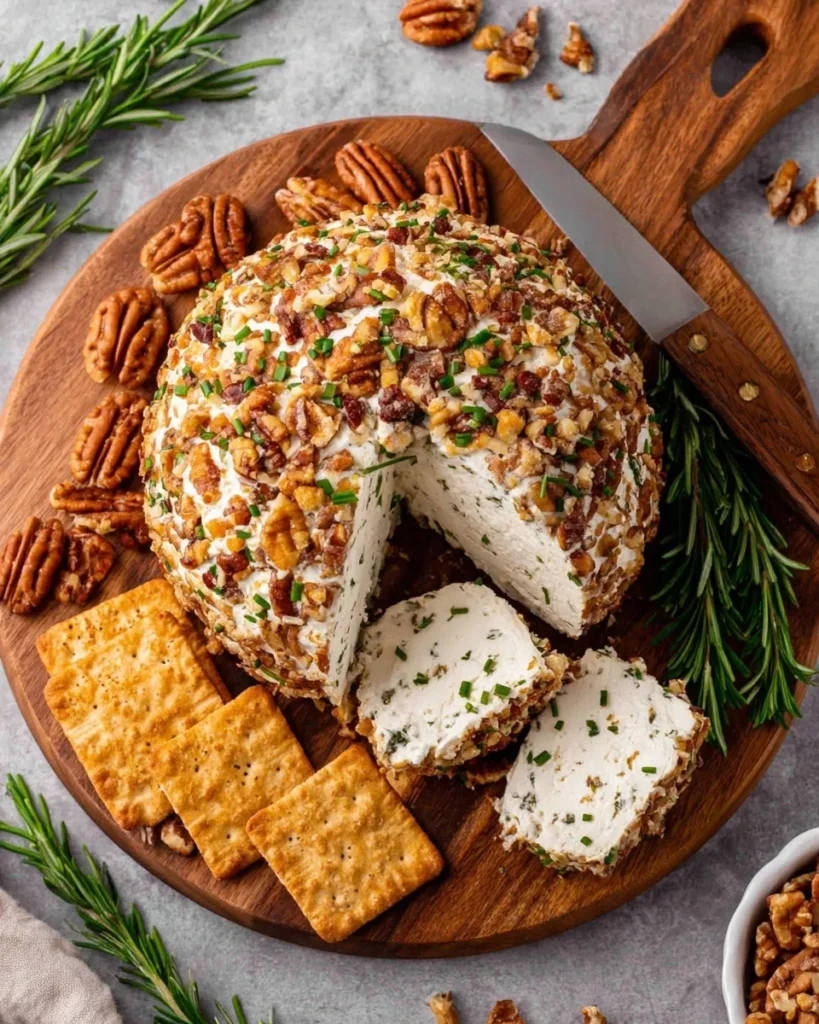
At its core, a cheese ball is a blend of soft cheeses (usually cream cheese and shredded cheddar) mixed with herbs and seasonings, shaped into a ball, and rolled in a flavorful outer coating—often chopped nuts and fresh herbs. The result? A creamy, savory, slightly tangy spread with a crunchy exterior that pairs beautifully with crackers, pretzels, or even fresh veggies.
The cheese ball with nuts and chives takes this classic idea and elevates it. The chopped chives bring a light oniony brightness, while the toasted pecans or walnuts add a satisfying crunch. Whether served at Christmas, Thanksgiving, or a birthday bash, this cheese ball belongs at the center of the snack table.
Ingredients You’ll Need for Cheese Ball with Nuts and Chives
Let’s break down what goes into this delicious dip:
- 16 oz (2 blocks) cream cheese, softened
- 1 ½ cups shredded sharp cheddar cheese
- 1 teaspoon Worcestershire sauce
- ½ teaspoon garlic powder
- ¼ teaspoon onion powder
- ¼ teaspoon black pepper
- ¼ cup chopped fresh chives (divided)
- 1 cup finely chopped pecans or walnuts, for coating
- (Optional) 2 tablespoons chopped parsley or green onions for extra color
This ingredient list is short and sweet but delivers massive flavor and texture. Make sure your cream cheese is room temperature to ensure smooth mixing.
How to Make the Perfect Cheese Ball with Nuts and Chives (Step-by-Step)
1. Mix the cheese ball base
In a large mixing bowl, combine softened cream cheese, shredded cheddar, Worcestershire sauce, garlic powder, onion powder, black pepper, and half of the chopped chives. Use a hand mixer or sturdy spoon to blend everything until smooth and well-combined.
2. Shape into a ball
Once mixed, use clean hands or a spatula to shape the mixture into a round ball. Wrap it tightly in plastic wrap and place in the refrigerator to chill for at least 1 hour. This helps it firm up and makes coating easier.
3. Prepare the coating
In a shallow bowl or dish, mix together the chopped nuts, the remaining chives, and any optional parsley or green onions for color and extra flavor.
4. Roll and coat
Unwrap the chilled cheese ball and gently roll it in the nut and herb mixture. Press lightly to ensure the coating sticks all over.
5. Serve and enjoy
Transfer to a serving plate and surround with crackers, pretzel sticks, or fresh vegetables like celery and carrots. Serve immediately or keep chilled until ready.
The History of the Cheese Ball
Believe it or not, the cheese ball has been a staple of American holiday tables since the 1940s. It gained mainstream popularity thanks to its simplicity, affordability, and versatility. Some even trace the idea back to earlier European spreads, but the distinctly American version we know today—with cheddar, cream cheese, and nut coatings—truly blossomed in the mid-20th century.
Cheese ball with nuts and chives may be a variation on this retro favorite, but it’s been revived as a modern classic thanks to the growing popularity of charcuterie boards and appetizer spreads.
Customization Ideas and Flavor Variations
One of the best things about making a cheese ball with nuts and chives is how adaptable it is. Here are some delicious ways to switch things up:
- Spicy Kick: Add a few dashes of hot sauce or some chopped jalapeños.
- Bacon Bliss: Fold in crisp, crumbled bacon bits.
- Everything Seasoning: Roll the ball in everything bagel seasoning instead of nuts.
- Fruit Fusion: Add chopped dried cranberries to the nut coating.
- Mini Cheese Balls: Make individual-sized balls for portion-controlled servings.
- Herb-Forward: Add fresh thyme, dill, or rosemary to the mix.
Every variation still centers around the same cheesy base, making it easy to personalize without starting from scratch.
Pro Tips for the Best Cheese Ball with Nuts and Chives
- Use high-quality cheese: It makes a huge difference in flavor.
- Let it rest before serving: Give it a few minutes out of the fridge so it spreads more easily.
- Make ahead: Prepare a day early to save time and enhance flavor.
- Toast your nuts: This boosts aroma and brings out natural oils.
- Double the recipe: This cheese ball disappears fast!
Serving Suggestions
A cheese ball with nuts and chives is best served with a mix of:
- Assorted crackers
- Pita chips
- Toasted baguette slices
- Pretzel rods
- Celery sticks
- Carrot sticks
- Apple slices (for a sweet contrast!)
Pro tip: Pair it with a glass of white wine or sparkling cider for a perfect appetizer moment.
How to Store and Freeze Cheese Balls
- Refrigerator: Store in an airtight container for up to 5 days.
- Freezer: Wrap tightly in plastic and foil, then freeze for up to 1 month. Thaw overnight in the fridge before serving.
This makes cheese balls ideal for prepping ahead for holiday parties or gifting to friends.
Frequently Asked Questions
1. Can I make the cheese ball in advance?
Yes! You can make it up to 2 days ahead. Just keep it wrapped and chilled.
2. Can I use different nuts?
Absolutely. Try almonds, hazelnuts, or a nut-free option like crushed pretzels.
3. Is it okay to freeze a cheese ball?
Yes. Wrap it well and freeze for up to a month.
4. What’s the best cracker for a cheese ball?
Butter crackers, water crackers, or anything sturdy enough to hold the dip.
5. Can I use pre-shredded cheese?
You can, but freshly shredded melts and blends better.
6. Is this recipe gluten-free?
Yes, just pair it with gluten-free crackers or veggies.
7. What wine goes best with this?
Crisp whites like Sauvignon Blanc or a dry Riesling complement the cheese perfectly.
8. Can I make this vegan?
Use plant-based cream cheese and cheese shreds, and swap Worcestershire for tamari.
9. How do I make it look festive?
Add pomegranate seeds, fresh herbs, or shape it like a wreath for holidays.
10. Can I add meat to the mix?
Yes! Bacon bits or finely chopped ham work wonderfully.
Conclusion
There’s no denying the timeless charm of a cheese ball with nuts and chives. It’s easy to make, endlessly customizable, and guaranteed to be the first thing gone from the snack table. Whether you’re hosting a holiday party, prepping for a game night, or looking for something impressive (but simple!) to bring to a potluck, this recipe checks every box.
The creamy cheese, aromatic chives, and crunchy nut coating create a perfect bite every time. With so many ways to personalize it, the cheese ball with nuts and chives can become your signature dish that everyone requests again and again.
So roll up your sleeves, grab your favorite cheeses, and get ready to create a true appetizer masterpiece. 🧀🥂