Introduction
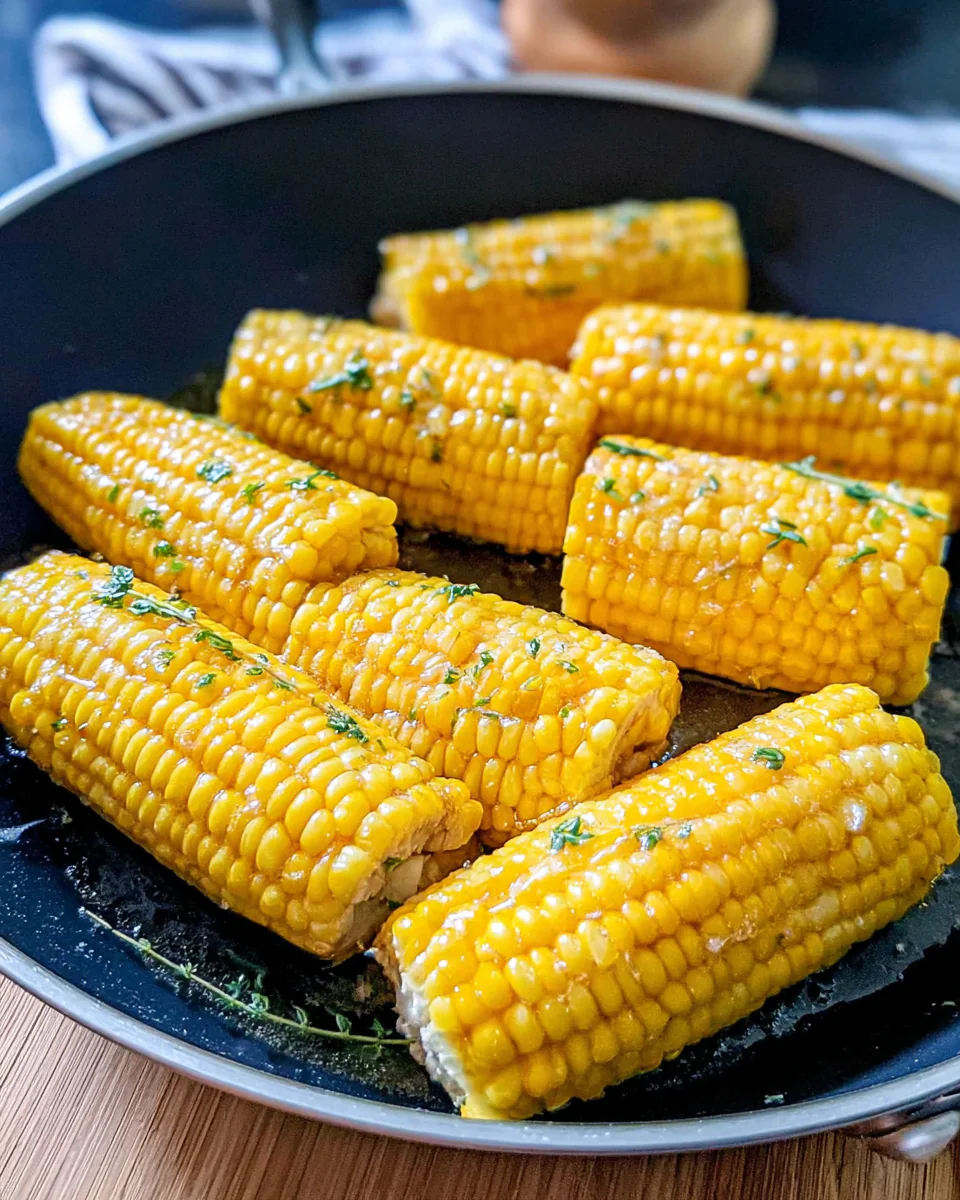
Few side dishes scream summer comfort quite like Cheesy Garlic Butter Corn on the Cob. The buttery sweetness of fresh corn, the rich aroma of garlic, and the irresistible melt of cheese come together in this simple yet decadent recipe. Whether you’re firing up the grill for a backyard barbecue or roasting indoors for a cozy dinner, this dish is guaranteed to steal the spotlight.
This cheesy twist on classic corn on the cob offers layers of flavor: creamy butter infused with garlic and paprika, a golden coating of cheddar and Parmesan, and a final garnish of fresh parsley for color and freshness. What makes it even better? It’s easy to prepare, quick to bake, and a total crowd-pleaser.
Let’s dive into the details of how to make this buttery, cheesy masterpiece that will have everyone asking for seconds.
Why You’ll Love This Recipe
- Bursting with flavor: Garlic butter and melted cheese elevate simple corn into a gourmet side dish.
- Perfect for any occasion: Great for barbecues, weeknight dinners, picnics, and potlucks.
- Customizable: Add your favorite herbs, switch up the cheese, or even spice it up with chili flakes.
- Simple to prepare: Just mix, coat, wrap, and bake (or grill). The oven does most of the work!
Ingredients with Quantities
Main Ingredients
- 6 ears of corn, husked
- ½ cup (1 stick) unsalted butter, softened
- 3 cloves garlic, minced
- ¼ teaspoon salt
- ¼ teaspoon black pepper
- ½ teaspoon paprika (optional, for color and mild spice)
- 1 cup shredded cheddar cheese
- ¼ cup grated Parmesan cheese
- 2 tablespoons chopped fresh parsley (optional, for garnish)
These ingredients combine to form layers of creamy, cheesy, and garlicky perfection. The butter keeps the corn moist and rich, while the cheese forms a slightly crisp golden layer that clings to every kernel.
Step-by-Step Directions and Preparation Method
Step 1: Preheat the Oven (or Grill)
Start by preheating your oven to 400°F (200°C). This temperature ensures the corn roasts perfectly, creating a tender interior and slightly caramelized exterior.
If you’re grilling instead, heat your grill to medium. Grilling imparts a smoky, charred flavor that enhances the cheesy garlic butter coating.
Step 2: Make the Garlic Butter
In a small bowl, combine the softened butter, minced garlic, salt, black pepper, and paprika. Mix with a fork or spatula until fully blended.
This step is where the magic begins — the garlic releases its natural oils into the butter, infusing it with deep, savory notes. Paprika adds a touch of warmth and color.
Tip: You can make this butter ahead of time and store it in the refrigerator for up to a week. It’s also fantastic on bread, baked potatoes, or grilled vegetables.
Step 3: Coat the Corn
Place the husked corn on a flat surface or a large baking sheet. Using a pastry brush or spoon, generously coat each ear of corn with the garlic butter mixture.
Make sure to cover all sides — you want every kernel to soak up that buttery flavor. The butter will melt and seep between the rows of corn as it cooks, ensuring every bite is rich and flavorful.
Step 4: Wrap in Foil
Wrap each corn ear individually in aluminum foil. This keeps the butter sealed in and prevents the corn from drying out. It also allows for even cooking whether you’re using an oven or grill.
Place the wrapped corn on a baking sheet if you’re roasting, or directly on the grill grates if you’re grilling.
Step 5: Bake or Grill the Corn
For the oven: Bake at 400°F for 25–30 minutes, turning once halfway through to ensure even cooking.
For the grill: Cook over medium heat for about 15 minutes, turning occasionally until the corn is tender.
You’ll know it’s done when the kernels appear bright and juicy.
Step 6: Add the Cheesy Topping
Carefully unwrap each corn cob (watch out for the steam!). Sprinkle a generous amount of cheddar cheese and Parmesan cheese over the top while the corn is still hot.
Place the corn back into the oven uncovered for another 5 minutes, or until the cheese melts into a gooey, golden topping.
For a crispier finish, you can broil the corn for an additional 1–2 minutes, just until the cheese starts bubbling and turning slightly brown.
Step 7: Garnish and Serve
Once done, sprinkle the hot cheesy corn with fresh parsley for a pop of color and freshness. Serve immediately while warm and melty.
Pair it with grilled chicken, steak, burgers, or even roasted vegetables — it complements almost any main dish beautifully.
Tips for Perfect Cheesy Garlic Butter Corn
- Use fresh corn: The fresher the corn, the sweeter and juicier your dish will be.
- Softened butter is key: Soft butter spreads evenly and helps the seasoning stick to every kernel.
- Don’t skip the foil: It traps steam, ensuring tender, evenly cooked corn.
- Cheese choices: Try mozzarella for a stretchy melt or pepper jack for a spicy kick.
- Add crunch: Sprinkle toasted breadcrumbs on top for a crispy layer.
Flavor Variations
1. Mexican Street Corn Style (Elote-Inspired)
Swap cheddar for cotija cheese, add a squeeze of lime, and sprinkle chili powder and cilantro.
2. Herb Butter Corn
Mix chopped dill, basil, or rosemary into the butter instead of paprika for a fragrant herb twist.
3. Spicy Kick Version
Add a dash of cayenne pepper or hot sauce to the butter mix for a fiery flavor.
4. Parmesan and Garlic Lovers’ Version
Use double the garlic and Parmesan, and skip the cheddar for a robustly savory finish.
5. Smoky BBQ Version
Brush the corn with a mix of barbecue sauce and garlic butter before baking — perfect for summer cookouts.
Pairing Ideas
- Main dishes: Grilled steak, roasted chicken, barbecue ribs, or shrimp skewers.
- Sides: Potato salad, coleslaw, garlic bread, or grilled vegetables.
- Drinks: Lemonade, iced tea, or a crisp white wine like Sauvignon Blanc.
The creamy, buttery richness of this corn balances well with smoky meats and refreshing drinks.
Nutritional Information
Per serving (1 ear of corn):
- Calories: ~280 kcal
- Total fat: 20 g
- Carbohydrates: 18 g
- Protein: 8 g
- Fiber: 2 g
- Sugars: 6 g
- Sodium: 250 mg
This dish is indulgent yet wholesome — providing fiber from the corn and calcium from the cheese. You can reduce calories by using light butter and low-fat cheese if preferred.
Storage and Reheating
- Refrigerate: Store leftovers in an airtight container for up to 3 days.
- Reheat: Warm in the oven at 350°F for 10–12 minutes or in a microwave for 30–45 seconds.
- Freeze: Not recommended, as cooked corn can lose texture after thawing.
Common Mistakes to Avoid
- Using cold butter: It won’t mix well with garlic and spices.
- Skipping the foil: Leads to uneven cooking and dry corn.
- Overbaking: Can make kernels tough instead of tender.
- Not turning the corn: Causes one side to brown too quickly.
FAQs
1. Can I use frozen corn instead of fresh?
Yes, but make sure to thaw it completely before coating with butter. Fresh corn yields a better texture, but frozen corn is a great year-round option.
2. What’s the best cheese for melting on corn?
Cheddar melts beautifully and gives that classic creamy flavor. Parmesan adds a salty edge, while mozzarella offers a stretchy, gooey finish.
3. Can I make this recipe ahead of time?
Absolutely! Prepare the corn and butter mixture in advance. When ready to serve, wrap and bake fresh for the best texture and flavor.
4. How can I make it spicier?
Add cayenne pepper, crushed red chili flakes, or even a drizzle of sriracha into the butter mix.
5. Can I cook the corn without foil?
Yes, but keep an eye on it. You can bake the corn directly on a tray for a roasted texture, though it may dry out slightly.
6. How can I make this vegan?
Use vegan butter and dairy-free cheese alternatives. The recipe remains just as delicious!
7. What goes best with this dish?
Cheesy Garlic Butter Corn pairs perfectly with grilled meats, baked chicken, or vegetarian burgers. It also makes a fantastic party side dish.
Pro Tips for Serving
- Presentation idea: Serve the corn on a wooden platter with melted butter drizzle and a sprinkle of extra cheese.
- Crowd servings: For parties, cut the corn into halves or thirds before coating with butter for easy eating.
- Fresh herbs: Parsley adds brightness, but cilantro or chives also make great options.
Conclusion
Cheesy Garlic Butter Corn on the Cob is more than just a side dish — it’s a flavor-packed experience. The combination of tender roasted corn, aromatic garlic butter, and a blanket of melted cheese transforms an everyday vegetable into a star-worthy treat.
Whether baked or grilled, this recipe brings a comforting, home-cooked warmth to any table. It’s the perfect example of how a few simple ingredients can create a dish that feels indulgent, nostalgic, and absolutely irresistible.
Next time you’re planning a barbecue, family dinner, or casual cookout, add this recipe to the menu. Watch as guests savor every bite and reach for seconds — because once you’ve tasted cheesy garlic butter corn, plain corn on the cob will never be the same again.