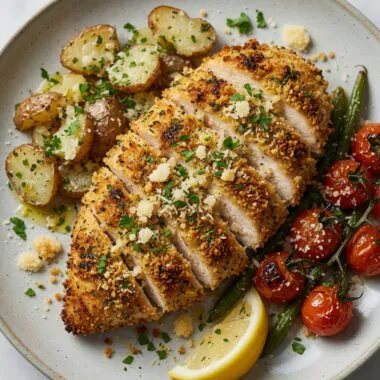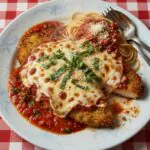
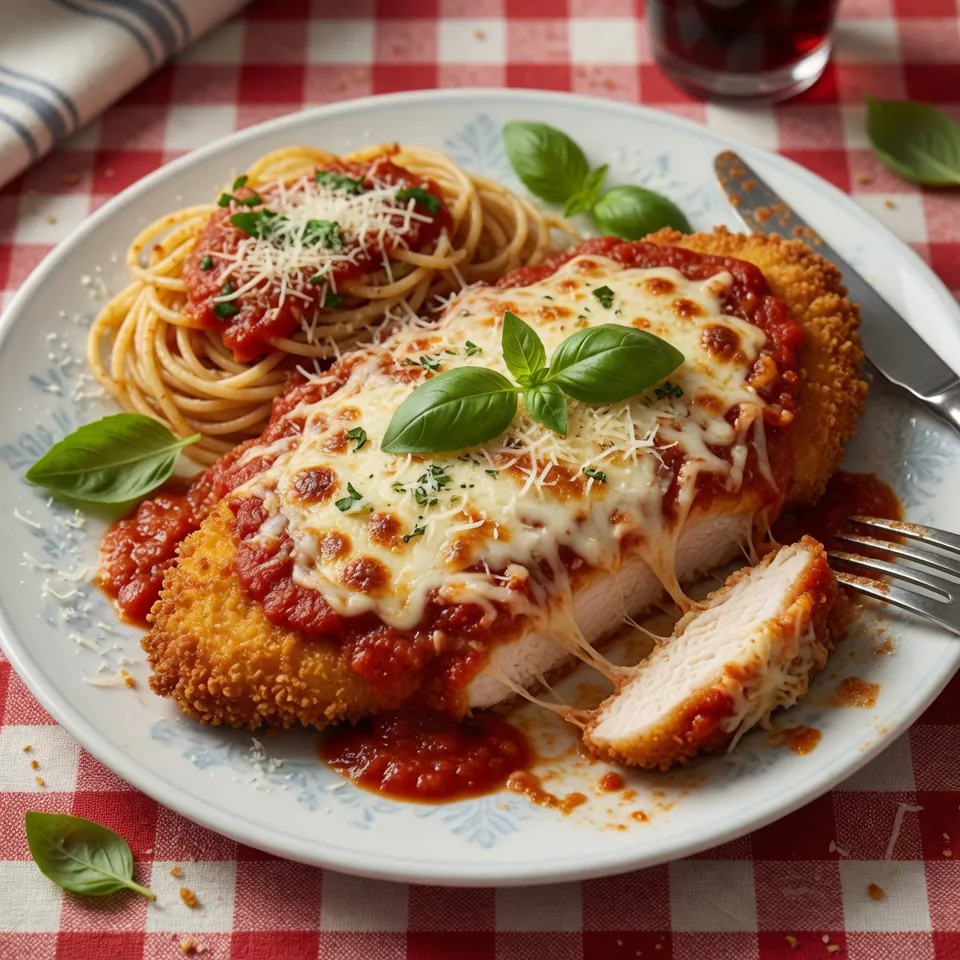
A perfectly crispy chicken cutlet smothered in rich marinara and melted mozzarella — this classic Italian-American comfort dish comes together in under 45 minutes.
📋 In This Article
Introduction
Let’s get one thing straight: most Chicken Parmesan recipes fail because they ignore the physics of breading. You’ve probably been there. You pull a beautiful golden cutlet from the oven, cut into it, and… soggy bottom. The breading slides off in one sad sheet. It’s disappointing. This Chicken Parm Recipe solves that problem permanently by treating the breading as a structural system, not an afterthought. The result is a dish that delivers on the promise: shatteringly crisp edges, juicy meat, and a blanket of melted cheese that doesn’t drown everything beneath it.
Why This Recipe Works
Here’s the thing. Most recipes treat breading as a simple flour-egg-crumb assembly line. But each layer serves a specific function. The flour creates a dry surface for the egg to grip. The egg acts as an emulsifier — essentially edible glue. And the panko? Its jagged, airy structure creates more surface area than traditional crumbs, which means more places for the Maillard reaction to occur. That’s the browning process that generates hundreds of new flavor compounds when proteins and sugars meet high heat. Crusted Parmesan Chicken Recipe: Crispy, Juicy & Foolproof.
The Chicken Parm Recipe also benefits from a two-stage cooking method. Pan-frying first builds a crust that baking alone can’t achieve. Then a brief oven finish melts the cheese without turning the cutlet into a sponge. We’re not trying to boil the chicken in sauce. We’re topping it.
Ingredients
Ingredients for Chicken Parm Recipe
Chicken
- 4 boneless, skinless Chicken Breasts: Slice horizontally to create cutlets for quick, even cooking.
Breading
- 1/2 cup All-purpose Flour: Creates a dry bonding surface for the egg wash.
- 2 large Eggs: Beaten, functioning as the adhesive layer between flour and crumbs.
- 1 cup Panko Breadcrumbs: The key to an airy, extra-crispy crust.
- 1/2 cup freshly grated Parmigiano Reggiano: Adds umami depth and helps the crumbs brown faster.
- 1 teaspoon Garlic Powder & 1 teaspoon Onion Powder: Distributed seasoning throughout the coating.
- Salt and Black Pepper: To taste, for seasoning both the chicken and the breading mixture.
Sauce
- 2 cups Marinara Sauce: Use high-quality store-bought or homemade. San Marzano tomatoes provide natural sweetness and lower acidity.
Cheese
- 1 cup whole milk Mozzarella Cheese: Shredded or sliced, for that characteristic stretch.
Finishing Touches
- 2 tablespoons Olive Oil: For pan-frying; choose a neutral oil if you prefer a milder flavor.
- Dried Italian Herbs (like Oregano or Basil): To sprinkle atop the finished dish.
- Fresh Basil: For garnish, adding a bright, aromatic finish to your Chicken Parm.
Quality matters here. San Marzano tomatoes have a lower seed count and thicker flesh than standard canned tomatoes, which means less water and more concentrated flavor. And freshly grated Parmigiano Reggiano contains none of the anti-caking agents found in pre-shredded cheese — agents that interfere with melting.
Step-by-Step Instructions
Prep Chicken
- Tenderize the Chicken Breasts: Place boneless, skinless chicken breasts in a zip-top bag or between two sheets of plastic wrap. Use a meat mallet to pound the chicken to an even thickness of about 1/2 inch. This isn’t just about tenderness — uniform thickness means the edges won’t overcook while the center remains raw. I used to skip this step and wonder why my chicken was dry on the edges. Don’t be like me.
Breading Station Setup
- Create Your Breading Station: Set up three shallow bowls: one with all-purpose flour seasoned with salt and pepper, the second with beaten eggs (the egg wash), and the third with panko breadcrumbs mixed with Parmigiano Reggiano and seasonings. Keep one hand dry for handling the flour and crumbs, one wet for the egg. This “wet hand, dry hand” technique prevents breading from caking onto your fingers.
Dredging the Chicken
- Dredge the Chicken: Start by coating each chicken breast in the flour, shaking off excess thoroughly. Any extra flour creates a gummy layer beneath the egg. Next, dip it into the egg wash, letting the excess drip off for a few seconds. Finally, press the chicken into the breadcrumb mixture, pressing firmly to ensure the crumbs adhere to both sides. The pressure matters — loose crumbs fall off in the pan.
Pan-Frying
- Pan-Fry the Breaded Chicken: In a large skillet, heat about 1/4 inch of olive oil over medium heat until shimmering. You’ll know the oil is ready when a few breadcrumbs sizzle immediately upon contact — around 350°F. Carefully add the breaded chicken cutlets, cooking for about 3-4 minutes per side, or until they are golden brown and crispy. Use a meat thermometer to ensure the chicken reaches an internal temperature of 165°F, the point where harmful bacteria are eliminated and proteins have fully set. Transfer to a wire rack, not paper towels, so air circulates and keeps the bottom crisp.
Assembling the Dish
- Layer with Marinara and Cheese: Preheat your oven to 425°F. In a baking dish, place the fried chicken cutlets. Spoon a generous amount of marinara sauce over the center of each cutlet — but not to the edges. Leave about half an inch of exposed crust. This preserves the textural contrast between crispy edges and saucy center. Top with slices or shreds of fresh mozzarella and a final sprinkle of Parmigiano Reggiano.
Baking/Broiling
- Bake the Chicken: Bake in the preheated oven for 10-14 minutes, until the cheese is melted and bubbly. For that restaurant-style speckled top, broil for an additional 2-3 minutes. Watch closely — the line between beautifully browned and burnt is thin.
Serving
- Serve and Enjoy: Let the dish rest for 3-4 minutes before serving. This brief pause allows carryover cooking to finish — the internal temperature continues rising even after the chicken leaves the oven — and lets the cheese set slightly so it doesn’t slide off when you cut. Garnish with fresh basil and serve immediately.

⚠️ Common Mistakes to Avoid
The most common failure in Chicken Parm Recipe execution is soggy breading, and it usually stems from one of three errors. First, overcrowding the pan. When cutlets touch, steam builds between them and turns the crust soft. Cook in batches if necessary. Second, saucing too early. The acid and moisture in marinara break down the breading’s structure within minutes. Add sauce only during the final bake, not before. Third, skipping the wire rack. Paper towels trap steam against the bottom of the chicken, undoing your crisping work.
Dry chicken is another frequent complaint. The solution is brining. A 30-minute soak in a solution of 1 tablespoon salt per cup of water seasons the meat throughout and helps it retain moisture during cooking. If you’re short on time, even 15 minutes makes a measurable difference.
Finally, under-seasoned breading. If your crust tastes bland, you likely seasoned only the flour. But the flour layer is thin. Mix salt, pepper, and dried herbs directly into the panko for flavor that actually reaches your palate.
Variations & Serving Suggestions
The classic Chicken Parm Recipe welcomes adaptation. For a richer result, substitute boneless chicken thighs for breasts — the higher fat content guarantees juiciness, though you’ll need to pound them slightly thinner. Veal cutlets offer a more traditional Milanese preparation, with a delicate texture that pairs beautifully with a lighter sauce.
Vegetarian diners can swap chicken for Eggplant Parmesan using the same breading technique. Slice eggplant into 1/2-inch rounds, salt and drain for 20 minutes to remove bitterness, then proceed with the standard dredging process.
For a gluten-free version, replace all-purpose flour with rice flour or cornstarch and use gluten-free panko. The texture differs slightly — less shatter, more crunch — but the flavor remains intact. Classic Chicken Parmesan Recipe: Crispy, Cheesy, Perfect.
An air fryer offers a lower-fat alternative that still produces respectable crispiness. Bread the cutlets as directed, spray lightly with oil, and cook at 375°F for 12-15 minutes, flipping halfway through. The crust won’t be quite as substantial as pan-fried, but it’s a solid weeknight compromise.
Serve over pasta with extra marinara, alongside garlic bread for sauce-mopping, or with a simple green salad dressed in vinaigrette to cut through the richness. For wine, a medium-bodied red like Chianti or Sangiovese echoes the Italian roots, while a crisp Pinot Grigio provides contrast.
Storage & Reheating
Proper storage preserves the textural integrity of your Chicken Parm. Allow cooked cutlets to cool to room temperature — but no longer than two hours, per food safety guidelines. Store in an airtight container with parchment paper between layers to prevent sticking. Refrigerated leftovers keep for 3-4 days. For longer storage, freeze individually wrapped portions for up to 3 months.
Reheating is where most people go wrong. The microwave is convenient but turns crisp breading into something resembling wet cardboard. Instead, preheat your oven to 350°F (175°C) and place the chicken parmesan on a baking sheet. Heat for 15-20 minutes, or until the cheese bubbles and the internal temperature reaches 165°F. If the cheese browns before the chicken heats through, tent loosely with foil.
For frozen portions, thaw overnight in the refrigerator before reheating. Direct-from-freezer reheating often results in uneven warming and rubbery cheese.
💡 Expert Tips & Tricks
Pre-salt your chicken 30-45 minutes before cooking. This isn’t just seasoning — salt dissolves some muscle proteins, allowing them to retain more moisture during cooking. The result is noticeably juicier meat.
Use a cast iron skillet if you have one. Its superior heat retention means the oil temperature drops less when you add the chicken, resulting in more consistent browning and better crust development.
Let the chicken rest on a wire rack after frying, not on paper towels. Air circulation keeps the bottom crisp while you prepare the baking dish. Paper towels trap steam and create exactly the soggy spot you’re trying to avoid.
Don’t skip the thermometer. Visual cues for doneness are unreliable — a golden exterior can hide an undercooked center. The internal temperature must reach 165°F for safety, but carryover cooking will push it to 170°F during resting. Pull at 165°F for optimal texture.
Fresh mozzarella matters. Pre-shredded cheese contains potato starch or cellulose to prevent clumping, which also prevents smooth melting. Fresh mozzarella doesn’t have this issue and produces that characteristic stretch. Easy Creamy Garlic Butter Chicken & Rigatoni in Parmesan Sauce Recipe.
Frequently Asked Questions (FAQ)
+Why does my chicken parm get soggy?
Sogginess usually comes from three sources: overcrowding the pan (which creates steam), resting fried chicken on paper towels (which traps moisture), or adding sauce too early (which soaks into the breading). Fry in batches, use a wire rack for resting, and sauce only during the final bake.
+Can I use chicken thighs instead of breasts?
Absolutely. Boneless, skinless chicken thighs work beautifully and stay juicier thanks to their higher fat content. Pound them to 1/2-inch thickness just like breasts, and note that they may need an extra minute per side to cook through.
+How do I know when chicken parm is done?
Use an instant-read thermometer inserted into the thickest part of the meat (not touching the pan). It should read 165°F. Visually, the juices should run clear and the meat should be opaque throughout, but temperature is the only reliable indicator.
+Can I skip the frying step and just bake it?
You can, but the crust won’t develop the same depth of flavor or texture. Pan-frying triggers the Maillard reaction across the entire surface of the breading. Baking alone produces a paler, softer coating. If you must skip frying, bake at 425°F for 20-25 minutes, flipping once halfway through.
+How long does chicken parm last in the fridge?
Properly stored in an airtight container, cooked chicken parmesan keeps for 3-4 days in the refrigerator. The breading will soften over time, but reheating in a 350°F oven for 15-20 minutes helps restore some crispness.
+What should I serve with chicken parm?
Classic pairings include spaghetti or linguine with extra marinara, garlic bread for sauce-mopping, or a crisp green salad with vinaigrette to balance the richness. Roasted vegetables like broccoli rabe or asparagus also work well.