Introduction
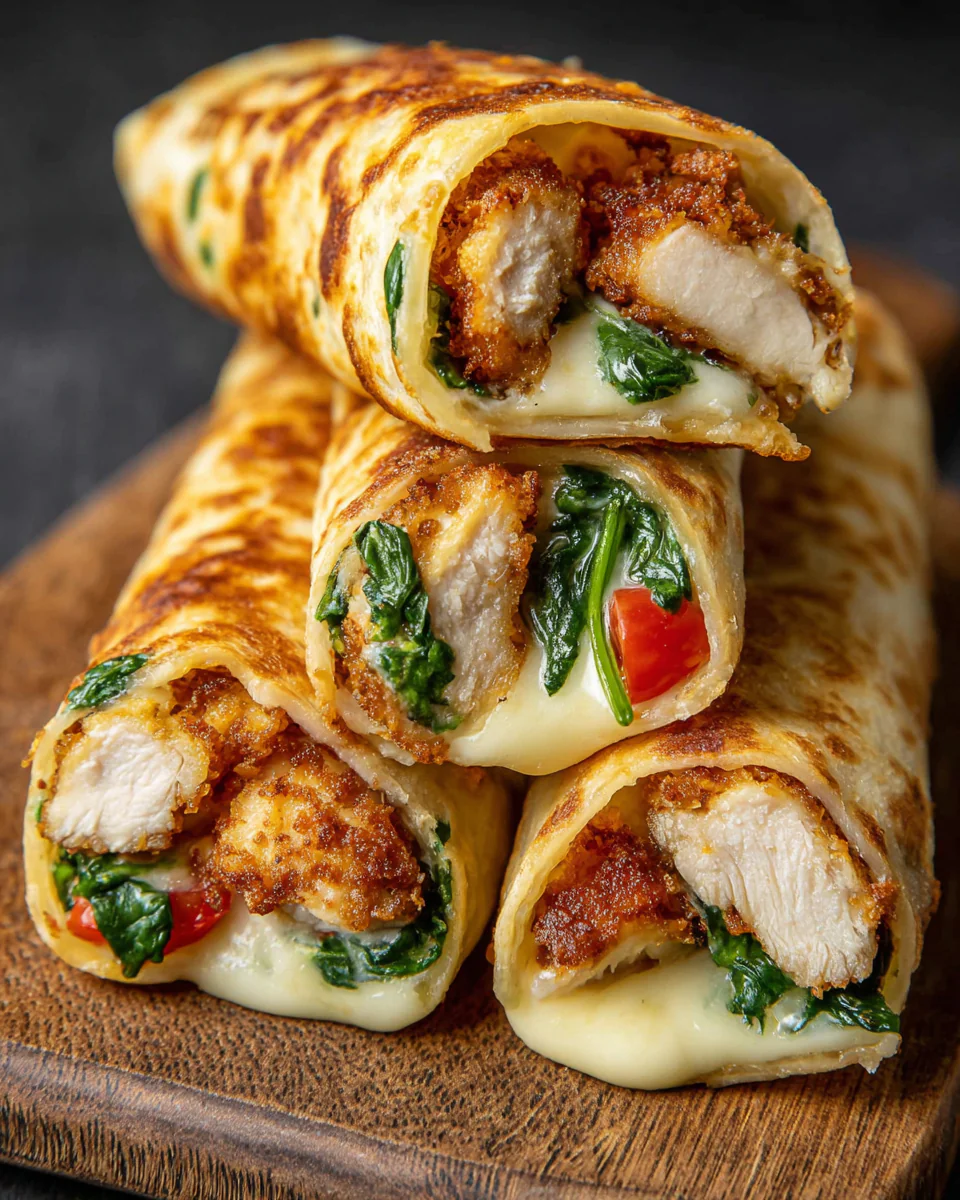
If you're on the lookout for a quick and satisfying meal, these Crunchy Crispy Air Fryer Chicken & Mozzarella Wraps are sure to impress. Packed with flavor and texture, they make an excellent lunch or dinner option for busy weekdays.
Made with tender chicken coated in a crispy breading, topped with gooey mozzarella, and wrapped in a warm tortilla, these wraps are both comforting and delicious. Using an air fryer not only cuts down on calories but also gives you the perfect crunch without the guilt of deep frying.
Ingredients
- 1 lb boneless chicken breast, cut into strips
The chicken breast serves as the main protein source, providing a lean and nutritious base for the wraps. Slicing it into strips helps it cook faster and evenly, ensuring tender bites. - 1 cup breadcrumbs
Breadcrumbs create the crispy coating that envelops the chicken. They add texture and crunch, making the wraps satisfying to bite into, while also acting as a vehicle for flavor. - 1/2 cup grated Parmesan cheese
Parmesan cheese not only enhances flavor with its salty and nutty notes but also contributes to a more golden-brown, crispy texture in the breading when air-fried. - 2 large eggs
Eggs act as a binding agent, helping the breadcrumbs adhere to the chicken strips. They also add moisture, contributing to the overall tenderness of the chicken. - 1 tsp garlic powder
Garlic powder infuses the chicken with a savory flavor that elevates the taste profile. It blends seamlessly into the crispy coating, ensuring every bite is savory. - 1 tsp paprika
Paprika adds a subtle smokiness and color to the dish. Its warm flavor complements the chicken and enhances the overall flavor profile of the wraps. - 4 large flour tortillas
Tortillas serve as the wrap base, holding each delicious ingredient together. Flour tortillas are soft and pliable, making them easy to roll and enjoyable to eat. - 1 cup shredded mozzarella cheese
Mozzarella brings a creamy, melty texture to the wraps. It complements the savory chicken and crispy breading, ensuring a satisfying gooeyness in each bite. - Cooking spray or olive oil
Using a light spray of cooking oil enhances the crispiness of the chicken in the air fryer. It helps the breadcrumbs brown nicely without overpowering the dish with fat.
Directions & Preparation
Step 1: Preheat the air fryer to 400°F (200°C).
Preheating the air fryer is a crucial step to ensure that the chicken cooks evenly and achieves that desired crunchy exterior. Proper preheating helps create a hot environment that mimics frying, allowing the breadcrumbs to crisp up beautifully.
Step 2: Prepare the chicken for breading by placing it in a bowl.
Starting with the chicken in a bowl allows you to season it and coat it evenly. This step is essential for flavor, as you'll mix in the spices and ensure every piece is well-coated before breading.
Step 3: In a separate bowl, whisk together eggs and set aside.
Whisking the eggs until well blended provides a smooth coating for the chicken. This helps the breadcrumbs adhere better and throughout the entire cooking process, ensuring all surfaces are evenly coated.
Step 4: In another bowl, combine breadcrumbs, Parmesan cheese, garlic powder, and paprika.
Mixing the dry ingredients together before breading ensures an even distribution of flavor across the chicken. Each bite will be packed with the same great taste, and the mixture becomes more aromatic and enticing.
Step 5: Dip each chicken strip first into the egg, then press into the breadcrumb mixture, ensuring an even coat.
This two-step process is vital; the egg binds the breadcrumbs to the chicken, creating a crispy outer layer when cooked. Take your time during this step to ensure complete coverage, as missing spots can lead to uneven cooking.
Step 6: Arrange the breaded chicken strips in the air fryer basket in a single layer, making sure they aren't overcrowded.
Conveniently spacing out the chicken strips allows for even air circulation, which is key for achieving that perfect crunch. Overcrowding can cause uneven cooking and result in softer spots, rather than all-over crispiness.
Step 7: Spray the chicken lightly with cooking spray or brush with olive oil before cooking.
Adding a bit of oil aids in achieving a beautifully browned and crispy finish to the chicken strips. This simple step amplifies crunchiness, while the steaming action of the air fryer helps keep the chicken juicy.
Step 8: Air fry the chicken strips for about 12-15 minutes, flipping halfway through for even cooking.
Flipping the chicken ensures that both sides receive equal heat and airflow, leading to a uniformly crispy texture. Monitor the color closely, as air fryers may have different cooking times based on the model.
Step 9: While the chicken is cooking, prepare your tortillas by laying them out on a clean surface.
Prepping the tortillas at this stage prevents any delays once the chicken is ready. Having everything in place also builds anticipation for assembling the wraps!
Step 10: Once the chicken is cooked and crispy, place an even amount of chicken on each tortilla, followed by a generous helping of mozzarella cheese.
Layering the chicken and cheese helps achieve a balanced flavor profile, where the creamy mozzarella contrasts beautifully with the crunchy chicken. Be generous with the cheese to ensure that each bite is melty and satisfying.
Step 11: Wrap the tortillas tightly around the chicken and cheese, ensuring they are fully enclosed.
Tightly wrapping ensures that the gooey cheese remains nestled within the tortilla, enriching each bite while also keeping everything intact when you take a bite. A snug wrap prevents the fillings from spilling out.
Step 12: Return the wraps to the air fryer for an additional 3-4 minutes, to melt the cheese and crisp the tortillas.
This final step is critical for elevating the overall experience; melting the cheese means you’ll enjoy a gooey texture alongside the crunchy elements. It sends the wraps over the top and makes them enjoyable to share.
Step 13: Remove the wraps from the air fryer, let them cool slightly, then slice in half to serve.
Letting the wraps cool slightly allows the cheese to set a bit, making them easier to slice and eat. The visual appeal of a clean cut reveals the delicious layers inside, enhancing the anticipation of tasting.

Customizing Your Wraps
One of the greatest advantages of these wraps is their versatility. Feel free to customize them with your favorite ingredients. Adding veggies like bell peppers or spinach enhances nutrition, while swapping the chicken for turkey or plant-based options opens the recipe up to more tastes. The options are endless, and you can tailor each wrap to suit your preferences.
Serving Suggestions for a Complete Meal
These Crunchy Crispy Air Fryer Chicken & Mozzarella Wraps can stand on their own, but you can easily elevate your meal. Pair them with a fresh side salad or crispy fries for added texture and flavor. For dipping, a zesty ranch or marinara sauce works splendidly, making every bite an experience worth savoring.
Making Ideal Leftovers
If you're lucky enough to have leftovers, they can be enjoyed the next day! Reheat the wraps in the air fryer to maintain their crispness. A few minutes at a lower temperature will revive the crunch and melty cheese, ensuring they taste freshly made, rather than soggy and bland. This makes for a fantastic quick meal option throughout the week.
FAQs
What can I do if the breading becomes too soggy?
If the breading turns out soggy, ensure that the air fryer is preheated to the correct temperature. Additionally, you can add more breadcrumbs next time for a thicker crust that holds up better.
Can I use different types of cheese in this recipe?
Absolutely! Cheddar or pepper jack can be great alternatives, but each will impart its own unique flavor. Just keep in mind that different cheeses melt differently.
What if I want to make these wraps spicier?
You can easily spice things up by adding jalapeños or a dash of cayenne pepper to the breadcrumb mixture. Hot sauce is also a great way to amp up the heat after cooking.
Can I make these wraps without chicken?
Yes, you can substitute the chicken with tofu, mushrooms, or even chickpeas for a delicious vegetarian version. Adjust cooking times accordingly to ensure they're heated through.
What if the chicken cooks too quickly and the cheese doesn't melt?
If the chicken is done before the cheese melts, you can reduce the temperature and let the wraps cook a little longer for the cheese to melt properly.
How can I scale this recipe for a larger group?
To serve more people, simply double or triple the ingredient amounts. Ensure that your air fryer is large enough to handle multiple batches without overcrowding.
Conclusion
These Crunchy Crispy Air Fryer Chicken & Mozzarella Wraps are not just delicious; they are also a breeze to make. The air fryer simplifies the cooking process while delivering wonderfully crispy results, perfect for any home cook looking to impress.
So gather your ingredients, let your creativity flow, and enjoy crafting these delightful wraps that will surely become a family favorite. With endless variations and sides to pair with, you'll find this recipe a delightful staple in your kitchen.
Recipe Card
Savory Crockpot Turkey Breast for Easy Meals
Ingredients
Method
- Prepare the crockpot and turkey breast
- Make the seasoning mix
- Season the turkey breast
- Sear the turkey (optional)
- Place turkey in the crockpot
- Add liquid ingredients
- Cook on low for 6-8 hours
- Rest the turkey before slicing
- Serve and enjoy
Tried this recipe?
Let us know how it was!Notes
Additional serving suggestions: pair with a crisp salad, garlic bread, or roasted seasonal vegetables for balance.
For make-ahead, prep components separately and assemble just before heating to preserve texture.
Taste and adjust with acid (lemon/vinegar) and salt right at the end to wake up flavors.