Introduction
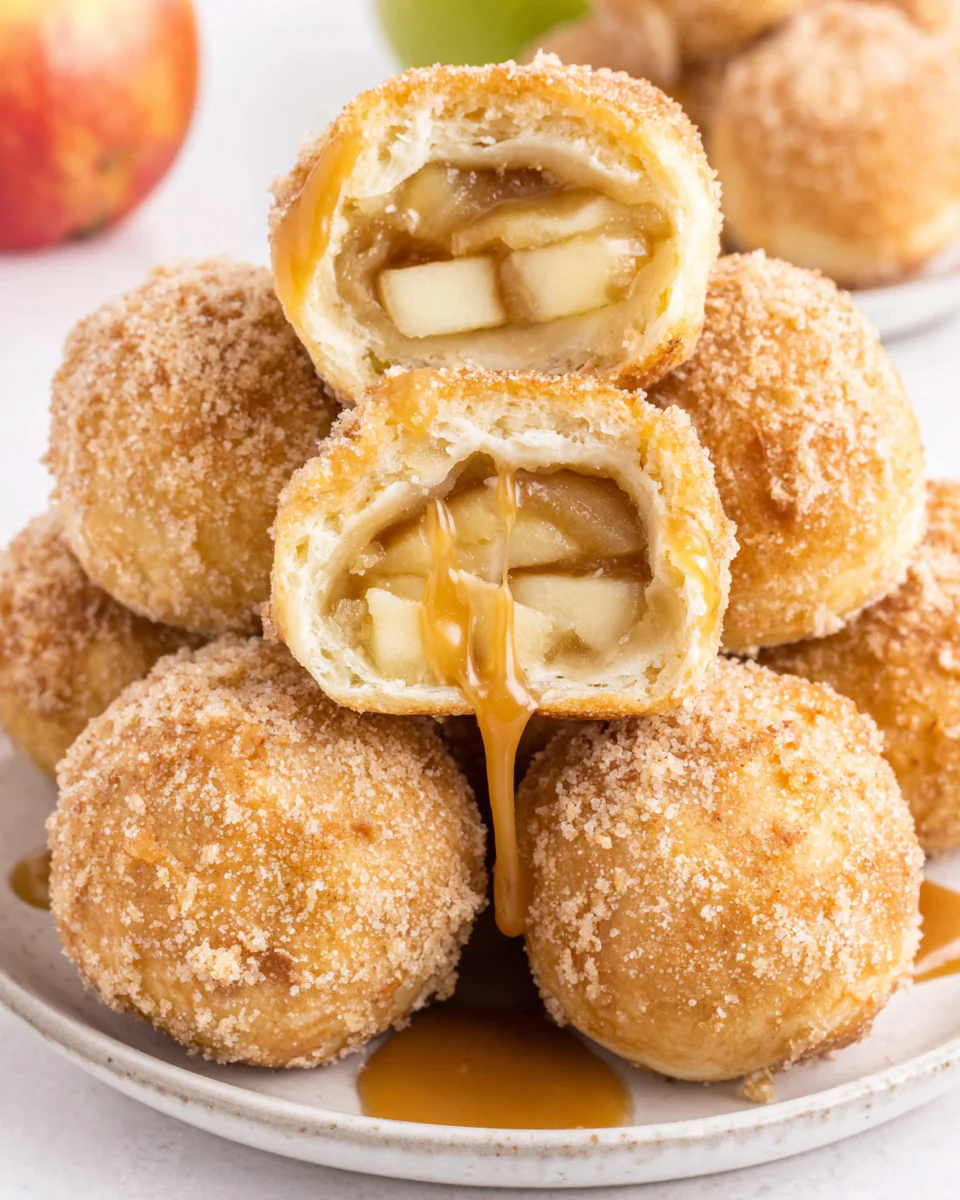
There’s something truly magical about the combination of caramel, apples, and pie. Wrapped in a cheerful pastry, these simple caramel apple pie bombs are the perfect treat for any occasion. They not only bring a delightful taste but also a comforting nostalgia that can warm the heart.
Making these bombs is an easy venture that doesn’t require advanced baking skills, yet offers a rewarding outcome. Whether you’re preparing for a family gathering or just indulging in a sweet craving, these treats can transform any moment into a celebration.
Ingredients
- 2 cups all-purpose flour
All-purpose flour serves as the backbone of the pastry dough, providing structure and texture. Its gluten content helps create the flaky, tender texture needed for the outer layer of the bombs. - 1 teaspoon salt
Salt enhances flavor in baked goods, ensuring that the sweetness of the caramel and apples shines through. It also plays a role in gluten development, strengthening the dough. - 1 teaspoon sugar
Adding a bit of sugar to the dough helps to create a balanced flavor profile, giving the pastry a slight sweetness that complements the filling without overpowering it. - 1 cup unsalted butter, chilled and cubed
Butter adds richness and flavor to the pastry. Using cold butter is key, as it creates layers in the dough that result in a flaky texture when baked. - 6-8 medium apples, peeled and diced
Apples provide the primary flavor and texture in these bombs. Choose a mix of sweet and tart varieties for depth, and ensure they are firm enough to hold together when baked. - 1 cup caramel sauce
Caramel sauce adds sweetness and a sumptuous layer of flavor. It binds the apple filling together and creates a delightful gooeyness that complements the crust. - 1 teaspoon cinnamon
Cinnamon enhances the overall flavor profile of the apples, contributing warmth and depth that evoke the comfort of traditional apple pie. - 1 egg, beaten
The beaten egg works as an egg wash, helping to achieve a golden-brown finish on the pastry. It also helps to seal the edges of the bombs, keeping the filling securely inside. - Powdered sugar, for dusting
A light dusting of powdered sugar not only enhances the visual appeal of the bombs but also adds a touch of sweetness right at the finish, making each bite delightful.
Directions & Preparation
Step 1: Prepare the pastry dough by mixing flour, salt, and sugar.
Start by whisking together the flour, salt, and sugar in a large mixing bowl. This ensures that the ingredients are well combined and evenly distributed, which is crucial for texture. It sets the base for your pastry, allowing the other ingredients to work effectively together.
Step 2: Cut in the cold butter until the mixture resembles coarse crumbs.
Using a pastry cutter or your hands, work the cold, cubed butter into the flour mixture until you achieve a texture similar to breadcrumbs. This step is critical as it begins the layering process in the dough that will create a flaky pastry. Be careful not to overwork it; you want to see small pieces of butter throughout.
Step 3: Form the dough into a ball and refrigerate for 30 minutes.
Chilling the dough is essential for firming up the butter, which helps achieve the desired flakiness in the baked bombs. It also relaxes the gluten, making the dough easier to roll out later. Wrap the ball in plastic wrap and place it in the refrigerator.
Step 4: Prepare the apple filling by combining diced apples, caramel sauce, and cinnamon.
In a separate bowl, mix your diced apples with caramel sauce and cinnamon until well-coated. This mixture will be the heart of your bombs, so ensure that the apples are evenly distributed in the caramel, allowing each bomb to have that rich flavor and sweetness.
Step 5: Preheat the oven to 375°F (190°C).
Preheating your oven is crucial for achieving the right cooking temperature from the start. A hot oven ensures that the pastry puffs and browns properly. Take this time to roll out your dough while the oven heats up.
Step 6: Roll out the pastry dough and cut into circles.
On a lightly floured surface, roll out your chilled dough to about 1/8-inch thickness. Use a round cutter to create circles, making sure they are large enough to encase your filling. This is where the visual appeal begins, so try to keep your cuts as uniform as possible.
Step 7: Place a spoonful of the apple filling onto each dough circle.
Spoon a small amount of the apple filling into the center of each pastry circle, making sure not to overfill. Overfilling can lead to spillage while baking, so leave a little room at the edges for sealing. This step is where you begin to see the transformation from simple dough to delicious bombs.
Step 8: Fold the dough over the filling and seal the edges.
Carefully fold the dough over the filling and pinch the edges to seal. Using a fork to crimp the edges can also provide an attractive finish while ensuring a tight seal. This step is essential to keep the delicious filling from leaking out during baking.
Step 9: Brush the tops with beaten egg and transfer to a baking sheet.
Before placing your bombs in the oven, brush them lightly with beaten egg. This egg wash will promote a golden, glossy finish, making your treats look as good as they taste. Use parchment paper on your baking sheet for easy cleanup.
Step 10: Bake for 25 to 30 minutes until golden brown.
Baking is where the magic happens! Keep an eye on your bombs, and look for a beautiful golden brown color. The baking time can slightly vary based on your oven, so it’s a good practice to check them a few minutes early to avoid overbaking.
Step 11: Allow to cool, then dust with powdered sugar before serving.
After removing your pie bombs from the oven, let them cool on a wire rack for a few minutes. Once cool, give them a light dusting of powdered sugar for an extra special touch. This step elevates the presentation and makes each bite even more enticing.

The Allure of the Apple Filling
The secret to these caramel apple pie bombs lies in the delectable filling. Gyroscoping on a classic pie, the harmony of sweetness from the apples combined with the smooth, rich caramel creates a comforting embrace for your taste buds. The bright notes of cinnamon elevate the flavor, completing this nostalgic blend that dances between tart and sweet.
Mastering the Perfect Dough
Dough preparation is an art that can make or break your pastry experience. Using cold butter is key; it prevents the fat from melting into the flour, helping to achieve those delightful, flaky layers. Don’t rush this process. Allowing the dough to chill ensures it is easier to work with and provides the perfect base for holding all that scrumptious filling.
Versatility on a Plate
Caramel apple pie bombs are delightfully versatile, perfect for various occasions. Whether served as a part of your fall dessert table or enjoyed as a cozy treat on a winter evening, they spark joy and nostalgia. Consider experimenting with fillings, such as merging berries or using chocolate chunks, for a fresh twist that keeps this recipe exciting and delightful.
FAQs
What should I do if my dough is too sticky?
If your dough feels sticky, add a little more flour, a tablespoon at a time, while kneading gently. Too much flour can make the dough tough, so be cautious and mix just until it reaches a workable consistency.
Can I use other fruits instead of apples?
Yes, you can certainly experiment with other fruits such as pears or even mixed berries. Just be mindful of their moisture content to ensure your pie bombs don’t become soggy.
What can I do if my filling is too runny?
If your filling seems too runny, you can mix in a tablespoon of cornstarch to help thicken it. Allow it to sit for a few minutes to absorb excess moisture before spooning it into the dough.
How can I make these bombs more visually appealing?
For a fancier presentation, sprinkle some coarse sugar on top before baking for added crunch and sparkle. You can also drizzle extra caramel on top or serve them with a scoop of ice cream.
Can I prepare the dough in advance?
Absolutely! You can make the dough a day ahead and keep it wrapped in the fridge. This allows for more time to relax while giving the dough a better texture when you roll it out.
What if the dough breaks while sealing?
If your dough breaks while sealing, don’t worry! Simply patch it with a little extra dough, ensuring that the filling is well-contained. Keep your hands floured to minimize sticking.
Conclusion
Enjoying a warm caramel apple pie bomb is akin to a hug in dessert form. Each bite offers layers of sweetness and nostalgia that connect us to comforting moments shared over good food.
You’ll find that these bombs are endlessly adaptable, allowing you to customize them based on your preferences. With every batch, put your own spin on this delightful recipe, ensuring it remains a cherished tradition in your kitchen.
Recipe Card

Creating a Creamy Burrata Pasta Delight
Ingredients
Method
- Cook the pasta.
- Sauté the garlic.
- Add cherry tomatoes.
- Combine pasta and sauce.
- Add burrata and season.
- Plate and garnish.
Tried this recipe?
Let us know how it was!Notes
Additional serving suggestions: pair with a crisp salad, garlic bread, or roasted seasonal vegetables for balance.
For make-ahead, prep components separately and assemble just before heating to preserve texture.
Taste and adjust with acid (lemon/vinegar) and salt right at the end to wake up flavors.