Introduction
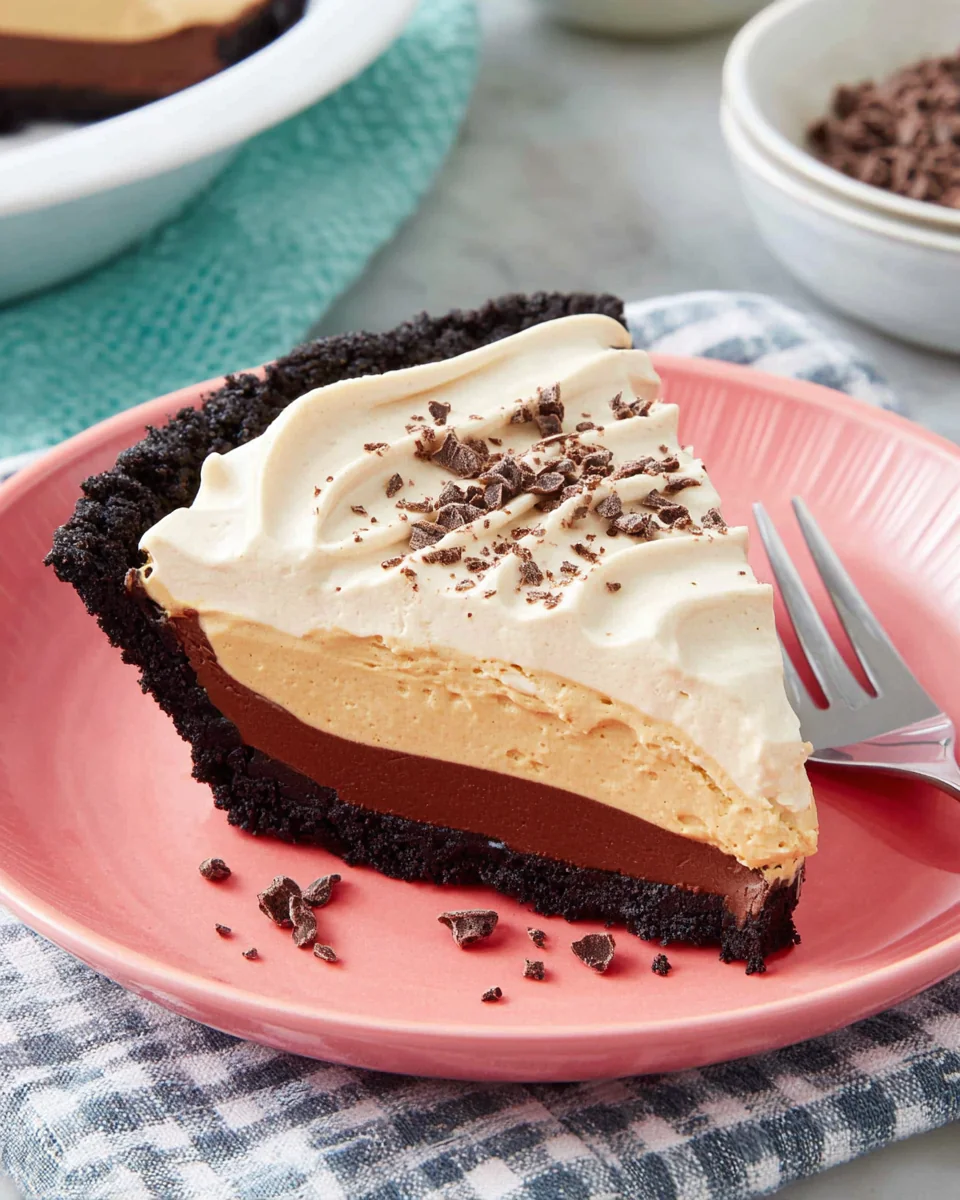
Chocolate and peanut butter is a classic combination that never fails to impress. This easy chocolate peanut butter pie brings together rich flavors and creamy textures, making it the perfect dessert for any occasion. With minimal effort and a handful of ingredients, you can create a dessert that both friends and family will adore.
Imagine the satisfaction of slicing into a pie that boasts a smooth, chocolatey layer atop a fluffy peanut butter filling, all resting in a crisp crust. Whether you’re hosting a dinner party or simply treating yourself, this pie is bound to become a favorite in your household. Get ready to enjoy a sweet indulgence that’s both simple and delightful.
Ingredients
- 1 pre-made Oreo pie crust
The Oreo pie crust provides a rich, chocolatey base that complements the filling beautifully. This crust is easy to use and saves time compared to making one from scratch, ensuring a hassle-free preparation process. - 1 cup creamy peanut butter
Peanut butter is the star of this pie, adding a rich and nutty flavor. The creamy texture ensures that the filling is smooth and luxurious, making every bite a delight. - 1 cup powdered sugar
Powdered sugar is used for sweetness and to create a velvety texture in the peanut butter filling. It dissolves quickly and blends well to create a smooth consistency. - 8 ounces cream cheese, softened
Cream cheese adds a decadent creaminess and tanginess to the pie, enhancing the flavor while helping to stabilize the filling. Softening it allows for easy incorporation into the mixture. - 1 cup heavy whipping cream
Heavy whipping cream adds airiness to the pie, making the filling light and fluffy. Whipping it to soft peaks ensures the filling has the right texture, providing a delightful contrast to the crust. - 4 ounces semi-sweet chocolate, melted
Melting semi-sweet chocolate creates a luscious chocolate layer that enhances the pie's indulgence. It adds depth of flavor and a perfect shiny finish to the dessert. - 1 teaspoon vanilla extract
Vanilla extract brightens the flavors of both the crust and the filling. It adds a subtle aroma and complements the chocolate and peanut butter beautifully.
Directions & Preparation
Step 1: Prepare the crust
Start by placing the ready-made Oreo pie crust on a serving platter. This foundation will hold all the delicious filling and provides essential crunch. A well-placed crust also helps keep the pie intact when serving, making it easier to slice just the right portions.
Step 2: Beat the cream cheese
In a mixing bowl, beat the softened cream cheese until smooth. This step is crucial to avoid lumps in the filling, ensuring a creamy texture. Take your time and scrape down the sides of the bowl to incorporate all ingredients smoothly.
Step 3: Combine peanut butter and sugar
Incorporate the creamy peanut butter and powdered sugar into the cream cheese mixture. Mix until fully combined, achieving a thick and smooth consistency. The sweetness from the sugar should balance the salty undertones of the peanut butter.
Step 4: Add vanilla and melted chocolate
Blend in the vanilla extract and melted semi-sweet chocolate, allowing the mixture to harmonize in flavor. Make sure the chocolate isn’t too hot before adding, as it can affect the texture of the filling, causing it to become runny.
Step 5: Whip the cream
In a separate bowl, whip the heavy cream until stiff peaks form. This aeration adds lightness to the filling, allowing the pie to have a fluffy texture that contrasts beautifully with the dense crust.
Step 6: Fold the whipped cream into the filling
Gently fold the whipped cream into the peanut butter mixture, taking care not to deflate the air you've incorporated. This step is vital; if you overmix, you risk losing that light and airy quality that makes the pie sumptuous.
Step 7: Fill the crust
Pour the peanut butter filling into the prepared Oreo crust. Use a spatula to spread it evenly, ensuring a smooth top. This step sets the stage for the final chill, allowing flavors to meld and the pie to take shape.
Step 8: Chill the pie
Refrigerate the assembled pie for at least 4 hours, or overnight if possible. Chilling helps to firm up the filling, making it easier to slice later while enhancing flavors as they continue to meld.
Step 9: Serve
Once chilled, slice the pie into wedges and serve cold. For an extra touch, consider garnishing with whipped cream or chocolate shavings. The cold temperature makes each bite refreshing and decadent—perfect for any gathering.

The Key to a Perfect Filling
Achieving a well-balanced peanut butter filling requires careful measurement and mixing techniques. The right ratio of cream cheese to powdered sugar creates a creamy texture without being overly sweet. Remember to beat the cream cheese well to avoid lumps, and incorporate ingredients in a way that maintains the lightness for an inviting bite.
Why Chilling is Essential
Allowing the pie to chill for several hours not only firms up the filling but also allows the flavors to mingle. Chilling helps create a cohesive dessert where every bite tastes harmonious. Skipping this step might leave you with a runny filling, which can significantly alter the overall enjoyment of the pie.
Garnish Ideas for Presentation
While the chocolate peanut butter pie is stunning on its own, a few thoughtful garnishes can elevate your presentation. Consider topping with mini chocolate chips, crushed peanuts, or a swirl of whipped cream. These not only enhance visual appeal but also add textures and flavors that can complement each slice beautifully.
FAQs
What if the whipped cream doesn't hold its shape?
If the whipped cream separates or doesn't hold its shape, it may not have been whipped enough. Make sure to whip until stiff peaks form and consider chilling your mixing bowl and beaters beforehand for better results.
Can I use natural peanut butter in the filling?
Yes, you can use natural peanut butter, but be aware it might alter the texture due to higher oil content. Make sure to stir it well before using to incorporate the oils.
What if my pie is too thick or dense?
If the filling feels too thick, it could be due to overmixing or too much cream cheese. Always measure carefully and fold in the whipped cream gently to maintain the desired texture.
Can I use dark chocolate instead of semi-sweet?
Absolutely! Dark chocolate can provide a richer flavor profile, but make sure to adjust the amount of sugar if you prefer a sweeter filling.
What can I do if I find the crust too crumbly?
If your crust crumbles, try pressing it more firmly into the pie pan or adding a little melted butter to help it bind better. Ensure you’re using enough pressure to compact it into an even layer.
How can I add more chocolate flavor?
To enhance the chocolate flavor, consider drizzling chocolate syrup over the filling before chilling or adding cocoa powder to the filling. Just be mindful of sugar adjustments when adding cocoa.
Conclusion
This easy chocolate peanut butter pie is not just a treat for the taste buds but also an effortless way to impress your guests. With a few simple ingredients and straightforward preparation, your dessert table will see a delightful addition that everyone can enjoy.
Next time you’re in the mood for something sweet, remember this recipe. The combination of creamy, chocolaty flavors is undeniably moreish, making each bite an experience worth savoring time and again.
Recipe Card

Savory Cheesy Spinach and Artichoke Stuffed Mushrooms
Ingredients
Method
- Preheat the oven to 375°F (190°C).
- Prepare the mushrooms by cleaning and removing stems.
- In a mixing bowl, combine cream cheese, mozzarella, Parmesan, chopped spinach, artichokes, minced garlic, lemon juice, salt, and pepper.
- Fill each mushroom cap generously with the cheese mixture.
- Place the filled mushrooms on a baking sheet and drizzle with olive oil.
- Bake in the preheated oven for 20-25 minutes, or until the mushrooms are tender and the tops are golden.
- Remove from the oven and let cool for a few minutes before serving.
Tried this recipe?
Let us know how it was!Notes
Additional serving suggestions: pair with a crisp salad, garlic bread, or roasted seasonal vegetables for balance.
For make-ahead, prep components separately and assemble just before heating to preserve texture.
Taste and adjust with acid (lemon/vinegar) and salt right at the end to wake up flavors.