Introduction
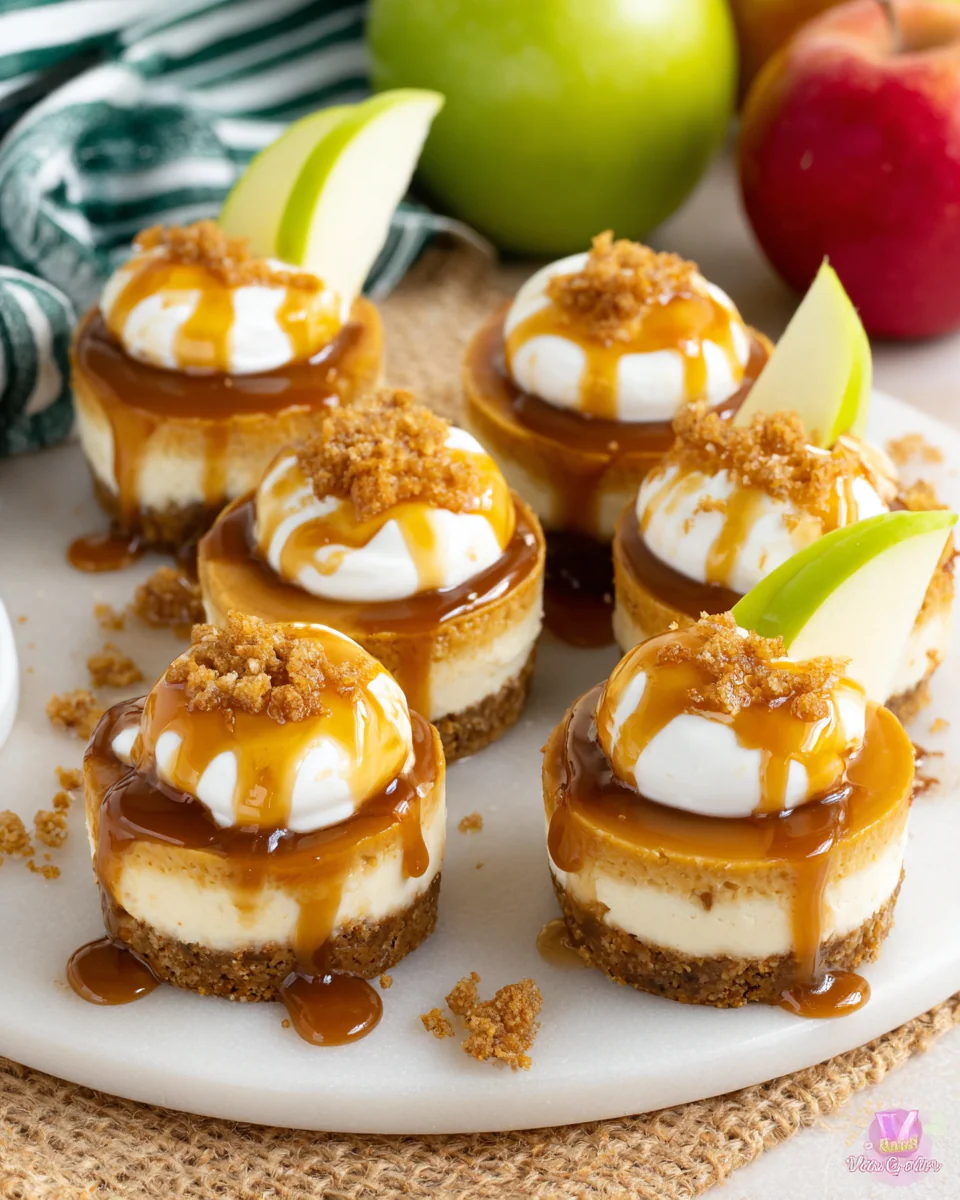
Cannoli are a beloved Italian dessert, celebrated for their crisp shells and creamy ricotta filling. While traditional cannoli require careful assembly, classic cannoli squares provide all the delightful flavors in a simpler format. This dessert not only appeals to those with a sweet tooth but also brings a touch of Italian nostalgia to your kitchen.
Crafting these cannoli squares involves layering a buttery crust with a luscious filling, topped with chocolate chips and a dusting of powdered sugar. This approachable recipe makes it easy to bring the richness of cannoli into your home without the fuss. Whether you’re planning a family gathering or a casual dinner, these squares are sure to impress.
Ingredients
- 1 cup all-purpose flour
The foundation of the crust, all-purpose flour provides structure and stability. Its fine texture ensures a tender yet firm base that holds the other ingredients together. - 1/2 cup unsalted butter, softened
Butter not only adds richness and flavor to the crust but also contributes to a tender texture. Softened butter is easier to blend, ensuring an even distribution throughout the mixture. - 1/4 cup granulated sugar
Sugar sweetens the crust while enhancing its flavor. It also aids in creating a crispy texture as it caramelizes during baking. - 1 large egg
Egg acts as a binding agent, bringing moisture to the dough and helping it to hold its shape. It also contributes to the overall richness and flavor. - 1 teaspoon vanilla extract
Vanilla adds a warm, aromatic note to the crust, elevating its flavor profile. It complements the sweetness from the sugar. - 1 cup ricotta cheese
Ricotta is the star of the filling, providing a creamy texture and rich flavor. Its mildness pairs perfectly with the other ingredients, allowing for versatility in taste. - 1/2 cup powdered sugar
Powdered sugar sweetens the ricotta filling without making it grainy. It also contributes to a smoother, silkier texture. - 1/2 teaspoon ground cinnamon
Cinnamon adds a warm spiciness that enhances the overall flavor of the filling, reminiscent of traditional cannoli. - 1/4 cup mini chocolate chips
These add bursts of chocolate throughout the filling, creating delightful contrast in both texture and flavor with every bite. - Powdered sugar for dusting
Used as a final touch, powdered sugar gives a beautiful finish and additional sweetness that enhances the presentation of the cannoli squares.
Directions & Preparation
Step 1: Preheat the oven to 350°F (175°C).
Preheating ensures that your oven reaches the right temperature before the crust goes in. This allows for even baking, helping the crust to become golden and crisp. Skipping this step could lead to an undercooked crust.
Step 2: In a bowl, combine flour, sugar, and softened butter.
Mixing these dry ingredients with butter creates a crumbly mixture known as a 'shortcrust.' The butter should be incorporated until the mixture resembles coarse crumbs, which is key for achieving a flaky texture in your crust.
Step 3: Add the egg and vanilla extract, mixing until combined.
Incorporating the egg and vanilla adds moisture to the dough, helping it come together as a cohesive mass. It’s important not to overmix at this stage, as this can make the crust tough.
Step 4: Press the dough into the bottom of a greased 9×9-inch baking pan.
Flattening the dough into the pan evenly ensures that it bakes uniformly. Using your fingers, press down firmly to avoid any air pockets that might affect the texture after baking.
Step 5: Bake for 20-25 minutes, until golden.
Baking until golden gives the crust a pleasant crunch and a slight sweetness. Keep an eye on it during the last few minutes to prevent over-baking, which can lead to a hard crust.
Step 6: While the crust is cooling, prepare the filling by mixing ricotta, powdered sugar, cinnamon, and chocolate chips.
Combining these ingredients creates a luscious filling that mimics the texture and flavor of traditional cannoli. Ensure the ricotta is smooth for a creamy consistency; if it’s too chunky, it will not distribute well.
Step 7: Spread the filling evenly over the cooled crust.
Properly spreading the filling ensures every bite is packed with flavor. Use a spatula to smooth it out and create a beautiful, even surface, which not only looks good but also helps with cutting clean squares.
Step 8: Refrigerate for at least 2 hours before serving.
Chilling allows the filling to firm up and flavors to meld, creating a stunning contrast between the creamy filling and crispy crust. It also makes cutting into squares much easier.
Step 9: Dust with powdered sugar before serving.
A dusting of powdered sugar adds a professional touch and enhances the dessert's appeal. It also adds a sweet note to each bite, making the squares even more enticing.

Perfecting the Cannoli Flavor
Balancing the flavors in your cannoli squares is essential. The sweetness from the powdered sugar and the mildness of the ricotta need to be complemented by the warm spice of cinnamon. If you desire extra complexity, consider adding a hint of orange zest for a citrusy brightness that nicely contrasts with the creamy filling.
Tips for a Flaky Crust
Achieving a flaky crust is all about handling the dough with care. Make sure your butter is appropriately softened, as this helps create a tender texture. Be cautious not to overwork the dough; the less you handle it, the flakier the crust will turn out. Keeping your workspace cool and your ingredients cold will also help.
Serving Suggestions for Cannoli Squares
These classic cannoli squares shine as a dessert on their own but can be elevated further with accompaniments. Consider pairing them with a scoop of vanilla gelato or quietly melting dark chocolate on the side. Fresh raspberries can also add a pop of color and tartness, balancing the richness of the cannoli.
FAQs
What can I do if my cannoli filling is too runny?
If your filling turns out too runny, try adding more powdered sugar to thicken it. Alternatively, incorporate a small amount of ricotta to absorb excess moisture.
Can I make the cannoli squares in advance for a party?
Absolutely! These squares can be made a day in advance, allowing flavors to develop. Just be sure to keep them refrigerated until you’re ready to serve.
What if my crust breaks when cutting the squares?
If your crust breaks, allow it to cool completely before cutting. A sharp knife can also help ensure cleaner cuts. Consider warming the knife if it’s too cold for better results.
Can I add nuts to the filling for extra crunch?
Yes! Chopped pistachios or walnuts can add a delightful crunch and a touch of nuttiness that complements the creamy filling.
How can I ensure my cannoli squares set correctly?
Make sure to chill the squares thoroughly; proper refrigeration is crucial to achieve the desired firmness for cutting and serving.
Can I use flavored ricotta for a unique twist?
Definitely! Flavored ricotta, such as pistachio or almond, can add an exciting twist to the classic cannoli flavor profile.
Conclusion
Classic cannoli squares are not just a dessert; they are a sweet reminder of the joy of home cooking. Their combination of a buttery crust and rich filling captures the essence of traditional cannoli beautifully and makes them perfect for sharing.
So, gather your ingredients and enjoy the process of creating this delightful treat. With each square, you're not only satisfying your sweet tooth but also embracing a rich cultural tradition that has stood the test of time.
Recipe Card

Maple-Glazed Chicken with Roasted Sweet Potatoes
Ingredients
Method
- Preheat your oven to 400°F (200°C).
- In a small bowl, mix the maple syrup, garlic powder, salt, and pepper.
- Place the chicken thighs in a large baking dish and pour the glaze over them.
- Chop the sweet potatoes into uniform cubes and add them to the dish.
- Drizzle olive oil and sprinkle rosemary over the sweet potatoes, then toss everything together.
- Roast in the preheated oven for about 35–40 minutes.
- Check the internal temperature of the chicken; it should reach 165°F (75°C).
- Once cooked, allow the dish to rest for 5 minutes before serving.
Tried this recipe?
Let us know how it was!Notes
Additional serving suggestions: pair with a crisp salad, garlic bread, or roasted seasonal vegetables for balance.
For make-ahead, prep components separately and assemble just before heating to preserve texture.
Taste and adjust with acid (lemon/vinegar) and salt right at the end to wake up flavors.