If you’re tired of limp salads and boring lunches, it’s time to shake things up — literally. These DIY Taco Salad Jars are here to revolutionize the way you meal prep. They’re colorful, flavorful, and layered to stay fresh for days. Whether you’re packing lunch for work, planning a weekend road trip, or prepping for the school week ahead, taco salad jars are your new go-to.
Not only do they taste amazing, but they also look pretty impressive. Just pop open the lid, give it a shake, or pour it into a bowl, and lunch is served. It’s quick, convenient, and much more exciting than another plain sandwich. In this in-depth guide, we’ll walk you through every step to mastering these layered salad jars — and by the end, you’ll wonder why you didn’t start sooner.
Let’s dive into this ultimate DIY Taco Salad Jar recipe and discover how to make lunchtime something you actually look forward to.
Why You’ll Love Taco Salad Jars
There are a lot of meal prep ideas out there, but none are quite as convenient, customizable, and crave-worthy as these taco salad jars. Here’s why they’re worth trying — and adding to your weekly rotation.
1. No More Soggy Lettuce
One of the biggest gripes people have with traditional meal-prepped salads is that the lettuce gets soggy. Not here. These taco salad jars are carefully layered, with the dressing on the bottom and the lettuce on top, keeping the greens crisp until you’re ready to eat.
2. Customize to Fit Your Cravings
Like it spicy? Add jalapeños or extra hot sauce. Prefer chicken over beef? Swap it out. Want more crunch? Throw in some crushed tortilla chips just before eating. These jars are totally customizable, so you can make them fit your taste and dietary preferences.
3. Perfect for Meal Prep
Make a batch on Sunday and you’re set for the week. These jars stay fresh in the fridge for up to four days, making them ideal for busy professionals, students, or parents on the go.
4. Portable and Mess-Free
Tightly sealed mason jars mean no leaks, no mess, and easy grab-and-go convenience. Take them to the office, on a picnic, or in the car on a long trip — they’re perfect for eating anywhere.
Ingredients for Taco Salad Jars (Serves 4)
Let’s break down exactly what you’ll need to make these vibrant, satisfying DIY taco salad jars.
For the Taco Meat:
- 1 lb ground beef or turkey – Choose lean meat for a lighter option, or go with ground turkey for a lower-fat version.
- 1 packet taco seasoning – Use store-bought or make your own blend for extra control.
- ½ cup water – Helps blend and simmer the spices into the meat.
For the Salad Layers:
- 1 cup salsa or taco dressing – Choose mild, medium, or hot based on your spice preference.
- 1 cup black beans (drained and rinsed) – Add protein, fiber, and texture.
- 1 cup corn kernels (fresh or canned) – Sweet, juicy contrast to the savory taco meat.
- 1 cup cherry tomatoes, halved – Adds freshness and a pop of color.
- 1 cup shredded cheddar cheese – Use sharp cheddar or your favorite Mexican cheese blend.
- 2 cups chopped romaine or iceberg lettuce – For crisp crunch that stays fresh.
- Optional add-ins: Diced avocado, sliced black olives, chopped green onions, crushed tortilla chips.
How to Make Taco Salad Jars (Step-by-Step Instructions)
Step 1: Cook the Taco Meat
In a large skillet over medium heat, brown the ground beef or turkey until fully cooked, breaking it up with a wooden spoon. Drain any excess fat if needed. Add the taco seasoning and water, then stir to combine. Simmer for 5–7 minutes, stirring occasionally, until the mixture thickens slightly and the flavors develop. Allow the taco meat to cool completely before layering it into jars — this prevents the lettuce from wilting later on.
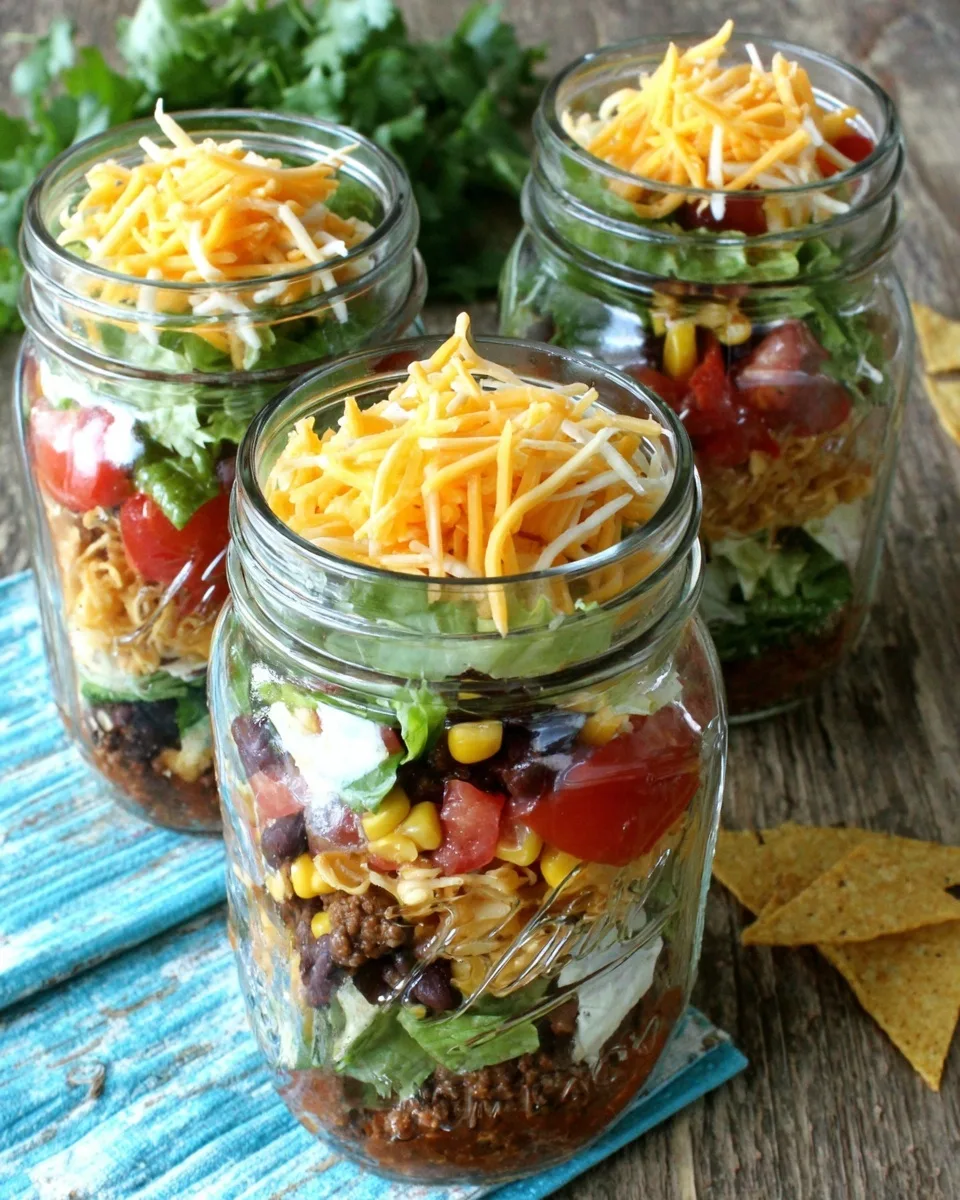
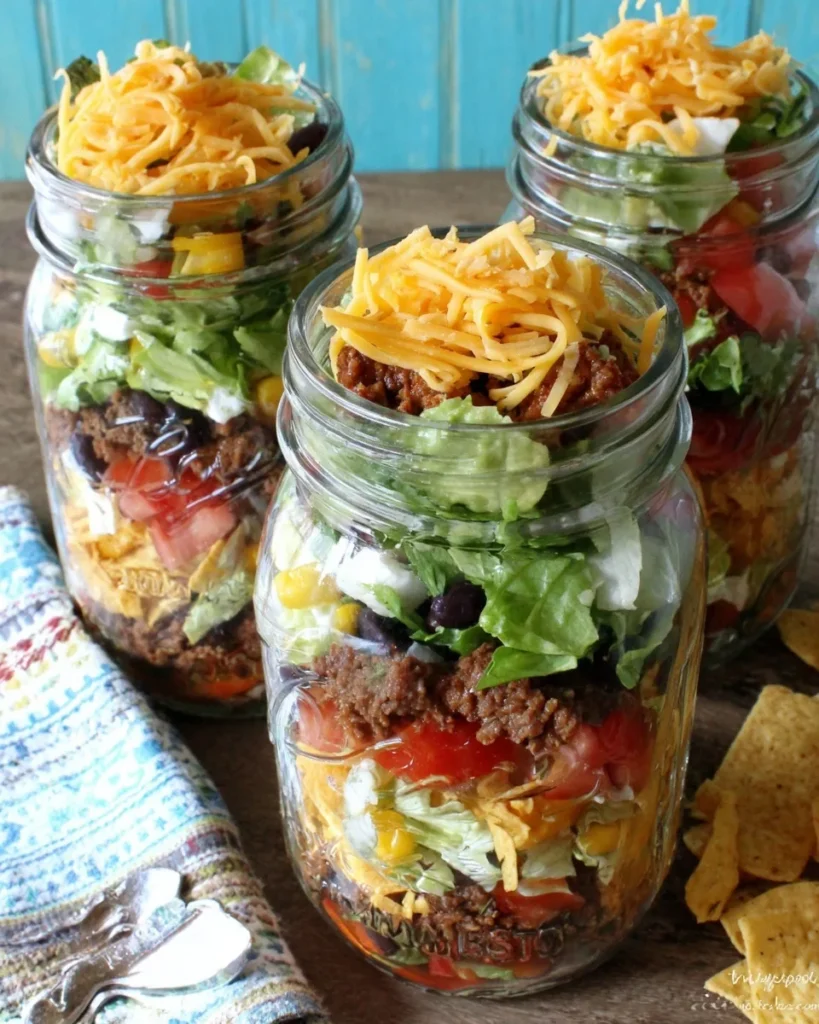
Step 2: Layer the Ingredients (Bottom to Top)
Grab 4 clean quart-sized mason jars (wide-mouth jars work best) and start layering your ingredients carefully in the following order. This layering sequence helps keep each element fresh and prevents sogginess.
- Salsa or dressing – Always go on the bottom to avoid soaking the lettuce.
- Taco meat – Make sure it’s cooled to room temperature first.
- Black beans – Add a hearty, protein-packed layer.
- Corn kernels – Sweet and juicy contrast.
- Cherry tomatoes – Adds brightness and moisture.
- Shredded cheddar cheese – Rich and melty when mixed later.
- Lettuce – Keep it at the very top to preserve its crispness.
Pro tip: If using avocado or crushed tortilla chips, wait until just before eating to add them. This keeps the avocado from browning and the chips from getting soggy.
Step 3: Seal and Store
Once the jars are layered, screw on the lids tightly and place them in the refrigerator. These jars will stay fresh for up to 4 days, making them ideal for weekday lunches or prepped meals for a long weekend.
Step 4: Time to Eat
When you’re ready to dig in, you have two easy options:
- Shake the jar vigorously to mix everything up and eat straight from the jar.
- Pour the contents into a large bowl, toss lightly, and enjoy.
Feel free to top with a dollop of sour cream, a sprinkle of hot sauce, or an extra spoonful of taco dressing.
Tips for the Best Taco Salad Jars
- Cool meat before layering: Always let the taco meat cool completely before adding it to your jar. Hot meat will steam and cause the upper layers to wilt.
- Use hearty greens: Romaine and iceberg lettuce work best. Avoid delicate greens like arugula or spring mix, which don’t hold up as well over time.
- Layer smart: Wet ingredients (like salsa) should go on the bottom. Dry ingredients and greens should always be at the top.
- Choose wide-mouth jars: They’re easier to fill and eat from.
- Pack tightly: Compact layers stay fresher longer and hold their structure better.
Taco Salad Jar Variations
Want to mix things up? Here are a few fun and delicious variations of the classic taco salad jar recipe:
Vegetarian Taco Salad Jar
Skip the meat entirely and double up on black beans or add lentils or quinoa for extra protein.
Chicken Taco Salad Jar
Use grilled or shredded chicken tossed in taco seasoning instead of ground meat.
Spicy Southwest Jar
Add jalapeños, pepper jack cheese, and chipotle dressing for bold flavor.
Low-Carb Version
Leave out the corn and tortilla chips, and use extra lettuce or spinach instead.
Tex-Mex Style
Throw in some pickled red onions, roasted poblano peppers, and a smoky chipotle crema for something different.
How to Store and Pack Taco Salad Jars
These jars are designed for meal prep, and with the right method, you can safely store them for several days. Here’s how to do it right:
- Refrigeration: Keep jars in the fridge immediately after assembling. They’ll stay fresh for 3 to 4 days.
- Tight seal: Make sure the jar lids are tightly closed to keep air out and ingredients crisp.
- Avocado advice: Don’t add avocado until the day you plan to eat — otherwise, it may brown.
- Transport tips: Keep upright in a lunch bag to maintain the layering, and use an insulated cooler pack if taking them to work or on the road.
FAQs About Taco Salad Jars
1. How long do taco salad jars stay fresh?
Properly stored in the refrigerator, taco salad jars last up to 4 days. Just make sure the lettuce is kept at the top and the jars are sealed tightly.
2. Can I use chicken instead of ground beef or turkey?
Absolutely! Shredded or grilled chicken seasoned with taco spices is a great alternative.
3. Are these jars freezer-friendly?
No. These taco salad jars are not meant to be frozen. The fresh veggies and lettuce won’t hold up well in the freezer.
4. What kind of jar should I use?
Use quart-sized wide-mouth mason jars. They’re easier to fill, clean, and eat from.
5. Can I make these jars vegan?
Yes! Omit the meat and cheese, and load up on beans, corn, avocado, and your favorite dairy-free dressing.
6. What dressing works best?
Salsa, ranch, avocado lime dressing, or even a yogurt-based chipotle sauce work well. Just avoid overly watery dressings.
7. Can I warm up the taco meat before eating?
You can, but most people enjoy this salad cold or at room temp. If you want it warm, scoop out the meat layer, heat it, and add it back before eating.
Conclusion: Your New Favorite Meal Prep—Taco Salad Jars
If you’re looking for a meal prep idea that’s healthy, satisfying, and fun to eat, these DIY Taco Salad Jars are a total game-changer. With endless customization options and the ability to prep several days’ worth of lunches in one go, you’ll wonder how you ever survived without them.
They’re portable, fresh, layered for maximum crunch, and bursting with bold taco flavor. Whether you’re aiming to eat healthier, save money on lunch, or simplify your week, this recipe checks every box.
Start prepping your own taco salad jars today and enjoy a better, tastier lunch — one shake at a time.