Introduction
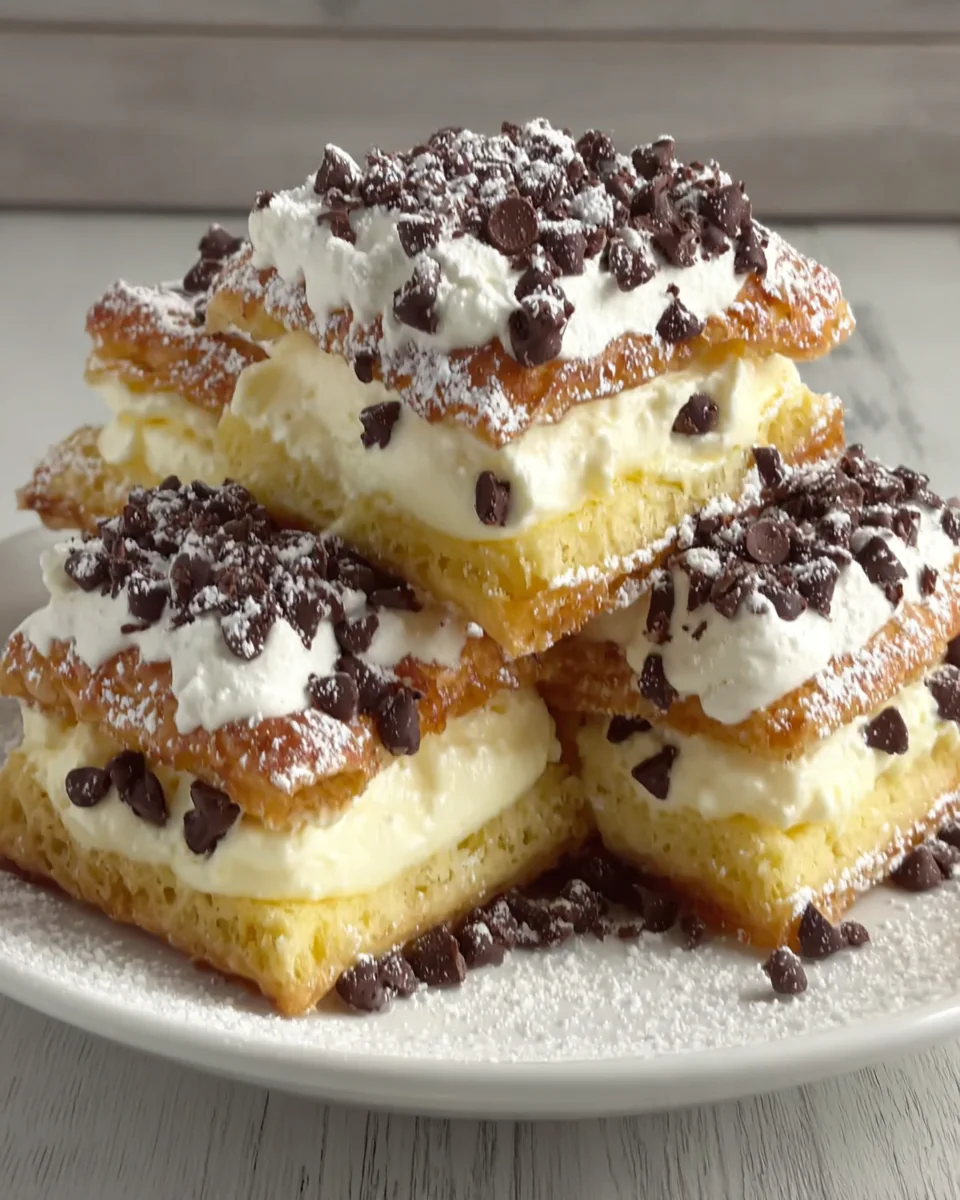
Classic cannoli squares capture the essence of the beloved Italian pastry in a straightforward, delectable form. These squares are an ideal choice for home cooks wanting to share a taste of Sicilian tradition without the fuss of frying individual shells.
Layered with a rich ricotta filling and a delicate vanilla shell, each bite offers a satisfying crunch coupled with creamy indulgence. Perfect for gatherings or a special family treat, these cannoli squares bring an air of celebration to any occasion.
Ingredients
- 1 cup all-purpose flour
The foundational structure of the squares, all-purpose flour provides the necessary gluten for a sturdy yet tender crust. It forms the base that holds up the layers of delicious filling and adds a slight chewiness. - 1/4 cup unsweetened cocoa powder
Cocoa powder enriches the crust with a deep chocolate flavor, balancing the sweetness of the filling. It contributes to the color and taste, making the squares visually appealing and delicious. - 1/4 teaspoon salt
Salt enhances the flavors of all ingredients while also balancing the sweetness of the filling. It’s a small amount but significantly impacts the overall taste of the cannoli squares. - 1/4 cup sugar
Sugar sweetens the crust while also aiding in achieving the desired texture. It helps to create a light, tender crumb that contrasts beautifully with the creamy filling. - 1/2 cup unsalted butter, softened
Butter adds moisture and richness to the crust, resulting in a tender, flavorful base. The fat content helps to create a flaky texture that melts in your mouth. - 2 large eggs
Eggs provide structure and stability to the crust while also adding moisture. They help bind the ingredients together, ensuring the squares hold their shape after baking. - 1 teaspoon vanilla extract
Vanilla extract infuses the crust with a warm, aromatic flavor that complements both the chocolate and ricotta filling. It enhances the overall sweetness and adds depth to the dish. - 1 cup ricotta cheese, drained
Ricotta cheese is the star of the filling, offering a creamy texture and slightly tangy flavor. Its moisture is critical for creating the rich, custard-like filling that defines classic cannoli. - 1/2 cup powdered sugar
Powdered sugar sweetens the ricotta filling without adding grittiness and helps to create a smoother texture. It dissolves easily, ensuring a creamy consistency. - 1/2 teaspoon cinnamon
Cinnamon adds warmth and spice to the filling, enhancing the flavor profile. It brings a reminiscence of traditional Italian desserts, making the cannoli squares feel authentic. - 1/4 cup mini chocolate chips
Mini chocolate chips are a delightful addition that adds little bursts of chocolate throughout the filling. They enhance the taste while providing an appealing presentation. - Powdered sugar, for dusting
Used for dusting before serving, powdered sugar adds a sweet finish and an elegant touch to the presentation of the cannoli squares. It contrasts with the richness of the filling.
Directions & Preparation
Step 1: Preheat the oven to 350°F (175°C).
Preheating the oven ensures that the squares start cooking at the right temperature, promoting even baking. An adequately heated oven helps to develop a nice crust while keeping the interior moist.
Step 2: In a mixing bowl, combine the flour, cocoa powder, salt, and sugar.
Mixing the dry ingredients together ensures they are well incorporated, preventing clumps and ensuring even flavor throughout the crust. This step prepares a cohesive mixture that combines all components essential for structure.
Step 3: Add the softened butter and mix until crumbly.
Incorporating the butter into the dry ingredients creates a crumbly mixture that leads to a tender crust. This step allows the flour to coat the butter, which, when baked, creates a flaky texture.
Step 4: In a separate bowl, whisk together the eggs and vanilla extract.
Whisking the eggs with the vanilla helps to break them down and incorporate air into the mixture. This aeration is vital for creating a light texture for the crust, enhancing the overall enjoyment of the squares.
Step 5: Combine the wet and dry mixtures, mixing until just combined.
Carefully combining the mixtures prevents over-mixing, which can lead to a tough crust. This stage is crucial to ensure that the ingredients meld together without losing the desired tenderness.
Step 6: Press the mixture into an even layer in a greased baking dish.
Evenly pressing the mixture into the baking dish ensures uniform cooking and creates a solid base for the filling. A compact layer prevents the crust from breaking apart when sliced.
Step 7: Bake the crust for 15–20 minutes until firm and set.
Baking until the crust is set gives it structure and prevents it from becoming soggy when the filling is added. It's important to let the crust cool slightly before introducing the filling for best results.
Step 8: In a mixing bowl, combine ricotta cheese, powdered sugar, cinnamon, and chocolate chips.
This step brings together the ingredients that create the creamy filling. Mixing well ensures that the flavors are evenly distributed, allowing for a balanced taste in each bite.
Step 9: Spread the filling evenly over the cooled crust.
Spreading the filling evenly ensures that each portion will have a consistent texture and flavor. This is a key step for creating a harmonious balance between the rich filling and the chocolate crust.
Step 10: Chill the assembled squares in the refrigerator for at least 2 hours.
Chilling allows the flavors to meld and the filling to set properly. This step is essential for achieving the right consistency and prevents the filling from being too soft when cut.
Step 11: Dust with powdered sugar before cutting into squares.
Dusting with powdered sugar adds a beautiful finishing touch that elevates the presentation. This step enhances the visual appeal while complementing the rich flavors with an extra hint of sweetness.

The Origin of Cannoli: A Sweet Tradition
Cannoli have been a beloved dessert in Italy since the 19th century, steeped in history and tradition. Originating in Sicily, these pastries were originally made to celebrate Carnevale and have since evolved into a dessert handmade for various occasions. Their filled shells symbolize prosperity and good fortune, making them a fitting treat for festive occasions, connecting generations and cultures through indulgence.
Adapting Cannoli for Every Palate
One of the joys of making classic cannoli squares lies in their versatility. Home cooks can easily adapt this recipe to suit different tastes or dietary preferences. From adding flavors like orange zest to experimenting with different types of chocolate in the filling, the possibilities allow for creativity while maintaining the essence of this Italian favorite, making every batch unique to the chef.
Serving Suggestions: Elevate the Experience
To elevate your cannoli squares, consider serving them alongside a drizzle of chocolate or a fruit compote. Pairing with fresh berries can add a refreshing contrast to the richness of the filling. For an extra indulgent touch, serve with a scoop of gelato or a dollop of whipped cream to enhance the dessert experience further, ensuring your guests are left with a lasting impression.
FAQs
What should I do if my cannoli filling is too runny?
If your filling is too runny, ensure that you drained the ricotta properly before mixing. You can also consider adding more powdered sugar to thicken it up while maintaining sweetness.
Can I make the cannoli squares in advance for a party?
Yes, you can prepare the squares in advance. Just be sure to keep them chilled until ready to serve to maintain their freshness and texture.
What if my crust breaks when cutting the squares?
If your crust breaks, it might be too dry. Ensure that you properly measure the ingredients and don't overbake. A gentle hand when cutting also helps maintain the squares' integrity.
Can I add nuts to the filling for extra crunch?
Absolutely! Chopped pistachios or almonds can add a lovely crunch and depth of flavor. Just ensure they are finely chopped to blend well into the filling.
What if my chocolate chips melt into the filling?
If the chocolate chips melt, it’s likely due to the filling being too warm when added. Allow the filling to cool slightly before incorporating the chips to maintain their shape.
Can I use flavored ricotta for a unique twist?
Yes! Using flavored ricotta can give your cannoli squares a unique twist. Options like lemon or coffee ricotta can enhance the flavor profile beautifully.
Conclusion
Classic cannoli squares are a delightful treat, merging the time-honored flavors of cannoli with ease of preparation. With their delicate chocolate crust and rich filling, these squares capture every essential element of this Italian dessert.
Whether it’s a family gathering or a simple evening at home, serving these squares is sure to bring smiles and satisfaction. Embrace the flavors of tradition and make this delicious recipe a staple in your dessert repertoire.
Recipe Card

Maple-Glazed Chicken with Roasted Sweet Potatoes
Ingredients
Method
- Preheat your oven to 400°F (200°C).
- In a small bowl, mix the maple syrup, garlic powder, salt, and pepper.
- Place the chicken thighs in a large baking dish and pour the glaze over them.
- Chop the sweet potatoes into uniform cubes and add them to the dish.
- Drizzle olive oil and sprinkle rosemary over the sweet potatoes, then toss everything together.
- Roast in the preheated oven for about 35–40 minutes.
- Check the internal temperature of the chicken; it should reach 165°F (75°C).
- Once cooked, allow the dish to rest for 5 minutes before serving.
Tried this recipe?
Let us know how it was!Notes
Additional serving suggestions: pair with a crisp salad, garlic bread, or roasted seasonal vegetables for balance.
For make-ahead, prep components separately and assemble just before heating to preserve texture.
Taste and adjust with acid (lemon/vinegar) and salt right at the end to wake up flavors.