Introduction
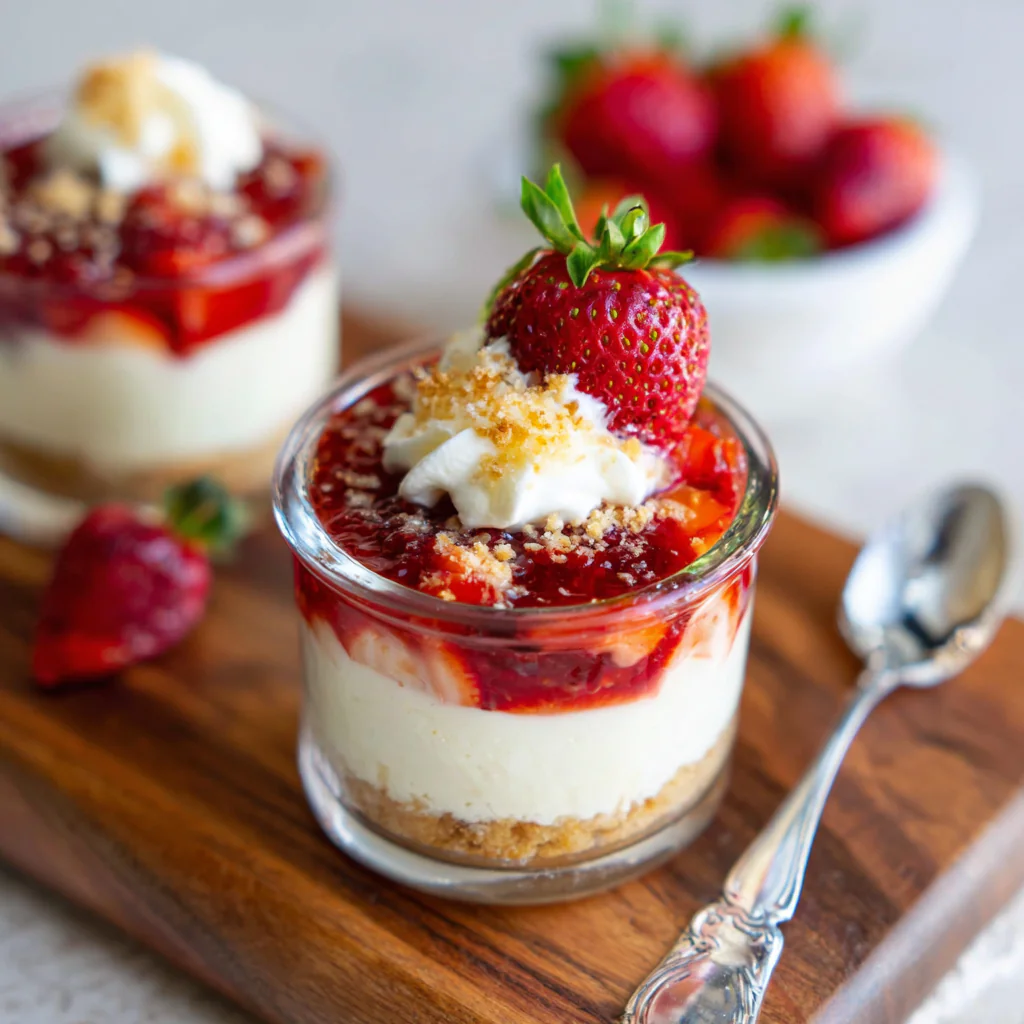
Strawberry Cheesecake Cups are the perfect no-bake dessert for anyone who loves the rich, creamy flavor of cheesecake but doesn’t want to turn on the oven. Each spoonful delivers layers of buttery graham cracker crust, smooth and velvety cheesecake filling, and bursts of juicy fresh strawberries. Whether you’re hosting a summer party, planning a romantic dinner, or simply craving something sweet and easy, these mini cheesecakes are guaranteed to impress.
What makes this recipe stand out is its simplicity. It takes just 20 minutes to prepare, requires no baking, and can be made ahead of time. The cups look elegant in small glasses or jars, making them ideal for entertaining guests or gifting. Every bite offers that classic cheesecake flavor in a portable, refreshing form.
Why You’ll Love Strawberry Cheesecake Cups
These Strawberry Cheesecake Cups aren’t just delicious—they’re practical and versatile. Here’s why you’ll love them:
- No baking required – Perfect for warm weather or busy days.
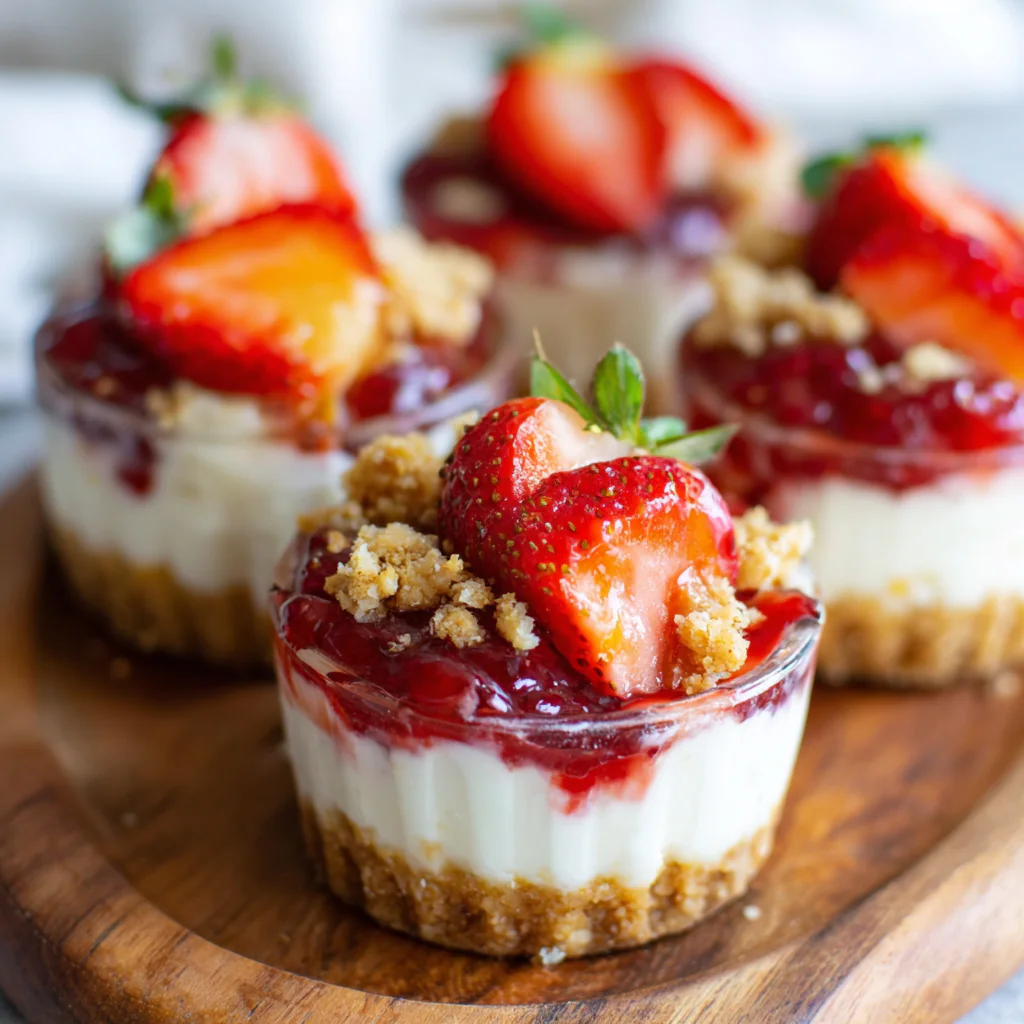
- Individual portions – Great for parties, picnics, or meal prep.
- Creamy texture – The whipped filling gives it a light, mousse-like consistency.
- Fresh fruit flavor – The natural sweetness of strawberries balances the richness of cream cheese.
- Quick and easy – With minimal ingredients, you can whip up this dessert in under half an hour.
This dessert offers all the indulgence of a traditional cheesecake with a fraction of the effort—ideal for both beginners and experienced bakers.
Ingredients with Quantities
Here’s everything you need to create these irresistible Strawberry Cheesecake Cups:
For the Crust:
- 1 cup graham cracker crumbs
- 2 tablespoons melted butter
- 2 tablespoons sugar
For the Cheesecake Filling:
- 1 (8 oz) package cream cheese, softened
- 1/3 cup powdered sugar
- 1 teaspoon vanilla extract
- 1 cup whipped topping (like Cool Whip), thawed
For the Strawberry Layer:
- 1 cup fresh strawberries, chopped
- Extra strawberries for topping (sliced or whole)
Nutrition & Serving Info:
- Prep Time: 20 minutes
- Cooking Time: 0 minutes
- Total Time: 1 hour 20 minutes (includes chilling)
- Kcal: Approximately 210 per cup
- Servings: 6 cups
Step-by-Step Directions and Preparation Method
Step 1: Prepare the Crust
In a small mixing bowl, combine graham cracker crumbs, melted butter, and sugar. Stir until the mixture resembles wet sand. The sugar helps the crumbs stick together while adding a hint of sweetness.
Spoon about 2 tablespoons of the mixture into the bottom of each small cup or jar. Press it down gently using the back of a spoon or your fingers to form a compact crust. This layer will provide the perfect buttery base for your creamy filling.
Tip: If you prefer a more solid crust, chill the cups for 10 minutes in the refrigerator before adding the filling.
Step 2: Make the Cheesecake Filling
In a medium bowl, beat the softened cream cheese using a hand mixer or stand mixer on medium speed. Add powdered sugar and vanilla extract, and continue beating until the mixture becomes smooth and creamy.
The cream cheese forms the heart of your dessert—it should be silky and lump-free for the best texture. The powdered sugar sweetens it without making it gritty, and the vanilla adds a gentle aroma.
Step 3: Fold in the Whipped Topping
Using a rubber spatula, gently fold the whipped topping into the cream cheese mixture. Do not beat—fold slowly to preserve the light, airy texture. The whipped topping transforms the dense cream cheese into a fluffy, mousse-like filling that melts in your mouth.
Step 4: Add the Fresh Strawberries
Chop the fresh strawberries into small, even pieces and gently fold them into the cheesecake mixture. This step adds freshness and a burst of fruity flavor to every bite. If you prefer a smoother texture, you can puree half of the strawberries before mixing them in.
Step 5: Assemble the Cheesecake Cups
Once your layers are ready, spoon or pipe the strawberry cheesecake filling evenly into each prepared cup over the graham cracker crust. You can use a piping bag or a ziplock bag with one corner snipped off for a neater presentation.
Smooth the tops with the back of a spoon and make sure the filling reaches all sides for an even layer. If you’re making these for guests, layering them in clear cups or jars will beautifully showcase the colors and textures.
Step 6: Chill the Cups
Place the filled cups in the refrigerator for at least 1 hour before serving. This chilling time allows the flavors to blend and the texture to firm up. The result is a creamy, refreshing dessert that holds its shape perfectly.
For best results, you can prepare them several hours ahead or even the night before your event.
Step 7: Garnish and Serve
Just before serving, top each cup with a slice or whole fresh strawberry. You can also add a mint leaf for an extra pop of color. If you’d like to make them look more festive, drizzle a little strawberry sauce or melted white chocolate on top.
These mini cheesecakes are best enjoyed chilled. The combination of buttery crumbs, creamy filling, and juicy strawberries makes every bite pure bliss.
Tips for Perfect Strawberry Cheesecake Cups
- Use room-temperature cream cheese – This ensures smooth blending and prevents lumps.
- Don’t overmix – Folding gently helps retain a light, creamy texture.
- Fresh strawberries are best – Frozen ones can make the filling watery.
- Customize your base – Try using crushed vanilla wafers or Oreos instead of graham crackers for a twist.
- Add layers – Alternate cream filling and strawberries for a parfait-style look.
- Storage – Store covered in the refrigerator for up to 3 days.
Flavor Variations to Try
You can easily modify this recipe for different flavor profiles and occasions:
- Chocolate Strawberry Cheesecake Cups: Add 2 tablespoons of cocoa powder to the crust and top with chocolate shavings.
- Lemon Cheesecake Cups: Add 1 tablespoon of lemon juice and zest to the filling for a tangy note.
- Mixed Berry Cups: Combine strawberries, blueberries, and raspberries for a colorful twist.
- Nutty Crunch Cups: Sprinkle crushed almonds or pecans on top for a crunchy texture.
- Strawberry Shortcake Style: Layer diced cake pieces between the cheesecake filling and strawberries.
How to Make Ahead and Store
These Strawberry Cheesecake Cups are ideal for make-ahead desserts. You can prepare and assemble them up to 24 hours before serving. Simply cover each cup with plastic wrap or store them in an airtight container in the refrigerator.
If you want to prepare components separately:
- Store the graham cracker crust mixture in an airtight container at room temperature for up to 3 days.
- Keep the cheesecake filling refrigerated (without strawberries) for up to 2 days.
- Add the fresh strawberries and assemble shortly before serving for the best texture.
Avoid freezing, as the creamy filling can lose its smoothness once thawed.
FAQs
1. Can I use frozen strawberries instead of fresh ones?
It’s best to use fresh strawberries for this recipe because frozen ones tend to release water, which can make the filling too soft and alter the texture. If using frozen berries, thaw and drain them well before folding them in.
2. Can I substitute whipped topping with homemade whipped cream?
Absolutely! Fresh whipped cream works perfectly. Whip 1 cup of heavy cream with 2 tablespoons of powdered sugar until soft peaks form, then fold it into the cream cheese mixture.
3. What kind of cups or jars should I use?
Small glass jars, dessert cups, or even disposable plastic cups work great. Aim for 4–6 oz size portions to keep them light and easy to serve.
4. How long do Strawberry Cheesecake Cups last?
These cups will stay fresh in the refrigerator for about 3 days. Always store them covered to prevent the filling from absorbing other fridge odors.
5. Can I make a larger version instead of individual cups?
Yes! You can layer the crust and filling in a small 8×8-inch dish and serve it like a no-bake cheesecake. Just cut it into squares when ready to serve.
6. Can I make this recipe sugar-free or low-fat?
Yes, you can easily adapt it:
- Use sugar-free graham crackers or sweetener instead of sugar.
- Replace cream cheese with low-fat or Greek yogurt cream cheese.
- Choose sugar-free whipped topping for fewer calories.
7. Why is my filling runny?
The most common reason is using overripe or frozen strawberries without draining them properly. Also, ensure the whipped topping isn’t over-mixed, which can cause it to lose its structure.
8. Can I add strawberry sauce or jam?
Yes! A spoonful of strawberry jam or sauce between the crust and filling adds an extra layer of flavor and makes it even more indulgent.
9. What’s the best way to decorate these cups for parties?
Try topping with chocolate curls, a dollop of whipped cream, edible glitter, or a sprig of mint. You can also serve them with small dessert spoons tied with ribbon for a charming presentation.
10. Are these suitable for kids?
Definitely! They’re creamy, lightly sweet, and portioned perfectly for kids. Plus, the no-bake method makes them safe and fun to prepare together as a family.
Nutritional Information (Per Cup)
- Calories: 210 kcal
- Protein: 3 g
- Fat: 14 g
- Carbohydrates: 18 g
- Sugar: 12 g
- Fiber: 1 g
- Calcium: 6% DV
This dessert offers a balanced combination of richness and freshness. While indulgent, it’s much lighter than a traditional cheesecake.
Conclusion
Strawberry Cheesecake Cups are a delightful, quick, and easy dessert that combines creamy cheesecake, crunchy crust, and juicy strawberries into a refreshing treat. Their no-bake nature makes them ideal for any occasion—from summer barbecues and picnics to romantic dinners and festive celebrations.
Each cup delivers the satisfaction of cheesecake in a convenient, mess-free serving. Whether you’re an experienced baker or just starting out, this recipe ensures delicious results every time. Try them once, and they’ll surely become one of your go-to desserts for family gatherings or special moments.
So grab your mixing bowl, fresh strawberries, and a few small cups—your perfect mini cheesecakes are just minutes away from becoming everyone’s favorite sweet indulgence!
Print
No-Bake Strawberry Cheesecake Cups – Easy Creamy Dessert in 20 Minutes
Ingredients
-
1 cup graham cracker crumbs
-
2 tbsp melted butter
-
2 tbsp sugar
-
1 (8 oz) package cream cheese, softened
-
1/3 cup powdered sugar
-
1 tsp vanilla extract
-
1 cup whipped topping (like Cool Whip), thawed
-
1 cup fresh strawberries, chopped
-
Extra strawberries for topping (sliced or whole)
Instructions
-
In a small bowl, mix graham cracker crumbs, melted butter, and sugar until the texture feels like wet sand.
-
Spoon about 2 tablespoons of the crumb mixture into the bottom of each small cup or jar and press down gently to form a crust.
-
In a medium bowl, beat softened cream cheese, powdered sugar, and vanilla extract until smooth and creamy.
-
Fold in the whipped topping until fully blended.
-
Gently fold in the chopped strawberries.
-
Spoon or pipe the cheesecake filling over the crust in each cup.
-
Chill in the refrigerator for at least 1 hour before serving.
-
Top with extra strawberries before serving for a fresh finish!