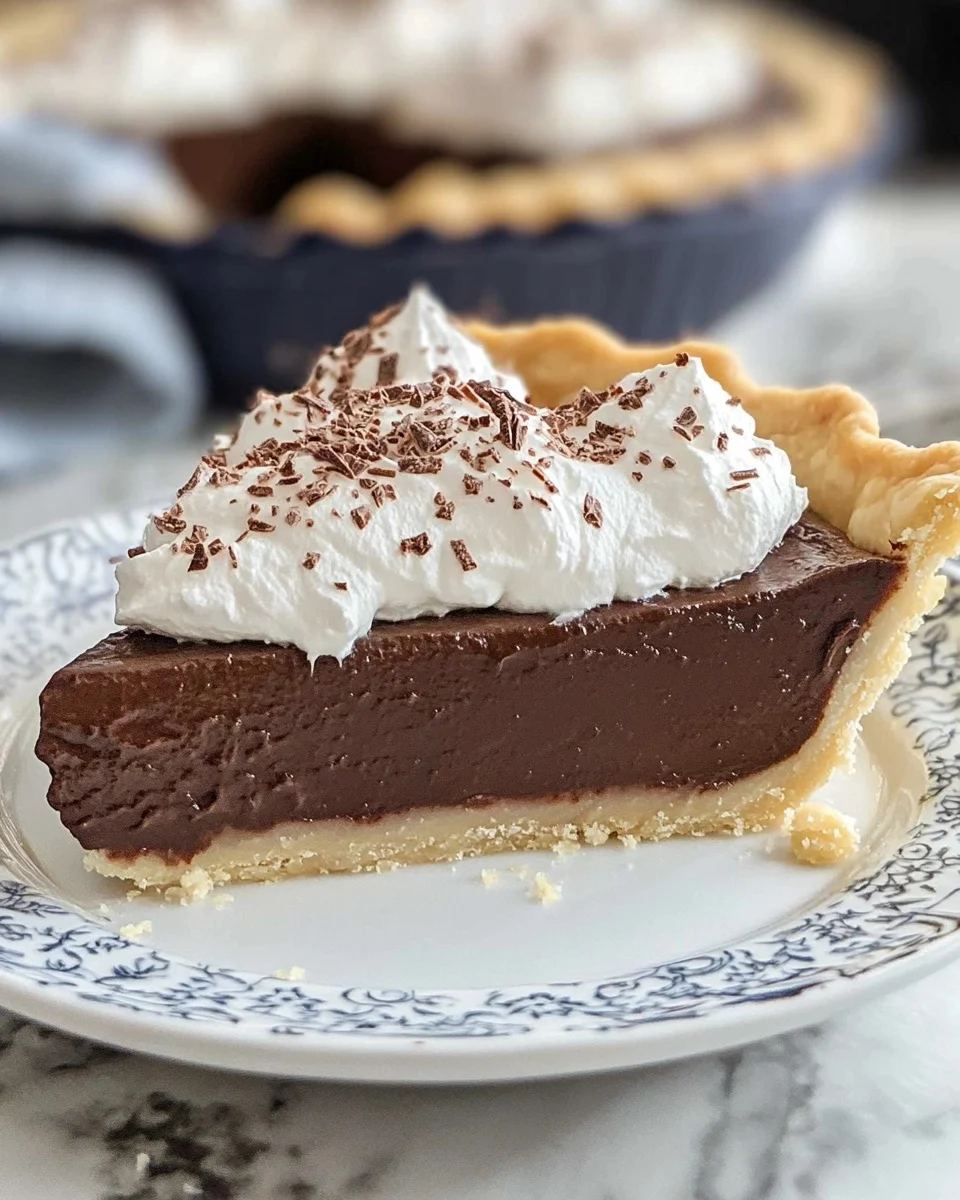
There’s just something undeniably comforting about a slice of Old-Fashioned Chocolate Pie. Maybe it’s the smooth, creamy texture of the rich chocolate filling or the flakiness of the buttery crust. Maybe it’s the nostalgia it carries — a recipe passed down from grandparents, made from scratch, and served warm with a dollop of whipped cream. Whatever the reason, one thing’s certain: Old-Fashioned Chocolate Pie has earned its place as a beloved dessert across generations.
In this comprehensive and SEO-optimized guide, we’re diving deep into everything there is to know about Old-Fashioned Chocolate Pie — from ingredients and preparation to customization tips, storage solutions, and expert FAQs. Whether you’re a seasoned baker or just discovering this Southern classic for the first time, this article will provide original, detailed, and conversational insights to help you master the recipe and understand why this pie continues to win hearts. This is not your average recipe post — it’s a 5,000-word celebration of the ultimate chocolate dessert.
Why We Love Old-Fashioned Chocolate Pie
Before we roll up our sleeves and start whisking, let’s talk about why Old-Fashioned Chocolate Pie is so special:
- Timeless flavor: Deep, rich chocolate that’s neither too sweet nor too bitter.
- Simple ingredients: Everything you need is likely already in your kitchen.
- Versatile: Perfect for holidays, potlucks, birthdays, or a comforting weeknight dessert.
- Family tradition: A recipe that brings back warm memories and creates new ones.
- Perfect texture: Creamy filling meets a crisp crust and fluffy whipped topping.
This pie isn’t just food — it’s comfort on a plate, and we’re about to walk you through how to make it absolutely unforgettable.
Ingredients for Old-Fashioned Chocolate Pie
Let’s break down the ingredients and talk about why each one matters in crafting the perfect Old-Fashioned Chocolate Pie.
For the Pie Crust
- 1 (9-inch) pie crust – You can use store-bought for convenience, but if you want to go the extra mile, make a homemade butter pie crust for a richer, flakier base.
For the Chocolate Filling
- 1 1/2 cups granulated sugar – Provides sweetness and helps give the filling body.
- 1/4 cup unsweetened cocoa powder – The foundation of the chocolate flavor. Use high-quality cocoa for the best taste.
- 1/4 cup all-purpose flour – Thickens the custard to the perfect creamy consistency.
- 1/4 teaspoon salt – Enhances the chocolate and balances sweetness.
- 2 3/4 cups whole milk – Adds creaminess. Whole milk is ideal for richness.
- 3 large egg yolks (beaten) – Contribute to the custard’s smooth, velvety texture.
- 2 tablespoons unsalted butter – Adds flavor and richness.
- 1 teaspoon vanilla extract – A subtle background note that enhances the chocolate.
For the Whipped Cream Topping
- 1 cup heavy cream – For a light, airy topping.
- 2 tablespoons powdered sugar – Adds a touch of sweetness.
- 1/2 teaspoon vanilla extract – Ties in with the vanilla in the filling.
- Shaved chocolate or curls (optional) – For presentation and extra indulgence.

Step-by-Step Instructions for the Perfect Old-Fashioned Chocolate Pie
Step 1: Prepare the Crust
If using a store-bought crust, bake according to package instructions — typically at 350°F (175°C) for 10–12 minutes until lightly golden. If making a homemade crust, blind bake it with pie weights for an evenly crisp finish. Let the crust cool completely before filling.
Step 2: Make the Chocolate Filling
In a medium saucepan, whisk together sugar, cocoa powder, flour, and salt. Gradually pour in the milk, whisking continuously to avoid lumps. Place the pan over medium heat and cook, stirring constantly, until the mixture begins to bubble and thicken — this should take around 8–10 minutes.
Step 3: Temper the Egg Yolks
In a small bowl, whisk the egg yolks. Slowly add a bit of the hot chocolate mixture to the eggs, whisking constantly. This gentle process is called tempering and prevents the yolks from scrambling. Once tempered, slowly pour the egg mixture back into the saucepan and continue cooking for another 2–3 minutes, stirring constantly until the filling is thick and luxurious.
Step 4: Add Butter and Vanilla
Remove the pan from heat and stir in the butter and vanilla extract until fully incorporated. The butter adds silkiness, while the vanilla brings out the richness of the chocolate.
Step 5: Fill the Crust and Chill
Pour the warm chocolate filling into the cooled pie crust. Smooth the top with a spatula. Cover with plastic wrap (pressing it gently against the surface to prevent a skin from forming), and refrigerate for at least 4 hours or overnight for best results.
Step 6: Make the Whipped Cream
In a chilled mixing bowl, beat heavy cream, powdered sugar, and vanilla until soft peaks form. Spread or pipe the whipped cream over the chilled pie.
Step 7: Garnish and Serve
Top with shaved chocolate or curls if desired. Slice with a warm knife for clean cuts and serve chilled.
Pro Tips for the Best Old-Fashioned Chocolate Pie
- Use high-quality cocoa: This affects the entire flavor profile.
- Whisk constantly: Avoid lumps and prevent burning.
- Cool the pie completely: Patience pays off in a firm, sliceable filling.
- Serve chilled: It brings out the creamy texture and deep chocolate notes.
Storage, Freezing, and Make-Ahead Advice
One of the best parts about Old-Fashioned Chocolate Pie is how well it holds up for later enjoyment:
- Refrigerator: Cover and store for up to 5 days. The flavor deepens as it sits!
- Freezing: Freeze the pie (without whipped topping) for up to 2 months. Thaw overnight in the fridge and top before serving.
- Make-ahead: The filling can be made a day in advance. Just reheat gently and pour into the crust.
Creative Variations on Old-Fashioned Chocolate Pie
Want to take things up a notch? Try one of these fun twists on the classic:
- Spicy Mexican chocolate pie: Add cinnamon and a pinch of cayenne.
- Mocha pie: Stir in instant espresso powder for a coffee-kissed version.
- Peanut butter chocolate pie: Swirl in a few tablespoons of creamy peanut butter before chilling.
- Salted caramel topping: Drizzle with salted caramel for an indulgent finish.
- Graham cracker crust: Swap the pie crust for graham crackers for a sweet crunch.
Serving Ideas and Pairings
Make your Old-Fashioned Chocolate Pie a showstopper with these pairings:
- Fresh berries: Strawberries and raspberries balance the richness.
- Coffee or espresso: Complements the deep chocolate flavor.
- Vanilla ice cream: Classic combo with contrast in temperatures.
- Mint garnish: Adds a refreshing pop of color and flavor.
Frequently Asked Questions (FAQs)
Q: Can I use 2% or non-dairy milk instead of whole milk?
A: Yes, but keep in mind the texture may be slightly thinner. For non-dairy versions, oat or coconut milk works best.
Q: Why do I have to temper the egg yolks?
A: To prevent them from scrambling when added to the hot mixture. It ensures a silky smooth filling.
Q: How do I prevent my pie from being runny?
A: Make sure to cook the filling long enough to thicken properly and chill for at least 4 hours.
Q: Can I make this pie without whipped cream?
A: Of course! It’s delicious on its own or with a dusting of cocoa powder or powdered sugar.
Q: Can I use cornstarch instead of flour?
A: Yes. Substitute 2 tablespoons of cornstarch for the 1/4 cup of flour for a smoother filling.
Q: Is this pie better served cold or room temperature?
A: Chilled is traditional, but some enjoy it slightly warmer — just not hot, or the filling will be too loose.
Q: Can I make this gluten-free?
A: Absolutely! Use a gluten-free pie crust and substitute a gluten-free flour blend or cornstarch.
Conclusion
If you’ve been searching for a dessert that’s both nostalgic and truly satisfying, look no further than Old-Fashioned Chocolate Pie. With its luscious, rich chocolate filling, flaky crust, and fluffy whipped cream, this pie hits every note of indulgence and comfort. Whether you’re baking for a special occasion or simply craving something sweet and soothing, this pie delivers every single time.
Its simplicity is what makes it shine. There’s no need for complicated steps or hard-to-find ingredients — just honest, homemade goodness that speaks to the soul. Share it with loved ones, serve it at holiday gatherings, or enjoy a quiet slice by yourself. One bite and you’ll understand why Old-Fashioned Chocolate Pie continues to be a dessert icon.
So go ahead — grab a whisk, preheat that oven, and let the sweet aroma of Old-Fashioned Chocolate Pie fill your kitchen. Trust us, your taste buds will thank you.
Print
Old-Fashioned Chocolate Pie Recipe – Rich, Creamy & Homemade Classic Dessert
Ingredients
For the Pie Crust:
1 (9-inch) pie crust (store-bought or homemade)
For the Chocolate Filling:
1 1/2 cups granulated sugar
1/4 cup unsweetened cocoa powder
1/4 cup all-purpose flour
1/4 teaspoon salt
2 3/4 cups whole milk
3 large egg yolks (beaten)
2 tablespoons unsalted butter
1 teaspoon vanilla extract
For the Topping:
1 cup heavy cream
2 tablespoons powdered sugar
1/2 teaspoon vanilla extract
Shaved chocolate or chocolate curls (optional)
Instructions
-
Prepare the Crust: If using a store-bought pie crust, follow the package instructions to bake it (usually blind-bake it at 350°F for about 10–12 minutes). If making homemade, bake the pie crust and let it cool completely before filling.
-
Make the Chocolate Filling: In a medium saucepan, whisk together sugar, cocoa powder, flour, and salt. Gradually add milk, whisking until smooth. Cook the mixture over medium heat, stirring constantly, until it starts to bubble and thickens (about 8–10 minutes).
-
Temper the Egg Yolks: In a small bowl, whisk the egg yolks. Slowly pour a little of the hot chocolate mixture into the egg yolks, whisking constantly to temper the eggs (to avoid curdling). Once tempered, slowly whisk the egg yolks back into the saucepan with the rest of the chocolate mixture.
-
Cook the Filling: Continue to cook the filling for another 2–3 minutes, stirring constantly, until it becomes thick and smooth. Remove from heat and stir in butter and vanilla extract until fully combined.
-
Fill the Pie Crust: Pour the chocolate filling into the prepared pie crust. Smooth the top with a spatula and refrigerate for at least 4 hours or overnight to set.
-
Make the Whipped Cream Topping: In a mixing bowl, beat heavy cream, powdered sugar, and vanilla extract until soft peaks form. Spread or pipe the whipped cream on top of the chilled pie.
-
Serve: Garnish with chocolate shavings or curls if desired. Slice and enjoy!

