Introduction
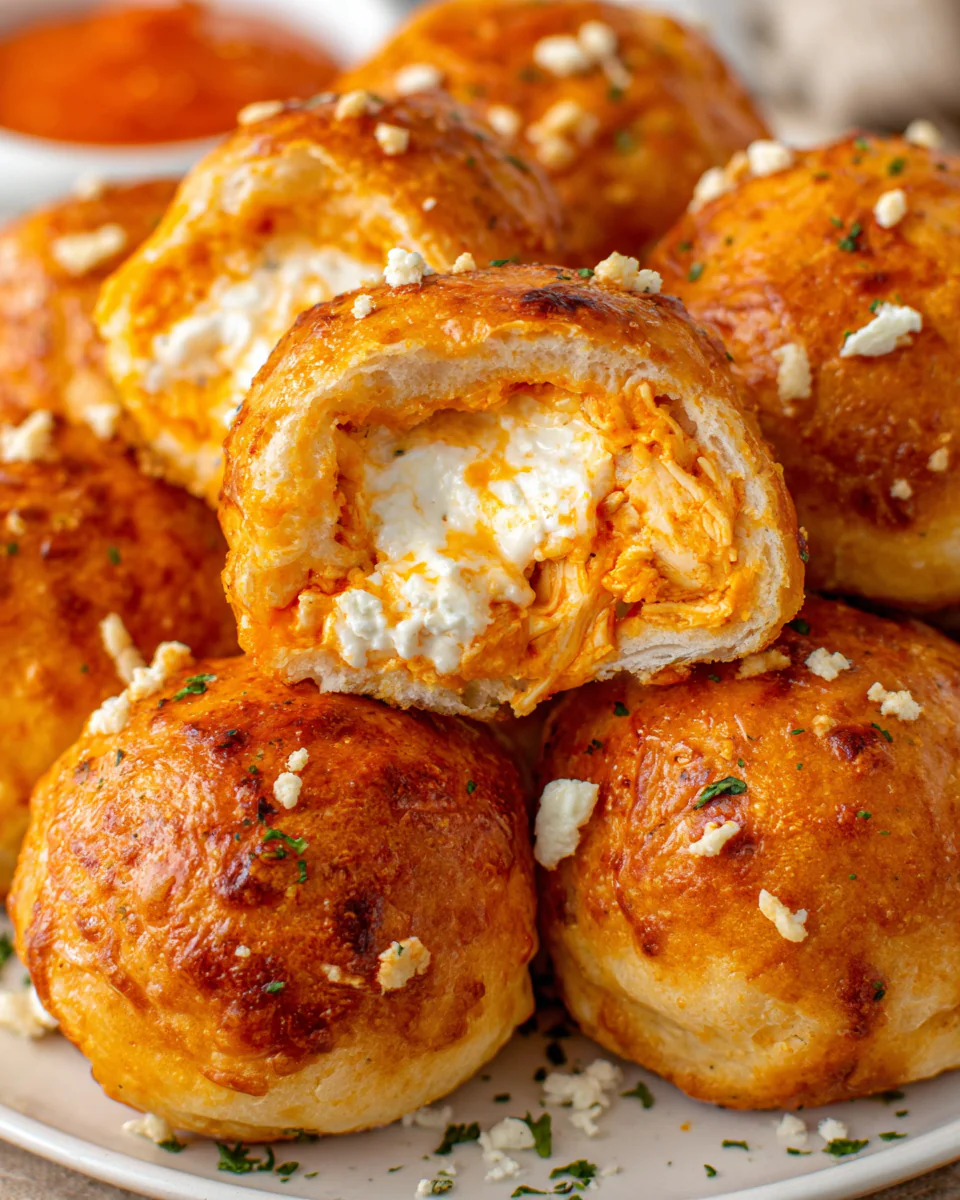
If you’re looking for a dish that combines spicy, tangy flavors with a cheesy indulgence, Buffalo Chicken Bombs are the answer. These delightful bites pack a punch with their Buffalo chicken filling and a creamy ranch center. Perfect for game nights or gatherings, they will undoubtedly impress your family and friends.
What makes these bombs truly special is not just the flavorful chicken but also the surprise ranch sauce at the core. Every bite offers a satisfying mix of textures and tastes that would make anyone a fan. With the perfect blend of heat and creaminess, these bombs could easily become your new favorite appetizer.
Ingredients
- 2 cups cooked shredded chicken
The main protein for this dish, shredded chicken adds a hearty base, allowing the spicy Buffalo sauce to coat and infuse each bite with flavor. It’s essential to use cooked chicken, which can be from a rotisserie or leftovers. - 1/2 cup Buffalo sauce
Buffalo sauce brings the signature spicy and tangy flavor profile that this dish is built upon. Adjust the amount according to your heat preference and enjoy its kicks! - 1/2 cup ranch dressing
The ranch dressing provides a creamy contrast to the heat of the Buffalo sauce, creating a balanced flavor sensation. It also serves as the delicious surprise filling inside each bomb. - 1 cup shredded cheddar cheese
Cheddar cheese melts beautifully and adds a savory richness that complements the chicken. This gooey texture is essential for the bombs, enhancing overall indulgence. - 1 package refrigerated biscuit dough (8 count)
The biscuit dough acts as the casing for the filling and becomes golden and crispy during baking. Using refrigerated dough makes this dish easy to prepare without compromising on taste. - 1 tablespoon olive oil
Olive oil is used to brush the tops of the bombs before baking. This not only helps achieve a beautiful golden color but also adds a hint of richness. - Cooking spray
Essential for preventing sticking, a light spray ensures that the bombs release easily from the baking tray, leading to a successful presentation. - Chopped green onions for garnish (optional)
Fresh green onions add a pop of color and a mild onion flavor, enhancing both presentation and taste. They are a delightful finishing touch.
Directions & Preparation
Step 1: Preheat your oven to 375°F (190°C).
Preheating the oven is crucial for achieving that perfect golden crust on the outside of your Buffalo Chicken Bombs. Starting with a hot oven allows the dough to puff up and bake quickly, sealing in the flavors and moisture of the filling.
Step 2: In a large bowl, combine the cooked shredded chicken and Buffalo sauce. Mix well to coat the chicken evenly.
Mixing the chicken with Buffalo sauce at this stage is important to ensure every piece is fully infused with flavor. This step also helps in achieving the right balance of spice, allowing you to taste and adjust the heat to your liking before putting the filling into the biscuit dough.
Step 3: Stir in the ranch dressing and shredded cheddar cheese until fully blended.
Adding ranch dressing and cheese not only contributes to the filling's creaminess but also binds the chicken pieces together. This step is crucial; leaving the mixture too dry can result in bland bites, while too much moisture can cause leaks during baking.
Step 4: Open the package of biscuit dough and separate the dough into individual biscuits.
Separating the biscuits is a fundamental step; each biscuit serves as a vessel for the flavorful filling. Make sure to handle the dough gently to avoid tearing, which would make it difficult to encapsulate the filling.
Step 5: Flatten each biscuit into a small round disc on a floured surface.
Flattening each biscuit creates a larger surface area for your filling. This ensures that the bombs can hold enough filling without bursting during baking. Aim for about 4 inches in diameter for best results.
Step 6: Spoon about 2 tablespoons of the chicken mixture onto the center of each disc.
Placing the filling becomes easier if the dough is adequately flattened. This step is about precision; too much filling might make sealing tricky, while too little can lead to disappointment in every bite.
Step 7: Carefully fold the edges of the biscuit over the filling and pinch to seal.
Sealing the biscuit properly ensures that the filling stays inside while baking. It’s important to pinch firmly, as any loose ends might lead to leaks, causing a messy outcome.
Step 8: Place the bombs seam-side down on a greased baking sheet.
Positioning the bombs seam-side down helps keep them closed during baking and promotes even cooking. A greased surface prevents sticking and ensures you can easily transfer the bombs post-baking.
Step 9: Brush the tops with olive oil and sprinkle with some additional cheddar cheese, if desired.
Brushing with olive oil helps achieve a rich, golden color while baking, enhancing the visual appeal. Adding more cheese on top gives an extra cheesy flavor and an appealing crust when cooked.
Step 10: Bake for 15-20 minutes, or until golden brown.
This final baking step helps the bombs develop a crispy exterior and ensures the filling is heated thoroughly. Keep an eye on them towards the end; every oven is different, and you want them beautifully golden without burning.
Step 11: Remove from the oven and let cool for a few minutes before serving.
Allowing the bombs to rest for a few minutes prevents burns from the hot filling and allows the flavors to settle. Serve with additional ranch dressing and enjoy your impressive creation!

Achieving the Perfect Spice Level
Finding the ideal spice level for your Buffalo Chicken Bombs is crucial to cater to different palates. If you prefer milder flavors, consider using a mild Buffalo sauce or combining it with some ranch dressing to temper the heat. For those who love a bolder flavor, feel free to kick it up with extra hot sauce or even add diced jalapeños for added crunch and heat!
Choosing the Right Biscuit Dough
The type of biscuit dough you choose can significantly impact the final product. While classic refrigerated biscuit dough works wonderfully, you can experiment with flaky pastry or even homemade dough for a unique twist. Just remember, the dough should be pliable enough to encase the filling without tearing— this is key to a successful Buffalo Chicken Bomb!
Serving Suggestions for Buffalo Chicken Bombs
These delicious bombs are versatile and pair wonderfully with various sides. Serve them with a fresh salad to balance the richness, or alongside classic celery sticks and carrot sticks to add crunch. For dipping, ranch dressing or even blue cheese dressing are perfect accompaniments that complement the spicy filling beautifully.
FAQs
What can I do if my filling is too thick?
If your filling appears too thick, simply add a bit more ranch dressing or Buffalo sauce to loosen it. This not only helps with mixing but also adds extra flavor to the bombs.
Can I make these bombs spicier?
Absolutely! You can incorporate more Buffalo sauce into the filling or even add some diced fresh jalapeños for a flavorful kick. Adjust to match your spice tolerance.
What if my dough tears while shaping?
If the dough tears, don’t panic. You can either gently patch it with another piece of dough or roll it back together and reshape it. Just be mindful to ensure your filling stays sealed inside.
Can I substitute the cheddar cheese?
Yes, you can substitute cheddar cheese with other melting cheeses like Monterey Jack or pepper jack for added flavor. Just ensure the cheese you choose melts well for the best results.
Can I prepare the filling in advance?
Certainly! You can prepare the chicken filling a day ahead and store it in the fridge. Just make sure to assemble the bombs shortly before baking for a fresh and warm treat.
What should I do if my bombs are overcooked?
If your Buffalo Chicken Bombs are overcooked, try serving them with extra ranch dressing to add moisture. You can also serve them with a spicy dipping sauce to mask the dryness.
Conclusion
Buffalo Chicken Bombs with a ranch-stuffed center are not just an appetizer; they are an experience. The combination of flavors and textures makes them a crowd-pleaser in any setting, from casual get-togethers to game day parties.
With a bit of practice, you'll master making these delicious bites that are bound to impress anyone who tries them. So gather your ingredients and get ready to experience the perfect blend of Buffalo chicken flavor wrapped in a warm, cheesy embrace.
Recipe Card

Deliciously Easy Meatloaf Cups for Busy Cooks
Ingredients
Method
- Preheat your oven to 375°F (190°C).
- In a large bowl, mix together the ground beef, breadcrumbs, ketchup, egg, onion, garlic powder, salt, and black pepper until fully combined.
- Grease a muffin tin with non-stick spray or oil.
- Scoop the meat mixture into the muffin tin cups, filling each one about 3/4 of the way full.
- If using cheese, sprinkle a small amount on top of each meatloaf cup before baking.
- Bake the meatloaf cups in the preheated oven for 20-25 minutes, or until they reach an internal temperature of 160°F (70°C).
- Let the meatloaf cups cool for a few minutes before carefully removing them from the muffin tin.
- Garnish with chopped parsley if desired and serve warm.
Tried this recipe?
Let us know how it was!Notes
Additional serving suggestions: pair with a crisp salad, garlic bread, or roasted seasonal vegetables for balance.
For make-ahead, prep components separately and assemble just before heating to preserve texture.
Taste and adjust with acid (lemon/vinegar) and salt right at the end to wake up flavors.