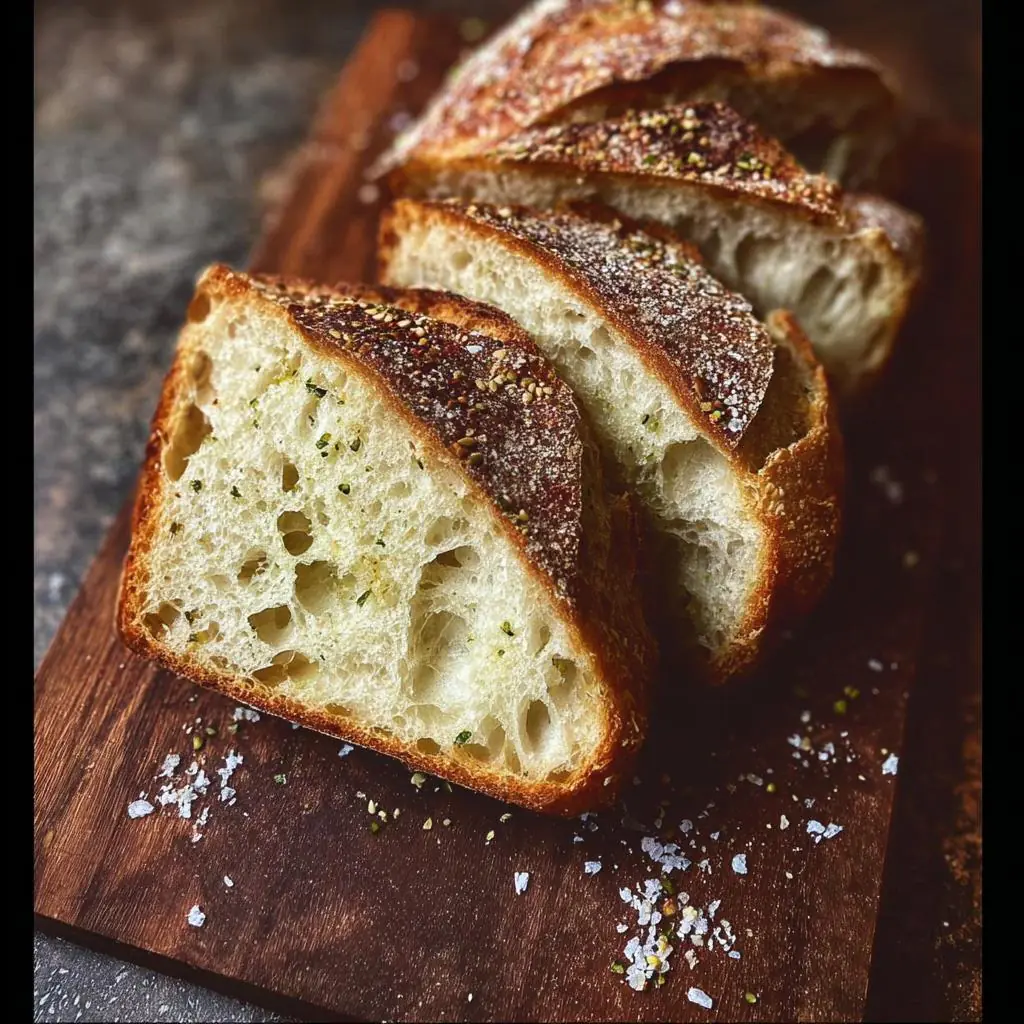
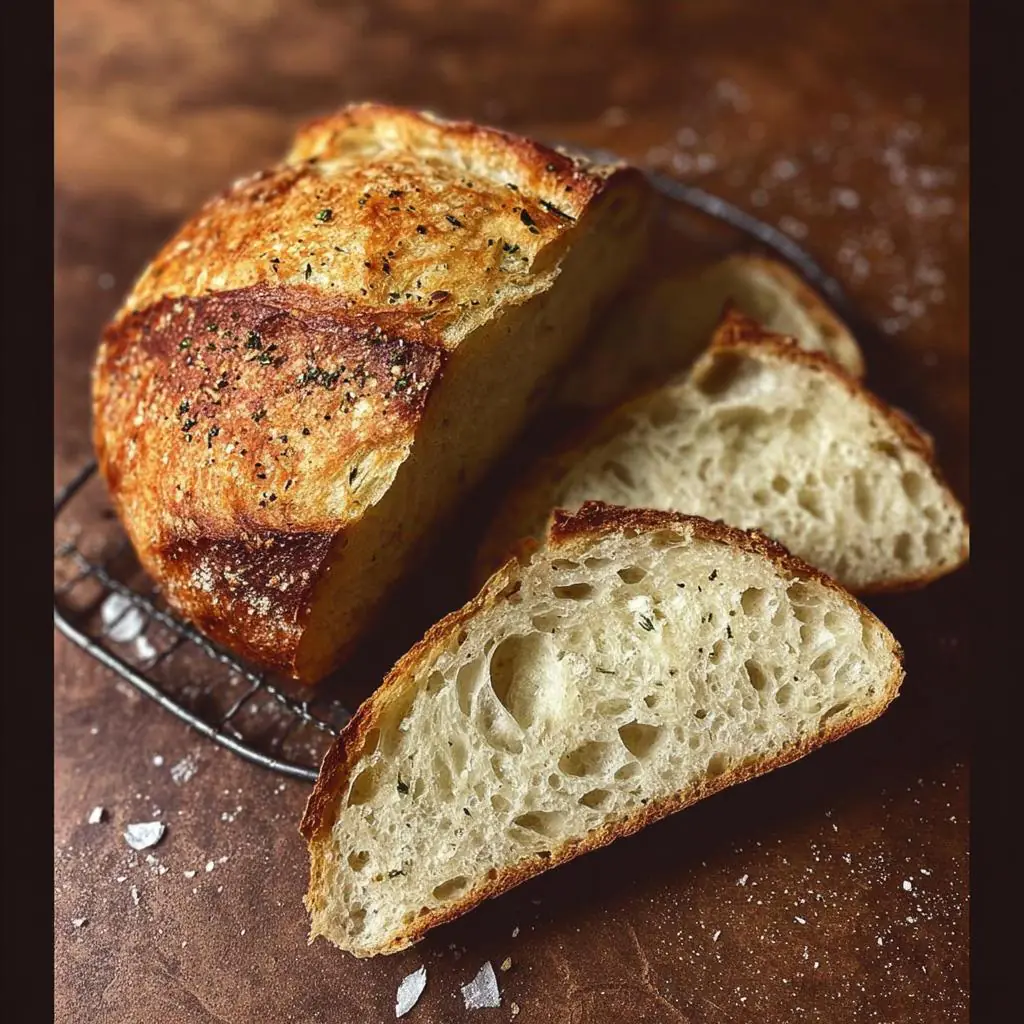
A crusty, tangy sourdough loaf rolled in a crunchy, aromatic blend of toasted nuts and Egyptian spices—perfect for dipping or devouring straight from the cooling rack.
📋 In This Article
Introduction
There is a specific kind of magic that happens when you combine the slow, tangy fermentation of sourdough with the aggressive, nutty crunch of Dukkah. Dukkah Sourdough Bread isn’t just a vehicle for butter; it is a texture study in contrasts. You get the shatteringly crisp crust, loaded with toasted hazelnuts, coriander, and sesame, giving way to a soft, airy, open crumb that tastes faintly of acid and wheat.
I’ve spent years tweaking sourdough formulas, and this one stands out because it forces you to think about surface area. The dukkah coating doesn’t just sit there—it interacts with the steam in the oven, toasting deeper as the bread bakes. It’s an artisan bread that feels rustic but tastes incredibly complex. If you’ve mastered a basic white loaf, this is your next step. It’s the kind of bread that disappears at dinner parties before the main course even hits the table.
Why You’ll Love This Recipe
This isn’t your standard sandwich loaf. The unique flavor profile comes from the Egyptian spice blend, which introduces savory, earthy notes that contrast beautifully with the natural sweetness of the flour.
- Texture Overload: The combination of a deeply flavored crust and a tender, airy crumb offers a sensory experience that store-bought bread simply cannot replicate.
- Versatility: Slice it thick for gourmet sandwiches, serve it alongside a bowl of soup, or tear it apart for a casual appetizer with olive oil.
- Impressive Results: This recipe teaches you to manage oven spring and dough handling, skills that translate to every other bread you bake.
- Customizable: Once you understand the base, you can swap the nuts and spices to fit your pantry.
What is Dukkah?
Before we bake, we need to talk about the star: Dukkah. This is a traditional Egyptian spice blend that acts as a dip, a crust, or a seasoning. At its core, it is a mixture of roasted hazelnuts or almonds, sesame seeds, coriander, and cumin, often punctuated by dried mint or pepper.
The word itself translates to “to pound” or “to crush,” which tells you everything you need to know about the texture. It shouldn’t be a fine powder; it needs to be coarse and gritty. When baked onto Dukkah Sourdough Bread, the nuts toast further (hello, Maillard reaction), the seeds become fragrant, and the spices bloom in the heat. It turns a simple bread into something that feels like a complete meal.
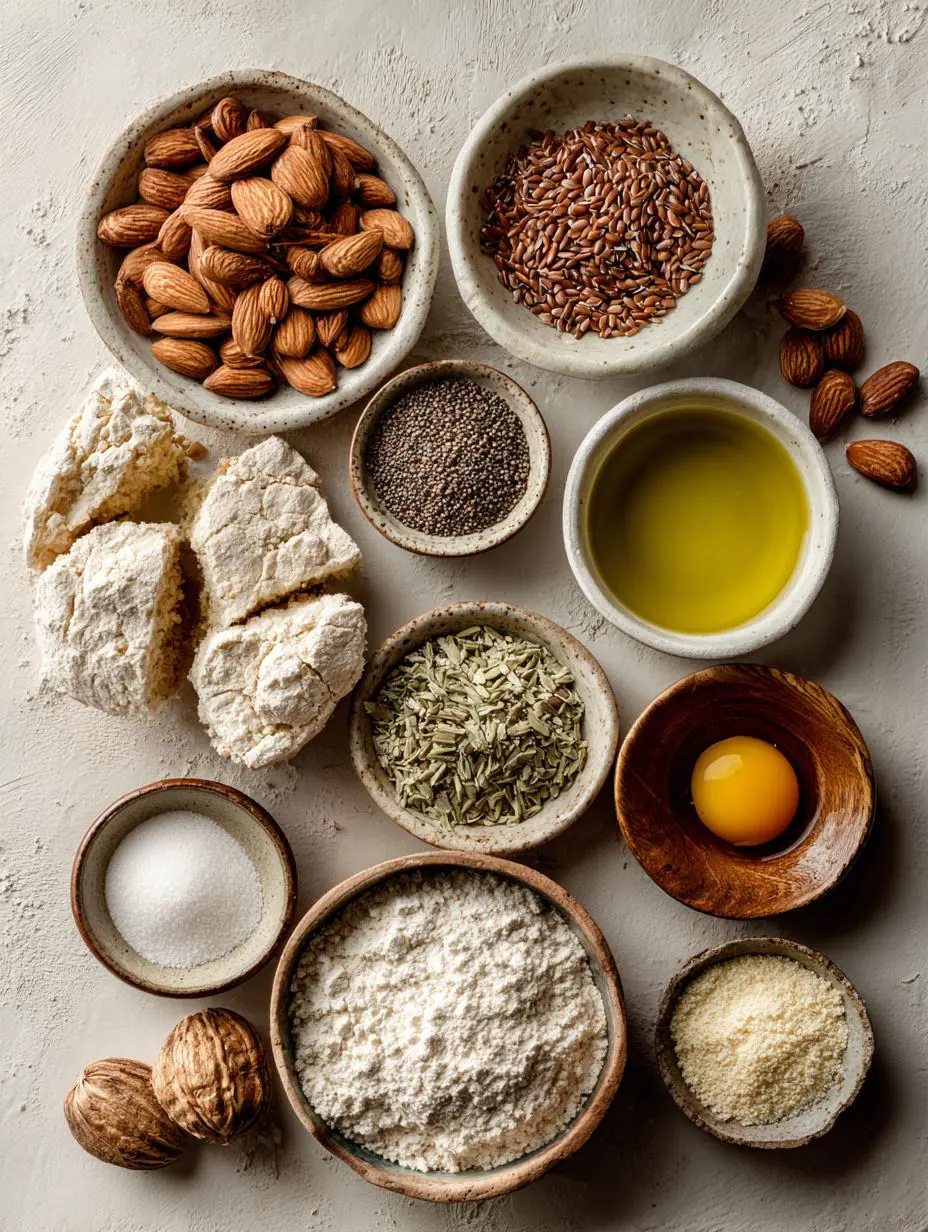
Ingredients
For the Dukkah
- ½ cup whole almonds, lightly toasted (hazelnuts work too, but remove the skins)
- 3 tablespoons white sesame seeds, toasted until golden
- 2 tablespoons coriander seeds, toasted to release oils
- 2 tablespoons pistachios, roasted for a green pop of color
- 1 tablespoon cumin seeds, toasted
- ½ tablespoon dried mint, for a fresh herbal note
- Pinch of red pepper flakes (optional), for heat
For the Sourdough Bread
- 50 g active sourdough starter (100% hydration, bubbly and float-tested)
- 380 g warm filtered water (approx. 80°F/27°C)
- 500 g strong bread flour (high protein is key for structure)
- 9 g fine sea salt
Equipment
You don’t need a professional bakery setup, but a few tools make the process significantly easier. A kitchen scale is non-negotiable; volumetric measurements are too inconsistent for the hydration levels in this dough. You’ll also need a 6-quart Dutch oven—it traps steam, mimicking a professional deck oven to create that crackling crust. A banneton basket helps the loaf hold its shape during the final proof, and a lame or sharp razor is essential for scoring. Don’t forget a dough scraper for handling the sticky dough without tearing it.
Step-by-Step Instructions
1. Prepare the Dukkah
Toast your ingredients separately. Nuts and seeds have different fat contents and sizes, so tossing them in one pan guarantees some will burn while others remain raw. Toast the almonds and pistachios until fragrant, then the sesame seeds, and finally the coriander and cumin seeds. Let them cool completely—grinding warm spices releases oils that can turn the paste into a clump. Pulse them in a food processor or crush with a mortar and pestle until you have a coarse, sandy texture. Stir in the dried mint and red pepper flakes.
2. Mix the Dough (Autolyse)
In a large bowl, combine the active sourdough starter and warm filtered water. Break up the starter with your hands until it dissolves. Add the bread flour and mix by hand until no dry flour remains. Cover and let it rest for 30 minutes. This phase, called the autolyse, allows the flour to hydrate fully and the gluten strands to begin forming without mechanical mixing. It makes the dough more extensible and easier to fold later.
3. Add Salt
Sprinkle the fine sea salt over the rested dough. Add a tiny splash of water (about 10g) to help dissolve it. Squeeze the dough through your fingers to incorporate the salt. It will feel tight at first, but as you mix, the dough will smooth out.
4. Bulk Fermentation (Stretch & Folds)
Over the next 2-3 hours, perform a set of stretch and folds every 30 minutes. Grab one side of the dough, pull it up high until you feel resistance, and fold it over the center. Rotate the bowl and repeat four times. This action organizes the gluten network, trapping the gas produced by fermentation. You’ll notice the dough gaining strength and becoming puffier with each set. After the folds, let the dough rest undisturbed until it has increased in volume by about 50%. Look for bubbles on the surface and a jiggly texture.
5. Shaping the Dough
Turn the dough out onto a lightly floured surface. Gently pre-shape it into a round, being careful not to degas it too much—you want to keep those fermentation bubbles. Let it rest for 20 minutes. For the final shape, flip the dough over and fold the edges toward the center, creating surface tension on the top. Flip it over and use your hands to drag the dough against the counter, tightening the skin into a smooth ball.
6. Add Dukkah Coating
Lightly mist the surface of your shaped loaf with water. Don’t soak it; just a fine spray. Pour a generous layer of your prepared dukkah onto a plate or tray. Gently roll the damp dough in the spice blend, pressing lightly to ensure the nuts and seeds adhere. The water acts as the glue.
7. Cold Proof
Place the dough, seam-side up, into a floured banneton basket. Cover it with a plastic bag or shower cap to prevent drying. Refrigerate it overnight, or for at least 8 hours. This cold proof slows fermentation, allowing the bacteria to produce more acetic acid (that tangy flavor) and making the dough firm and easy to score.
8. Baking in Dutch Oven
Preheat your oven to 450°F (232°C) with the Dutch oven inside. It needs a full 45-60 minutes to heat up; a cold pot won’t give you the spring you need. Carefully invert the cold dough onto a piece of parchment paper. Score the top with a lame—a simple cross or slash works best to direct the expansion. Use the parchment to lower the dough into the hot pot. Cover with the lid and bake for 20 minutes. The lid traps steam, keeping the crust soft so the bread can expand rapidly.
9. Finish Baking
Remove the lid. The bread should have already “sprung” up. Continue baking uncovered for another 25-30 minutes until the crust is a deep, golden brown. Watch the dukkah closely; if the nuts are darkening too quickly, you can tent the loaf with foil for the last 10 minutes. The internal temperature should reach 205°F (96°C).
10. Cool Completely
Transfer the bread to a wire rack. It is critically important to let it cool for at least 2 hours before slicing. Cutting into hot bread releases steam that is still gelatinizing the crumb, resulting in a gummy texture. Patience is the hardest part here.
⚠️ Common Mistakes to Avoid
Even experienced bakers stumble. Here is how to sidestep the usual pitfalls:
- Burning the Dukkah: Because the coating is exposed, it browns faster than the crust itself. If your oven runs hot, reduce the temperature to 425°F (218°C) after removing the lid, or tent with foil.
- Weak Starter: If your starter isn’t doubling in size within 4 hours of feeding, your bread won’t rise. Feed it a few times before baking to wake it up.
- Over-Proofing: If the dough spreads out like a pancake when you turn it out of the banneton, it likely over-fermented. Keep an eye on the fridge temperature; ideally, it should be below 40°F (4°C).
- Skipping the Autolyse: I used to skip this step when I was in a rush—don’t. It makes the dough significantly easier to handle and improves the final volume.
- Dukkah Not Sticking: If the spices fall off immediately, the dough surface was too dry. A light mist of water is essential before rolling.
Dukkah Sourdough Variations
Once you have the technique down, play with the formula.
- Spicy Kick: Increase the red pepper flakes or add a pinch of cayenne to the dukkah for a loaf that bites back.
- Cheese Integration: Fold cubes of gruyere or cheddar into the dough during the final stretch and fold. The melting cheese creates pockets of savory goodness.
- Whole Wheat Depth: Substitute 100g of bread flour with whole wheat flour. It adds a nutty backbone that complements the Egyptian spices, though it will make the crumb slightly denser.
- Everything Dukkah: Blend traditional dukkah with “everything bagel” seasoning for a crossover that works surprisingly well.
Storage & Serving Suggestions
To keep your Dukkah Sourdough Bread fresh, store it cut-side down on a cutting board or in a bread box for up to 2 days. Plastic bags soften the crust, which defeats the purpose of that crunchy coating. For longer storage, slice the loaf and freeze it in a zip-top bag for up to 3 months. Pop slices directly into the toaster—no thawing required.
Serve this bread with a drizzle of high-quality olive oil and flaky salt. It pairs exceptionally well with creamy soups or as a base for gourmet sandwiches with grilled chicken and avocado.
💡 Pro Tips for a Flawless Bake
- Manage Dough Temperature: Aim for a final dough temperature of 78°F (26°C). If your kitchen is cold, use warmer water; if it’s hot, use cooler water.
- Steam is Key: If you don’t have a Dutch oven, place a metal tray on the bottom rack of the oven and pour a cup of ice water into it when you load the bread.
- Score with Confidence: Hesitation leads to ragged cuts. Move quickly and decisively with your lame.
- Check the Crumb: A fully cooled loaf should have a semi-open crumb. If it’s dense, your starter might need more feedings, or you may need to extend the bulk fermentation.
Frequently Asked Questions
+What is dukkah bread?
Dukkah bread is any bread—often flatbread or sourdough—that is topped or rolled in dukkah, a traditional Egyptian blend of nuts, seeds, and spices like coriander and cumin.
+Is sourdough bread inflammatory or anti-inflammatory?
Properly fermented sourdough is often considered anti-inflammatory. The fermentation process breaks down gluten and phytic acid, making nutrients more bioavailable and easier to digest compared to commercial yeast breads.
+What is the difference between dukkah and zaatar?
While both are Middle Eastern blends, dukkah is nut-based (hazelnuts, almonds) with seeds and spices, offering a crunchy texture. Zaatar is an herb-based blend typically featuring thyme, oregano, sumac, and sesame seeds.
+Can I make dukkah ahead of time?
Absolutely. Dukkah stores beautifully in an airtight container in a cool, dark place for up to a month. In fact, the flavors meld together better after a few days.
+Can I use a different flour?
Yes, but hydration matters. If you swap bread flour for all-purpose, reduce the water by about 20g, as lower-protein flour absorbs less liquid.
+How do I know when my sourdough starter is ready?
It should be bubbly, have doubled in volume, and pass the “float test”—drop a small spoonful into a glass of water; if it floats, it’s ready to bake with.

Dukkah Sourdough bread
Ingredients
Method
- For the dukkah, place the almonds and rest of ingredients into a food processor. Pulse until coarsely chopped. You want the texture not too chunky, yet not too fine. Store in an air-tight container until ready to use.
- To make the dough: in a large bowl, combine the starter, water and bread flour. Mix everything until the flour is absorbed. Cover with plastic wrap and let it rest for 30 minutes.
- Add the salt. Lift and fold the dough over itself several times, and squish with your hands to incorporate. The dough will tear slightly as you fold, and the salt will not fully dissolve.
- Stretch & fold: To strengthen your dough, do a series of stretch and folds every 30 minutes for 2 hours during bulk fermentation. Simply gather a portion of the dough, stretch it upwards and then fold it over itself. Rotate the bowl ¼ turn and repeat until you have come full circle. You will have completed 4 folds.
- Then set aside for 5-6 hours at room temperature until the dough double in volume and feels soft.
- Shaping the dough: When your dough has risen nicely shape the dough. Remove the dough from the bowl, and place onto the floured section so that it does not stick. You do not need to 'punch down' the dough; it will gently deflate as you fold and shape it. If you want single loaf set aside as such or cut it into two loaf.
- Gather the dough, one side at a time, and fold it into the center. Flip the dough over and place it seam side down.
- To coat the dough just sprinkle the dough with water and add all your dukkah to a large bowl. Roll the dough around in the seed mixture until well coated. If there is too much flour on the dough, the dukkah will not stick.
- Second rise: Place your seeded dough into a banneton. Cover with plastic wrap and refrigerate overnight.
- When you are ready to bake, remove the dough from the fridge and allow it to rest for about ½ hour (in the banneton). Preheat your oven to 450F with pizza stone. Carefully invert the dough into a parchment paper.
- Slashing the dough: Right before your bread goes into the oven, make a shallow slash about 2 inches long in the center of the dough. Use a bread lame, sharp paring or serrated knife.
- Baking the bread: Place your bread into the oven (lid on) and bake for 35minutes or until deep, golden brown. Check the bread doneness but registering internal temperature 205F
- If you want crisp crust during the last 10 minutes of baking, crack open the oven door. This allows the moisture to escape, leaving your bread with crisp crust.
- Cooling: Remove the bread from the oven, and cool on a wire rack for at least an hour before slicing. The longer you wait, the easier it will be to cut. Don't slice into it too soon or else the texture will be gummy.
Nutrition
Notes
- For a crispier crust, crack open the oven door during the last 10 minutes of baking to allow moisture to escape, enhancing the crust's texture.
- To ensure your bread is fully baked, aim for an internal temperature of 205°F; the crust should be deep golden brown and firm to the touch.
- For the best flavor, refrigerate your shaped dough overnight for the second rise; this slow fermentation enhances the complexity of the sourdough.
- If you don't have certain nuts on hand, feel free to substitute them in the dukkah mix; walnuts or hazelnuts can work well in place of almonds or pistachios.
- To store your dukkah, keep it in an air-tight container in the fridge or freezer to maintain its freshness, and use within a month for optimal flavor.