Introduction
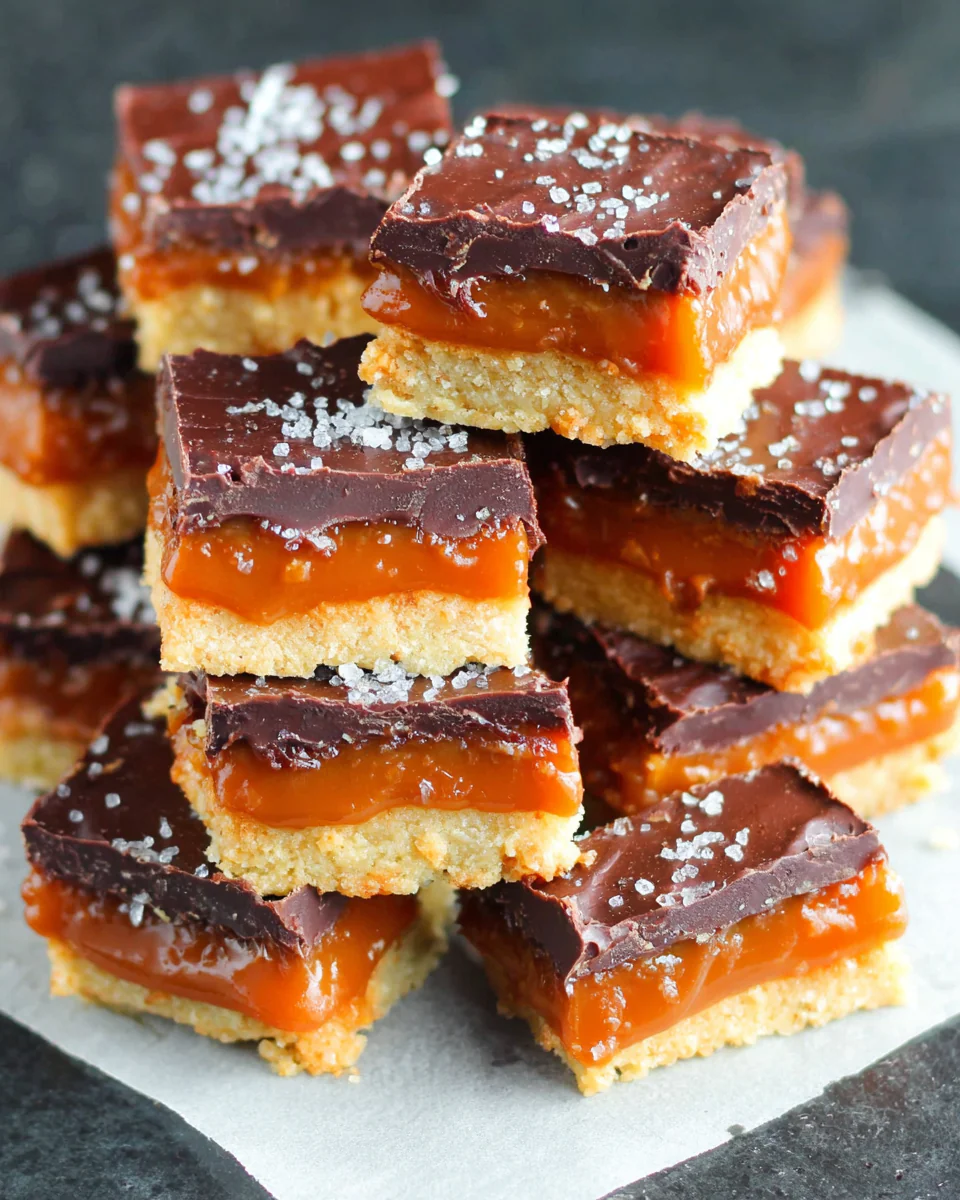
Keto Twix bars capture the essence of the classic treat while adhering to a low-carb, sugar-free lifestyle. These delicious bars feature layers of crunchy almond cookie, rich sugar-free caramel, and silky chocolate, making them a perfect indulgence for anyone on a ketogenic diet.
The best part? You can enjoy them guilt-free without compromising your dietary goals. This recipe is not just a treat; it's a delightful experience that blends flavors and textures harmoniously. Let's dive into creating these delectable bars that will satisfy any sweet tooth.
Ingredients
- 1 cup almond flour
Almond flour serves as the primary base in this recipe, replacing traditional wheat flour. It's low in carbohydrates and high in healthy fats, making it an excellent choice for keto dieters. - 1/4 cup unsweetened cocoa powder
Cocoa powder adds a deep chocolate flavor while keeping the sugar content in check. It also provides antioxidants, enhancing the health benefits of your treat. - 1/4 cup erythritol
Erythritol is a natural sugar alternative that provides sweetness without the added calories. It's low on the glycemic index, making it a popular choice for those watching their sugar intake. - 1/4 cup butter, melted
Melted butter adds richness and moisture, giving the bars a delightful texture. It also enhances the overall flavor profile, making each bite indulgent. - 1/2 teaspoon vanilla extract
Vanilla extract complements the chocolate and caramel flavors, enhancing the overall taste experience. It adds a warm, inviting aroma to the bars. - 1/2 cup sugar-free caramel sauce
The star of this recipe, sugar-free caramel sauce, brings a sweet, sticky texture that mimics the original Twix. It's an essential component for layering and creating that authentic flavor. - 1 cup sugar-free chocolate chips
Sugar-free chocolate chips are perfect for topping the bars. They melt down beautifully and provide the iconic chocolate coating that holds the bars together.
Directions & Preparation
Step 1: Prepare the crust by mixing almond flour, cocoa powder, erythritol, melted butter, and vanilla extract.
Start by preheating your oven to 350°F (175°C). In a mixing bowl, combine almond flour, cocoa powder, erythritol, melted butter, and vanilla extract until a cohesive dough forms. This mixture creates a rich, chocolate cookie base that will hold the layers together, giving you that desirable crunch in every bite.
Step 2: Press the mixture into a lined baking dish and bake for 10-12 minutes until firm.
Transfer the dough into a lined baking dish, pressing it evenly into the bottom. Baking allows the crust to set and develop a slight crispness that will contrast beautifully with the soft caramel layer. Keep an eye on it to avoid over-baking, which could result in a dry crust.
Step 3: Remove from the oven and let cool completely in the dish.
Cooling is a critical step; it allows the crust to firm up even more before layering. This ensures stability when you add the caramel and chocolate, preventing any unwanted mess. Patience is key here!
Step 4: Spread the sugar-free caramel sauce evenly over the cooled crust.
Take your sugar-free caramel sauce and generously spread it across the cooled crust. This layer is rich and sticky, contributing to the classic Twix texture. Make sure to leave no crust exposed, as you want each bite to be sweet and flavorful.
Step 5: Chill for about 30 minutes to set the caramel layer before adding the chocolate.
Chilling allows the caramel to firm up, making it easier to slice once topped with chocolate. This step ensures that when you bite into the bars, you won't have a drippy mess, but a nicely layered treat.
Step 6: Melt the sugar-free chocolate chips and pour over the caramel layer.
In a microwave-safe bowl, melt your sugar-free chocolate chips gently, stirring until smooth. Pour this luscious layer over the chilled caramel, spreading it evenly with a spatula. This glossy chocolate finish is what brings the entire creation together.
Step 7: Return to the fridge for at least 1 hour to fully set before cutting into bars.
Refrigerating the entire dish once more allows all the layers to meld together beautifully, resulting in a cohesive bar that holds its shape well when sliced. The wait is worthwhile for that perfect chocolate-caramel experience.
Step 8: Slice into bars and enjoy your homemade Keto Twix bars!
Once fully chilled and set, slice into your desired bar sizes. Each piece will reveal layers of crunchy crust, rich caramel, and smooth chocolate. Enjoy these bars as a delightful snack or dessert, satisfying your sweet cravings without the guilt.

The Importance of Layering in Keto Twix Bars
Layering is essential in creating the perfect texture and flavor balance in these Keto Twix bars. Each layer contributes distinct aspects: the crust provides a crunchy base, the caramel adds a soft chewy texture, and the chocolate topping delivers a satisfying snap. Together, they create the wonderful experience of the original Twix but with a healthier twist. Achieving perfect layers enhances not just the taste but also the presentation, making every bite visually appealing.
Choosing the Right Ingredients for Flavor
The quality of ingredients plays a significant role in the final flavor of your Keto Twix bars. Opting for high-quality cocoa powder and sugar-free chocolate chips can make a noticeable difference in achieving a rich chocolate flavor that complements the caramel. Each ingredient should be carefully selected to enhance the overall taste, ensuring that you don’t miss the sugar-laden versions. Making mindful choices promotes the essence of keto cooking while keeping your treats delicious.
Experimenting with Nut Variations
While almond flour is a staple in keto baking for its low-carb profile, feel free to explore other nut flours like hazelnut or macadamia if you prefer different flavor profiles. These alternatives can add unique tastes and textures, creating a personalized version of your Keto Twix bars. By experimenting with different nuts, you might discover a new favorite twist on the recipe that brings even more enjoyment to your low-carb treat!
FAQs
What if my caramel layer is too thick?
If your caramel is thicker than desired, try adding a teaspoon of water while heating it gently. This can help achieve a smoother, spreadable consistency.
Can I use a different sweetener in the recipe?
Yes, feel free to substitute erythritol with other keto-friendly sweeteners like monk fruit or stevia, but be sure to adjust the quantity based on sweetness level.
What should I do if my chocolate layer isn’t melting smoothly?
If your chocolate chips are clumping or not melting properly, try microwaving in shorter intervals, stirring in between to ensure even melting without scorching.
Can I make these bars without cocoa powder?
While cocoa powder is key for the chocolate flavor, you can experiment with carob powder for a different taste, although it will change the flavor profile significantly.
What if my base crust is too crumbly?
If the crust is too crumbly, it may need more melted butter or a teaspoon of water to help bind the ingredients together better.
How can I adjust the recipe for a smaller batch?
To make a smaller batch, simply halve the ingredients and use a smaller baking dish to ensure the layers remain sturdy and well-formed.
Conclusion
Creating Keto Twix bars at home is not only a rewarding baking experience but also a delicious way to maintain your low-carb lifestyle. With layers of rich flavors and textures, these bars are sure to become a household favorite.
So, the next time you're craving something sweet yet nutritious, reach for this recipe and indulge without any guilt. Happy baking and enjoy your homemade treats!
Recipe Card

Deliciously Easy Meatloaf Cups for Busy Cooks
Ingredients
Method
- Preheat your oven to 375°F (190°C).
- In a large bowl, mix together the ground beef, breadcrumbs, ketchup, egg, onion, garlic powder, salt, and black pepper until fully combined.
- Grease a muffin tin with non-stick spray or oil.
- Scoop the meat mixture into the muffin tin cups, filling each one about 3/4 of the way full.
- If using cheese, sprinkle a small amount on top of each meatloaf cup before baking.
- Bake the meatloaf cups in the preheated oven for 20-25 minutes, or until they reach an internal temperature of 160°F (70°C).
- Let the meatloaf cups cool for a few minutes before carefully removing them from the muffin tin.
- Garnish with chopped parsley if desired and serve warm.
Tried this recipe?
Let us know how it was!Notes
Additional serving suggestions: pair with a crisp salad, garlic bread, or roasted seasonal vegetables for balance.
For make-ahead, prep components separately and assemble just before heating to preserve texture.
Taste and adjust with acid (lemon/vinegar) and salt right at the end to wake up flavors.