Introduction
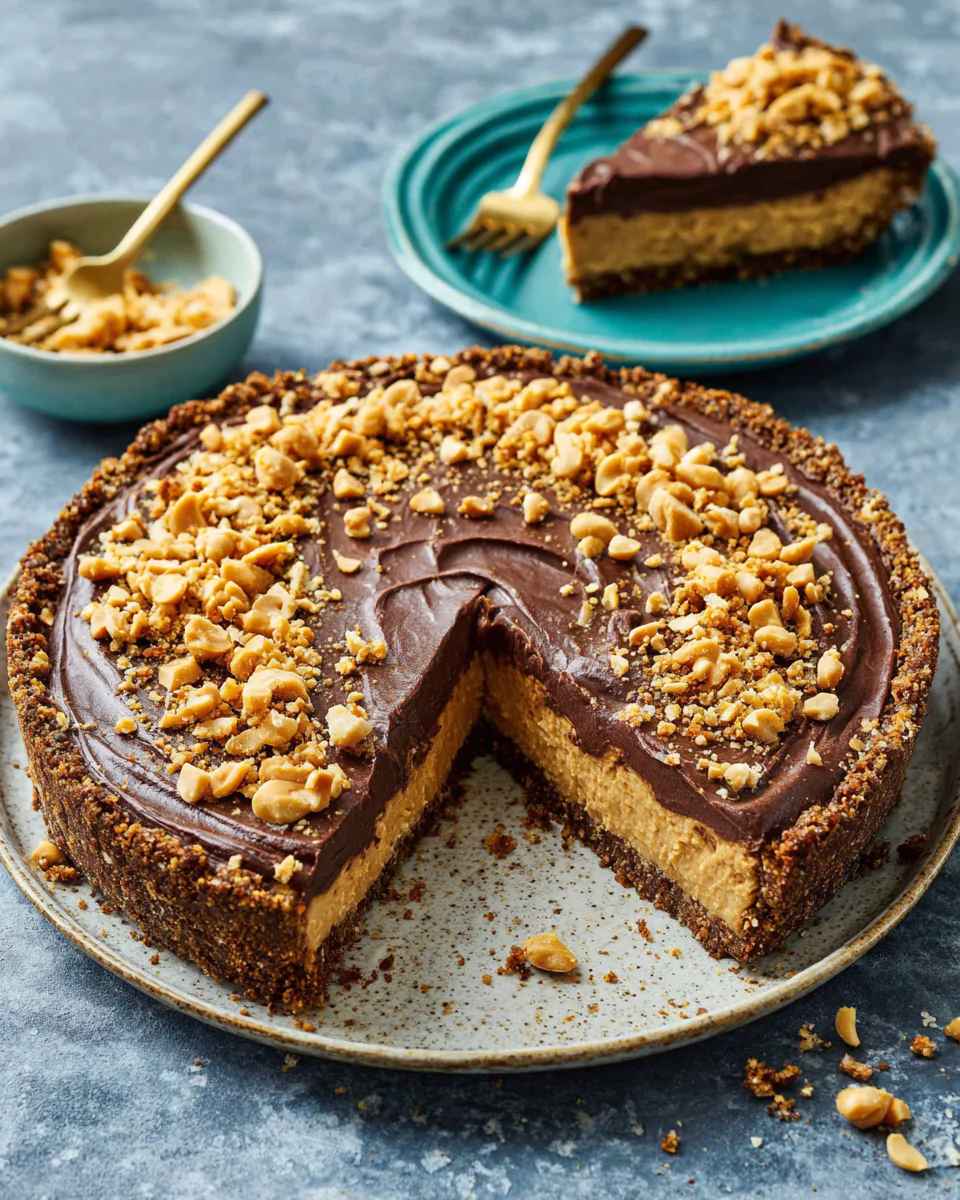
There's something uniquely comforting about a classic peanut butter pie, especially when it doesn’t require an oven. The creamy filling and crunchy crust come together to create a dessert that hits all the right notes. It's perfect for those warmer months when you want to avoid turning on your oven.
This no-bake peanut butter pie is simple yet indulgent, making it a favorite among home cooks and dessert lovers alike. Whether you're hosting a gathering, celebrating a birthday, or simply treating yourself, this pie will impress and satisfy with its rich flavor.
Ingredients
- 1 ½ cups graham cracker crumbs
Graham cracker crumbs serve as the foundation of the pie crust, providing a sweet and slightly crunchy texture that complements the smooth filling. - ½ cup unsalted butter, melted
The melted butter acts as a binding agent, helping the graham cracker crumbs hold together and form a sturdy base for the pie. - 1 cup creamy peanut butter
Peanut butter is the star ingredient, lending its rich, nutty flavor and creamy consistency that makes the filling indulgent and satisfying. - 1 cup powdered sugar
Powdered sugar sweetens the filling and helps create a smooth texture, ensuring that the pie is delightfully sweet without any graininess. - 8 ounces cream cheese, softened
Cream cheese adds a creamy, rich base to the filling, creating a luscious mouthfeel that balances the boldness of the peanut butter. - 1 teaspoon vanilla extract
Vanilla extract enhances the overall flavor profile of the pie, adding depth and a hint of warmth that complements the peanut butter. - 1 cup whipped topping (or heavy cream, whipped)
Whipped topping lightens the filling, contributing to its airy texture and making the pie feel light despite its rich ingredients. - Chocolate shavings or chips for garnish (optional)
Chocolate adds a delicious visual appeal and flavor contrast on top of the pie, pleasing both the eyes and the palate.
Directions & Preparation
Step 1: Prepare the pie crust by mixing graham cracker crumbs and melted butter.
Start by combining the graham cracker crumbs and melted butter in a bowl. Mix until the crumbs are well-coated with butter; the mixture should hold together when pressed. This step builds the base for your pie, ensuring it has the right texture and flavor. Make sure to use unsalted butter for the right balance of flavors.
Step 2: Press the mixture firmly into the bottom and sides of a pie dish.
Transfer the crumb mixture into a pie dish, using your fingers or the bottom of a measuring cup to press it firmly into the bottom and up the sides. A solid crust is crucial as it will provide structure and support for the rich filling. Take your time to ensure it's evenly packed and reaches the edges.
Step 3: In a mixing bowl, combine peanut butter, powdered sugar, and cream cheese.
In another mixing bowl, beat together the peanut butter, powdered sugar, and softened cream cheese until smooth and creamy. This mixture is the heart of your pie, and combining it well ensures a uniform flavor and eliminating any lumps. Scraping down the sides of the bowl may be necessary for an even blend.
Step 4: Add vanilla extract and whipped topping to the mixture, blending thoroughly.
Add the vanilla extract and the whipped topping (or whipped cream) to the peanut butter mixture. Gently fold in the whipped topping to maintain its lightness, which adds a fluffiness to the filling. This step is essential for achieving that perfect texture.
Step 5: Spoon the filling into the prepared crust and smooth the top.
Once the filling is ready, spoon it into the prepared pie crust using a spatula. Smooth the top out evenly to create a polished appearance. The filling should be heaped slightly, as it will settle as it chills. This is the moment where the visual appeal of your pie really starts to take shape.
Step 6: Refrigerate the pie for at least 4 hours or until set.
Place the assembled pie in the refrigerator to chill for at least four hours (or overnight if you can wait!). This time allows the filling to firm up properly. Chilling enhances the flavors as well, allowing all the ingredients to meld beautifully.
Step 7: Garnish with chocolate shavings or chips before serving.
Once set, remove the pie from the fridge and garnish it with chocolate shavings or chips if desired. This not only adds flavor but also a delightful visual aspect to the pie. Consider drizzling a bit of melted chocolate over the top to elevate it even further.
Step 8: Slice and enjoy your delicious no-bake peanut butter pie.
Finally, slice the pie using a sharp knife for clean edges. The pie can be served with additional whipped topping or a drizzle of chocolate sauce. Enjoy the rich flavors and creamy texture that everyone will love. Each slice is a perfect bite of peanut butter heaven!

The Secret to a Flawless Pie Crust
A well-prepared crust sets the foundation for any good pie, especially in no-bake recipes. Using fresh graham cracker crumbs gives the best flavor, while ensuring the butter is properly melted and mixed guarantees a sturdy base. If you find that the crust is falling apart, try adding a bit more melted butter for better cohesion.
Elevating the Filling Experience
The peanut butter filling is where the magic happens, and you can tweak it to cater to your taste. Consider mixing in chopped nuts for added crunch or a swirl of chocolate sauce for a richer flavor profile. The key to a great filling lies in its blend; ensure that your ingredients are at room temperature for smooth incorporation.
Presentation Matters
Though this pie is simple to prepare, how you present it can elevate the overall experience. Garnishing with chocolate shavings or drizzling with warm chocolate sauce enhances not only flavor but also visual appeal. Consider serving it alongside fresh berries or a scoop of ice cream for a complete dessert experience.
FAQs
What if my pie filling is too thick?
If your filling ends up too thick, add a tablespoon or two of milk or cream to loosen it up while mixing. This will help achieve a smoother consistency that spreads easily.
Can I use natural peanut butter for this recipe?
Yes, you can use natural peanut butter, but be aware that it may make the filling slightly more oily. Stir well before measuring to ensure a uniform consistency.
What if my crust is too crumbly?
If your crust crumbles apart, this might be due to insufficient butter. Consider melting a bit more butter and mixing it in, ensuring the crumbs are well-coated.
Can I add more chocolate to the filling?
Absolutely! You could mix in chocolate peanut butter or add cocoa powder to enhance the chocolate flavor in the filling.
How do I know if the pie is set?
The pie is set when the filling is firm to the touch and holds its shape when cut. You can lightly press the top with your finger; it should feel firm and not jiggle.
What if I want to make mini versions of this pie?
You can definitely make mini versions! Use a muffin tin or individual tart pans. Just adjust the chilling time as they may set faster than a full-sized pie.
Conclusion
This no-bake peanut butter pie is a testament to how easy yet rewarding dessert making can be. With just a few simple ingredients and no oven required, you'll have a treat that's perfect for any occasion.
Whether you're enjoying it on a sunny afternoon with friends or serving it at a festive gathering, this pie is bound to be a hit. Embrace the joy of baking without the heat, and enjoy every creamy, nutty bite.
Recipe Card
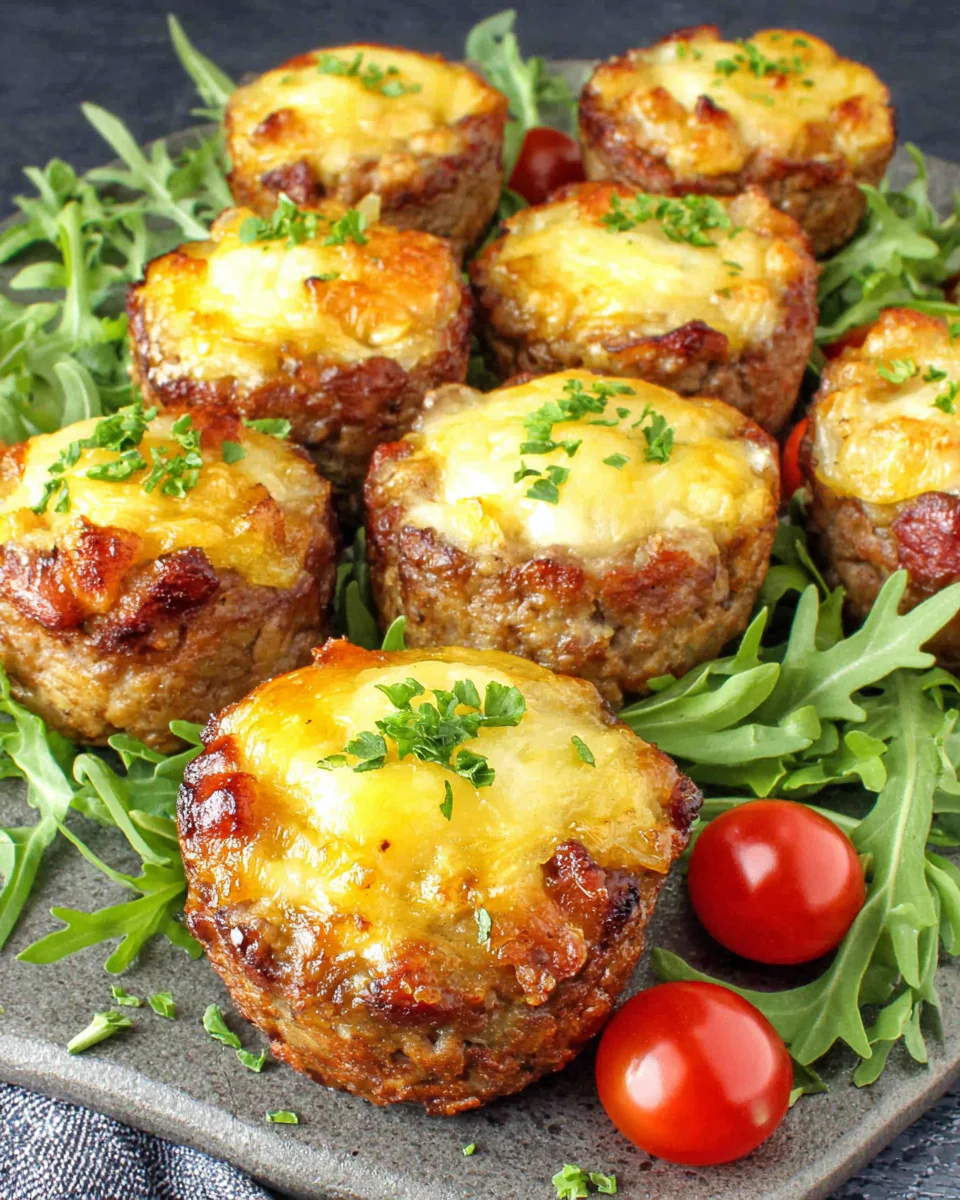
Deliciously Easy Meatloaf Cups for Busy Cooks
Ingredients
Method
- Preheat your oven to 375°F (190°C).
- In a large bowl, mix together the ground beef, breadcrumbs, ketchup, egg, onion, garlic powder, salt, and black pepper until fully combined.
- Grease a muffin tin with non-stick spray or oil.
- Scoop the meat mixture into the muffin tin cups, filling each one about 3/4 of the way full.
- If using cheese, sprinkle a small amount on top of each meatloaf cup before baking.
- Bake the meatloaf cups in the preheated oven for 20-25 minutes, or until they reach an internal temperature of 160°F (70°C).
- Let the meatloaf cups cool for a few minutes before carefully removing them from the muffin tin.
- Garnish with chopped parsley if desired and serve warm.
Tried this recipe?
Let us know how it was!Notes
Additional serving suggestions: pair with a crisp salad, garlic bread, or roasted seasonal vegetables for balance.
For make-ahead, prep components separately and assemble just before heating to preserve texture.
Taste and adjust with acid (lemon/vinegar) and salt right at the end to wake up flavors.