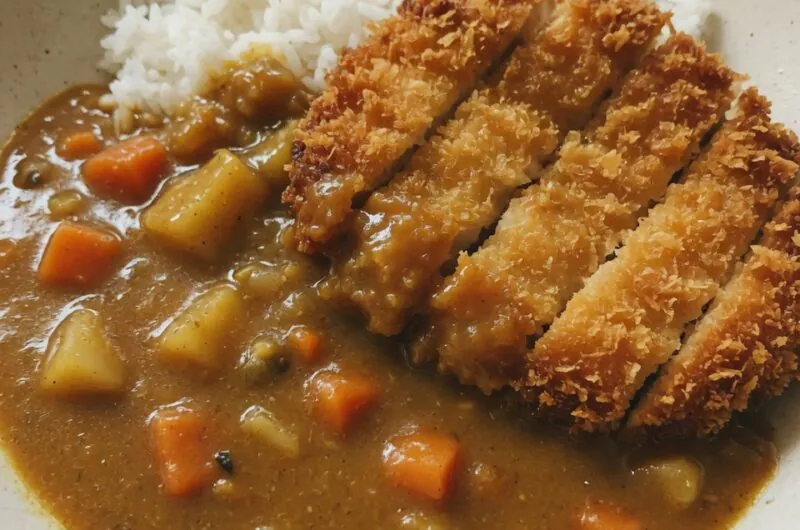
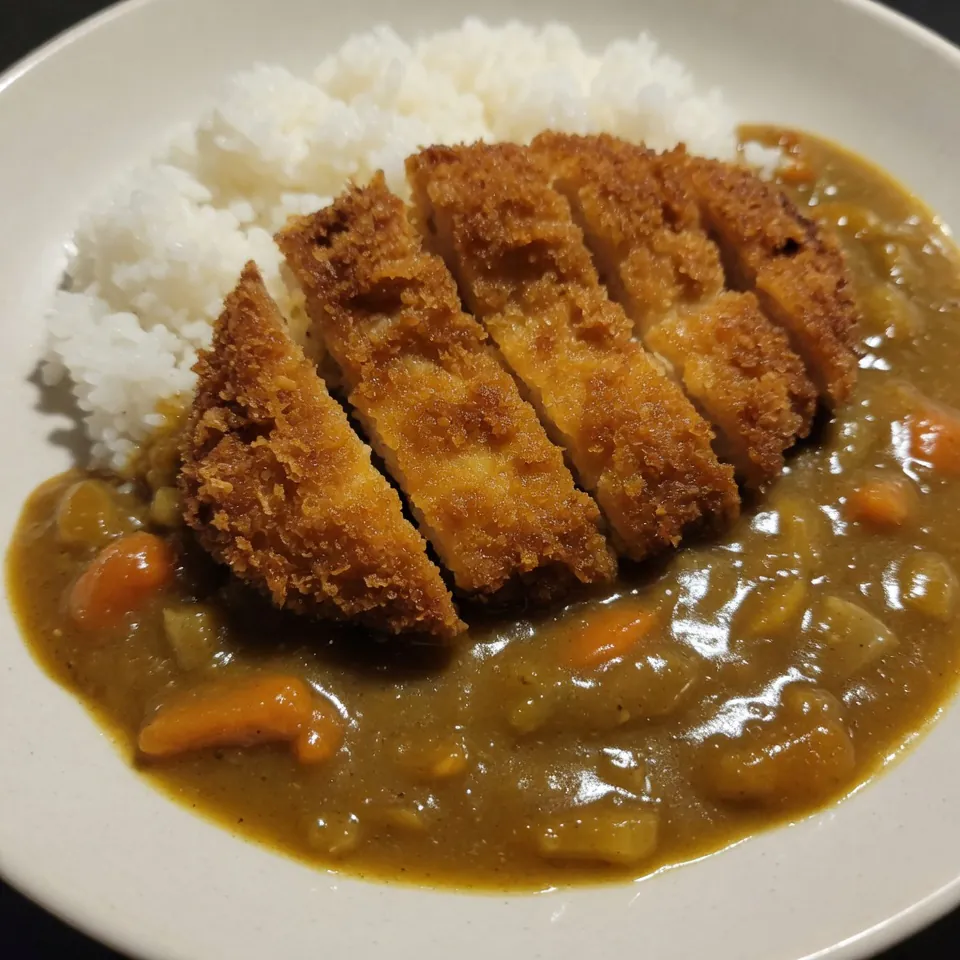
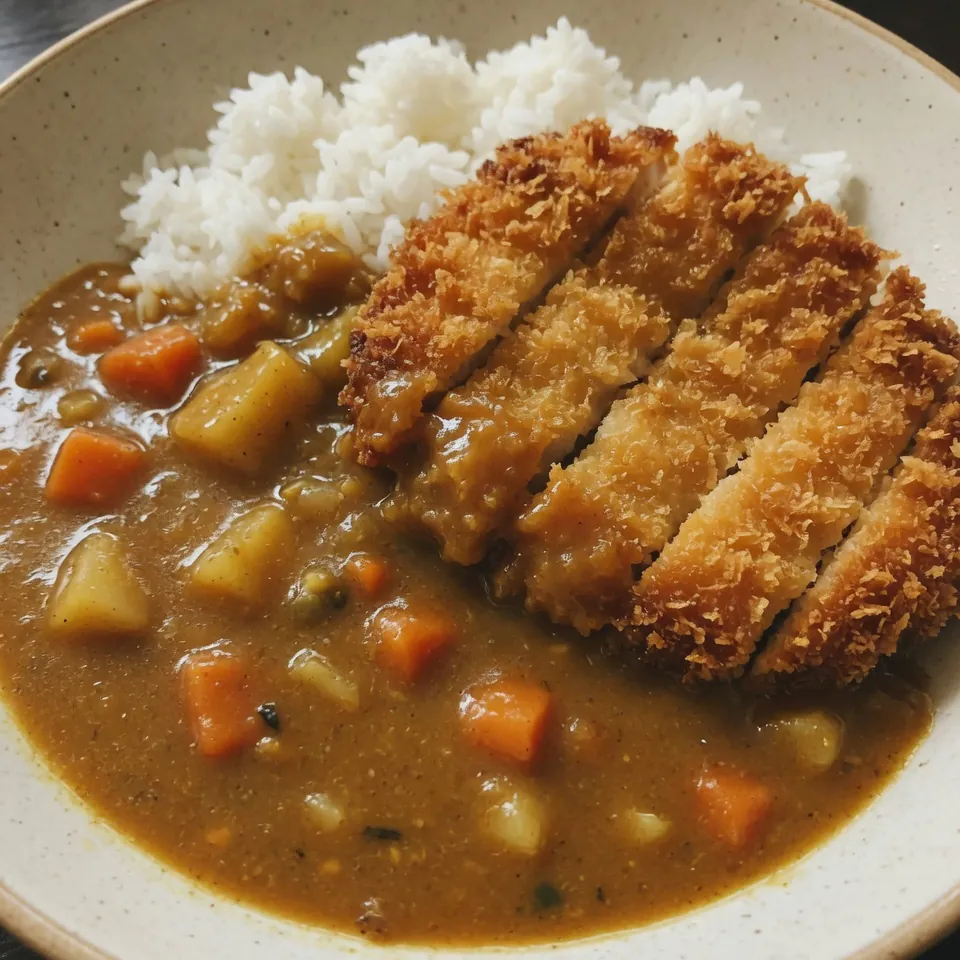
Crispy panko-crusted chicken cutlets resting on a bed of fluffy rice, smothered in a rich, savory-sweet Japanese curry sauce.
📋 In This Article
- Introduction
- Why Katsu Chicken Curry Works
- Ingredients Overview
- Crafting the Perfect Chicken Katsu
- Building the Rich Japanese Curry Sauce
- Assembling Your Katsu Curry Masterpiece
- Common Mistakes and How to Avoid Them
- Katsu Curry Variations & Customizations
- Storage and Reheating Tips
- Pro Tips for Katsu Curry Excellence
- Frequently Asked Questions (FAQ)
Introduction
There is a specific kind of magic in a bowl of Katsu Curry. It’s the kind of meal that feels like a warm hug on a rainy Tuesday. You get the shattering crunch of a perfectly fried Chicken Cutlet, the soothing fluff of steamed rice, and a Japanese Curry sauce that is thick, glossy, and deeply satisfying. Unlike its Indian or Thai counterparts, Japanese curry is milder, sweeter, and built on a roux that creates a velvety texture that clings to every bite of rice.
I’ve spent years testing techniques to get that restaurant-quality contrast at home—where the crust stays crispy even under the sauce. The secret isn’t just in the ingredients, but in the timing and temperature control. This recipe breaks down the science of the fry and the art of the sauce, ensuring your Katsu chicken curry turns out perfectly every single time.
Why Katsu Chicken Curry Works
The genius of this dish lies in its texture contrast. You have the brittle, jagged surface of the panko crust meeting the smooth, viscous curry. It’s a study in opposites. The sauce itself is a masterclass in umami, often built from a Japanese curry roux that balances savory curry spices with subtle sweetness from apples or honey.
This isn’t just “curry with chicken on top.” The flavor balance is critical. The richness of the fried cutlet needs the sharp, savory notes of the sauce to cut through the fat. When you break the cutlet into pieces, the steam escapes, preventing the breading from getting soggy too quickly, while the rice underneath soaks up the runoff. It is a carefully engineered system of deliciousness.
Ingredients Overview
To build this dish correctly, you need to treat the components separately before bringing them together.
For the Chicken Katsu
- Chicken Breast (2 pieces, about 400g): Boneless, skinless. We will pound these thin to ensure tender, juicy results.
- Panko Breadcrumbs (1 cup): Essential for that signature airy, crispy texture. Standard breadcrumbs are too fine.
- All-Purpose Flour (1/2 cup): The first layer of the dredge.
- Egg (1 large, beaten): The binding agent that glues the panko to the flour.
For the Japanese Curry Base
- Japanese Curry Roux (1/2 packet, e.g., House Vermont Curry): The backbone of flavor. You can make it from scratch, but the store-bought blocks offer consistent consistency and spice blends.
- Onion (1 large, sliced): Provides the aromatic base and natural sweetness.
- Carrot (1 medium, diced): Adds sweetness and color.
- Potato (1 medium, diced): Provides body and heartiness to the sauce.
- Vegetable Oil (for frying and sautéing): Neutral oil works best.
For Serving
- Cooked Rice (4 cups): Short-grain Japanese rice is traditional for its sticky texture.
- Tonkatsu Sauce (optional): For an extra layer of tang on the cutlet.
- Fukujinzuke (Japanese pickled vegetables): The classic crunchy, sweet-sour garnish.
Crafting the Perfect Chicken Katsu
The cutlet is the star, and treating the protein with respect is non-negotiable.
First, tenderizing. Place the chicken breast between two sheets of plastic wrap and pound it to an even thickness of about ½ inch. This isn’t just about making it thinner; it mechanically breaks down the muscle fibers, ensuring the chicken remains tender and cooks evenly. If you leave it thick in the middle, the outside will burn before the inside is safe.
Set up a standard breading station: flour, egg, panko breadcrumbs. Dredge the chicken in flour, shaking off the excess—this creates a dry surface for the egg to grab onto. Dip in the egg, then press firmly into the panko.
Here is the science: Heat your oil to 350°F (175°C). At this temperature, the moisture inside the breading turns to steam instantly, pushing outwards. This prevents oil from soaking into the crust. If the oil is too cool, the panko acts like a sponge. If it’s too hot, the exterior burns before the interior reaches 165°F (75°C).
Fry for about 4-5 minutes per side until golden brown. Transfer to a wire rack, not paper towels. Paper towels trap steam, leading to a soggy bottom. A wire rack allows air circulation, keeping that crust shatteringly crisp.
Building the Rich Japanese Curry Sauce
While the chicken rests, focus on the sauce. This is where the depth comes from.
Start by sautéing the onion, carrot, and potato. Don’t just soften them; take your time. Let the onions caramelize slightly. This triggers the Maillard reaction, the same chemical process that browns meat, adding a layer of complexity you can’t get from just boiling vegetables.
Add water or broth and bring to a boil, then reduce to a simmer. Add the Japanese curry roux. Stir continuously until the blocks melt. The sauce thickens rapidly because the roux contains flour that gelatinizes in the heat.
For a flavor upgrade, add grated apple and a drizzle of honey. The apple isn’t just for sweetness; it contains enzymes that help tenderize the vegetables and adds a fruity brightness that cuts the spice. Let the sauce simmer until the potatoes are fork-tender. If the sauce gets too thick, add a splash of water. Too thin? Keep simmering to reduce.
Assembling Your Katsu Curry Masterpiece
Assembly is the final, crucial step. Don’t just dump everything together.
Start with a bowl of hot rice. Slice your crispy chicken cutlet into thick strips—this exposes the juicy interior and makes it easier to eat with a spoon. Arrange the slices over the rice.
Now, the sauce. Ladle the curry over the chicken and rice, but leave the very tips of the cutlet exposed. This preserves the crunch of the crust on top while allowing the sauce to mingle with the rice below. It looks better, and it eats better.
Top with fukujinzuke or sliced scallions for a pop of color and a sharp contrast to the rich sauce.
⚠️ Common Mistakes and How to Avoid Them
Even a simple dish has pitfalls. Here is what usually goes wrong.
- Overcooked Chicken: Because the cutlet is thin, it cooks fast. Use a thermometer. Pull the chicken at 165°F (75°C). Carryover cooking will do the rest. I used to guess by color; the thermometer saved me from dry chicken forever.
- Soggy Katsu: This happens if you pour the sauce over the chicken too early. Keep them separate until the moment you serve. Also, never rest fried chicken on paper towels; use a wire rack.
- Bland Curry: If the sauce tastes flat, it usually needs salt or umami. A splash of soy sauce or Worcestershire sauce can wake it up. Sautéing the onions thoroughly at the start is the best preventative measure.
- Oil Temperature Drops: If you crowd the pan, the oil temp plummets, and the breading gets greasy. Fry in batches if necessary to maintain that 350°F heat.
Katsu Curry Variations & Customizations
This dish is a template. Once you master the technique, you can riff on it endlessly.
- Protein Swaps: While chicken katsu is standard, pork katsu (Tonkatsu) is the traditional predecessor and offers a richer flavor. For a vegetarian twist, try tofu katsu or thick slices of eggplant.
- Spice Levels: Japanese curry is generally mild. If you want heat, add fresh chili peppers or a dash of cayenne to the sauce. Some brands offer “Hot” versions of their roux.
- Gluten-Free: Use gluten-free panko and a gluten-free curry roux (or make a roux with gluten-free flour). The texture will be slightly different, but the flavor remains spot on.
- Cheese Katsu: A popular trend where a slice of cheese is tucked inside the chicken breast before breading. When you cut it open, the cheese oozes out. It’s decadent, rich, and absolutely delicious.
Storage and Reheating Tips
To enjoy leftovers, you must store components separately.
Store the katsu in an airtight container in the fridge for up to 3 days. The curry can be stored separately for up to 4 days or frozen for 3 months.
Reheating the katsu requires care. Do not microwave it—it turns the crispy crust into a soggy rubber mat. Instead, reheat it in a toaster oven or air fryer at 350°F (175°C) for 5-7 minutes. This revives the crispiness. Reheat the curry in a pot on the stove, adding a splash of water if it has thickened too much in the fridge.
💡 Pro Tips for Katsu Curry Excellence
To take this from good to “I can’t believe I made this,” try these expert techniques.
- Marinate the Chicken: A quick 30-minute bath in soy sauce, ginger, and garlic before dredging infuses the meat with flavor, not just the crust.
- Double Fry: For ultimate crunch, fry the cutlets until just pale gold, let them rest for 5 minutes, then fry them again at a slightly higher temp for 1 minute. This shocks the crust into extra crispiness.
- Use Dashi: Instead of water, dissolve the curry roux in dashi (Japanese kelp and bonito stock). It injects a massive dose of umami that water simply can’t match.
- The “Tent” Trick: If your chicken is browning too fast but isn’t cooked through, tent it loosely with foil. This lowers the immediate heat intensity while allowing the interior to finish cooking.
Frequently Asked Questions (FAQ)
+Why is my katsu soggy?
Sogginess usually comes from two places: oil temperature or steam. If your oil isn’t hot enough (below 350°F), the breading absorbs grease instead of frying crisp. If you let the cooked chicken sit on a solid plate or paper towel, steam gets trapped underneath and ruins the crust. Always use a wire rack.
+Can I make katsu curry gluten-free?
Yes. You need to swap three things: use gluten-free panko (often made from rice flour), use a gluten-free flour for the dredge, and ensure your curry roux is gluten-free. Many store-bought roux blocks contain wheat flour, so check the label carefully or make a homemade roux with cornstarch or rice flour.
+What is the difference between katsu and tonkatsu?
“Tonkatsu” specifically refers to a pork cutlet (Ton = pig). “Katsu” is a general term for a cutlet, which can be chicken (Chicken Katsu), beef, or even shrimp. The preparation method—pounded thin, breaded with panko, and fried—is the same.
+How do I know when the chicken is fully cooked?
The most accurate way is an instant-read thermometer. Insert it into the thickest part of the cutlet; you are looking for 165°F (75°C). Because pounded chicken is thin, this usually happens quickly (4-5 minutes per side), so don’t walk away from the pan.
+Can I freeze the curry sauce?
Absolutely. Japanese curry sauce freezes exceptionally well. Let it cool completely, then store it in an airtight container or heavy-duty freezer bag for up to 3 months. Thaw it overnight in the fridge before reheating.
Katsu Curry (Japanese Curry with Chicken Cutlet)
Ingredients
Method
- Add oil to a pot and heat over medium high heat.
- Add onion and sauté for a few minutes or until the onion becomes translucent and edges start getting slightly burnt.
- Add potatoes and carrots into the pot and stir for a couple of minutes or until the surface of the vegetables starts getting cooked.
- Add water and turn the heat up to bring it to a boil. Then reduce the heat to medium low and simmer for about 7 minutes or until the vegetables are nearly cooked through (note 4).
- Break the curry roux cake into small blocks along the lines and add them into the pot. Stir gently to blend the curry roux.
- Reduce the heat to low, place a lid on and cook for about 10 minutes or until the curry roux is completely dissolved. Stir occasionally as the curry tends to stick to the bottom of the pot.
- Check the consistency of the sauce. It should be like béchamel sauce. If it's too thick, adjust with some water. If too thin, cook further without the lid. It will thicken when cooled down as well.
- Turn the heat off.
- Serving
Nutrition
Notes
- For perfectly cooked chicken cutlets, ensure they reach an internal temperature of 165°F (74°C) and have a golden-brown crust before serving.
- To prevent sticking and burning, stir the curry sauce occasionally, and if it thickens too much, add a splash of water while cooking.
- If you prefer a leaner option, substitute chicken cutlets with pork cutlets or even tofu for a vegetarian twist.
- Store leftover curry in an airtight container in the fridge for up to 3 days, and when reheating, add a little water to loosen the sauce as it thickens when cooled.
- For a quick shortcut, chop your vegetables in advance and keep them refrigerated; this saves prep time on the day you cook.