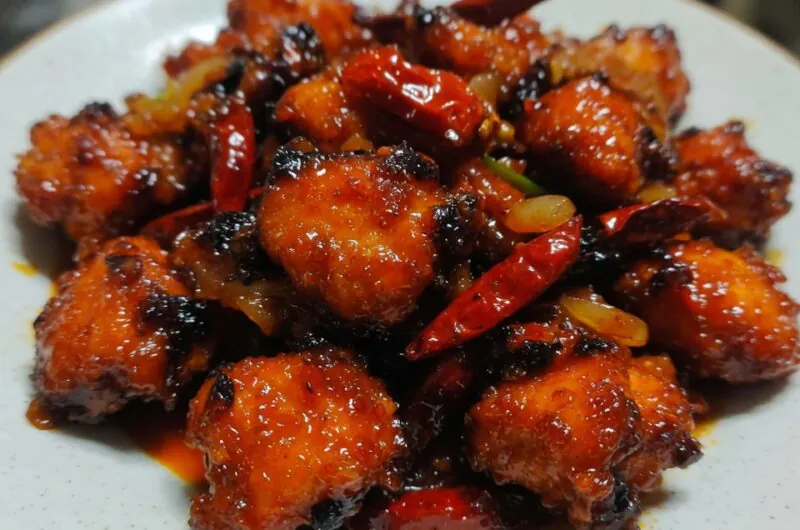
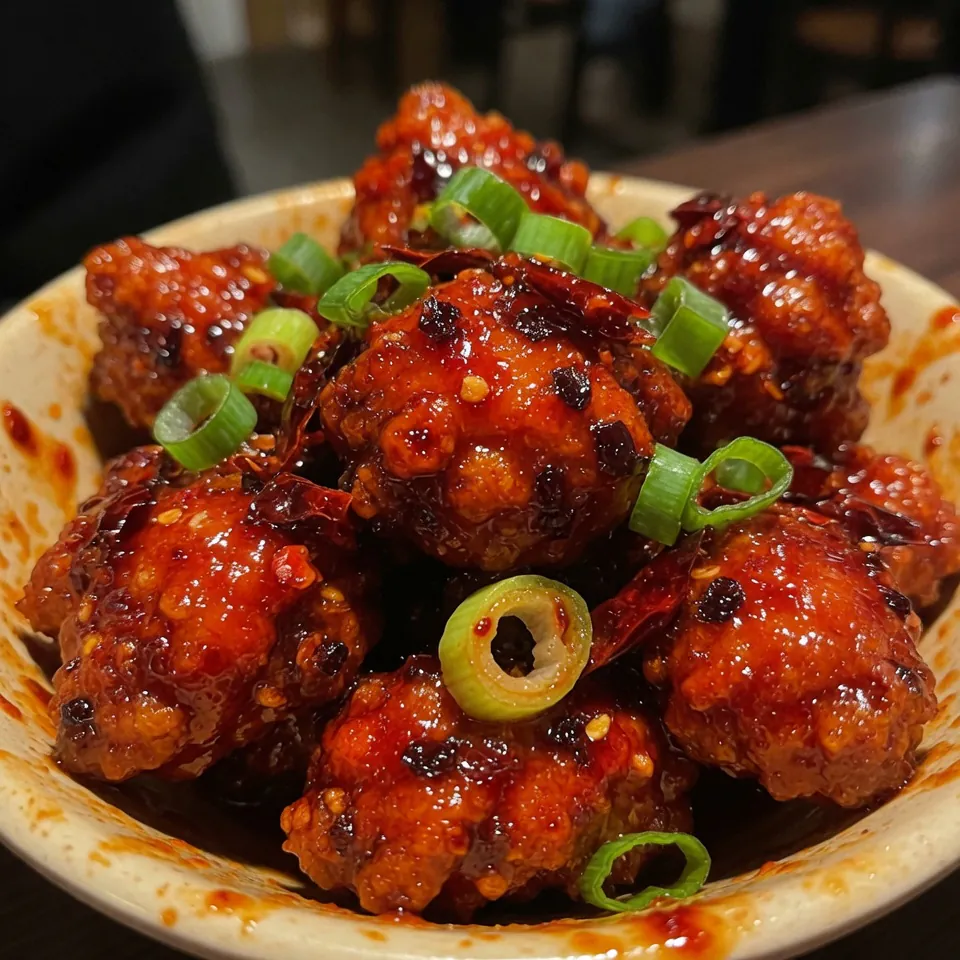
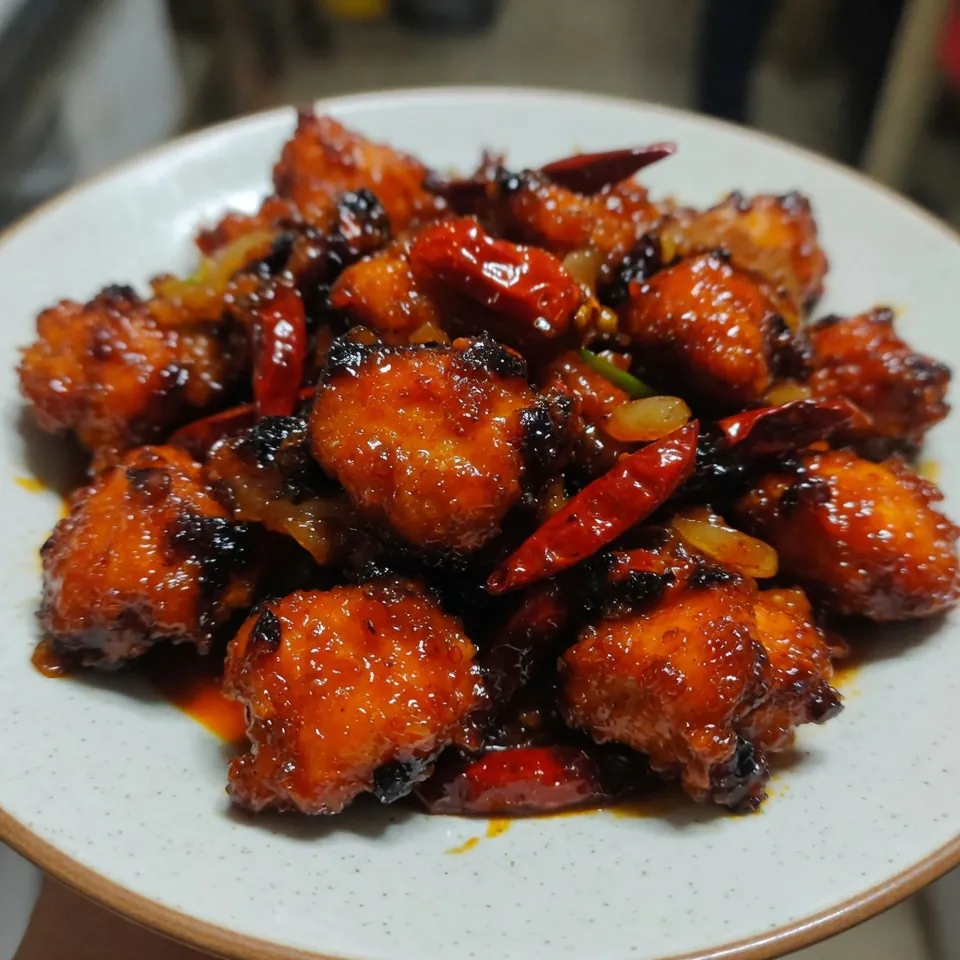
Restaurant-style Dragon Chicken with shatteringly crispy strips tossed in a glossy, spicy-sweet chili sauce—ready in 40 minutes using simple pantry staples.
📋 In This Article
- Introduction
- Why This Recipe Works: The Secret to Authentic Restaurant Flavor
- Essential Ingredients for Dragon Chicken
- Step-by-Step Cooking Instructions
- Achieving the Perfect Crispy Chicken: Frying Techniques
- Crafting the Signature Dragon Sauce
- Common Mistakes to Avoid for Dragon Chicken Success
- Variations & Serving Suggestions
- Storage & Reheating Tips
- Pro Tips for Dragon Chicken Mastery
- Frequently Asked Questions (FAQ)
Introduction
Dragon Chicken is the kind of Indo-Chinese appetizer that disappears the moment it hits the table. You know the one—those golden, jagged strips of crispy chicken cloaked in a sticky spicy sauce that leaves your fingers stained red and your taste buds buzzing. For years, I assumed this was restaurant territory only. The kind of thing that required a commercial wok burner and secrets I wasn’t privy to.
Turns out, the magic isn’t in the equipment. It’s in the red chili paste—homemade from soaked Kashmiri chilies—and a double-frying technique that creates a crust sturdy enough to withstand the sauce without collapsing into mush. This recipe delivers that same restaurant intensity at home, whether you deep-fry, air-fry, or bake. The result? A dish that rivals your favorite takeout spot, with the added satisfaction of knowing exactly what went into it.
Why This Recipe Works: The Secret to Authentic Restaurant Flavor
Here’s what separates restaurant Dragon Chicken from the sad, soggy versions that plague home kitchens: the sauce-to-crunch ratio. Most home recipes fail because they skip the homemade red chili paste. Store-bought sambal works in a pinch, but soaking and blending dried Kashmiri red chilies gives you that signature neon-red hue and deep, fruity heat that commercial pastes can’t replicate.
The marinade does more than flavor the meat. That combination of soy sauce, ginger, and garlic penetrates the muscle fibers, seasoning the chicken all the way through rather than just coating the surface. Salt and soy sauce work together to denature proteins slightly, which helps the meat retain moisture during the high-heat frying process.
Then there’s the double frying. The first fry cooks the chicken through at a lower temperature (around 325°F), allowing the interior to reach a safe 165°F without drying out. The second fry—at 375°F—triggers aggressive Maillard reaction on the exterior, creating that shatteringly crisp crust. This two-stage approach is why restaurant chicken stays crunchy even after saucing.
Essential Ingredients for Dragon Chicken
Chicken & Marinade
- 500 grams (1.1 pounds) boneless chicken breasts – cut into strips roughly ½ inch thick. Thighs work too, but breasts give you that clean, white-meat texture most restaurants use.
- 1 large egg white – creates a light, tempura-style coating that crisps without getting cakey.
- 4 tablespoons cornstarch – the secret to that jagged, crunchy exterior. Cornstarch creates a thinner coating than flour, resulting in a delicate, glass-like crust.
- ½ tablespoon grated garlic and ½ tablespoon grated ginger – fresh is non-negotiable here. The paste forms the aromatic backbone of the dish.
- 1 teaspoon soy sauce – provides salt and umami depth in the marinade layer.
- Salt to taste – don’t be shy. Properly seasoned chicken makes or breaks this dish.
Red Chili Paste
- 15 dried Kashmiri red chilies (about 20 grams) – these are prized for their vivid red color and mild heat. Soak in ½ cup boiling water until softened, about 20 minutes.
- ¼ cup water – for blending. The soaking liquid works too; it’s packed with flavor.
Substitution: In a hurry, Sambal Oelek works, though you’ll lose some of that signature color and gain more heat.
Dragon Sauce
- 2 to 3 tablespoons red chili paste – adjust based on your heat tolerance.
- 1 tablespoon soy sauce – adds savory depth and salt.
- 1 to 2 teaspoons rice vinegar – provides the acidic counterpoint that makes the sauce pop.
- 1 to 2 teaspoons sugar – balances the heat and acid. Don’t skip it.
- 2 tablespoons oil – for the sauce base. Neutral oil works best.
- 2 teaspoons cornstarch mixed in ⅓ cup water – this slurry gives the sauce its glossy, clinging consistency.
Garnish & Aromatics
- ¼ to ½ cup roasted unsalted cashews – add crunch and a buttery richness that plays beautifully against the heat.
- 1 small onion – thinly sliced. These cook down in the sauce, adding sweetness and texture.
- 1 bell pepper – sliced into strips. The sweetness tempers the chili heat.
- Spring onions – chopped, for a fresh, sharp finish.
Step-by-Step Cooking Instructions
1. Prepare & Marinate Chicken
Cut your chicken breasts into strips roughly ½ inch thick and 2-3 inches long. Uniformity matters here—strips of equal thickness cook at the same rate, preventing some pieces from drying out while others remain undercooked.
In a bowl, combine the chicken with soy sauce, vinegar, garlic, ginger, and a generous pinch of salt. Mix thoroughly with your hands, massaging the marinade into the meat. Let it sit for at least 30 minutes. Longer is better—90 minutes gives you noticeably deeper flavor penetration.
2. Make the Red Chili Paste
While the chicken marinates, prepare your paste. Remove the stems from the dried Kashmiri chilies. For a milder paste, split them and shake out the seeds. For more heat, leave them intact. Pour boiling water over the chilies and let them soak until completely softened—about 20 minutes.
Drain (reserving the soaking liquid) and transfer to a blender. Add fresh water or the soaking liquid and blend until completely smooth. You want a paste, not a chunky puree. This keeps in the refrigerator for up to two weeks, so make extra.
3. Prepare the Dragon Sauce
In a small bowl, whisk together 3 tablespoons red chili paste, 2 tablespoons soy sauce, 1 tablespoon sugar, and 1 tablespoon vinegar. Taste it. You’re looking for a balance where no single element dominates—sweet, sour, salty, and spicy in equal measure. Adjust as needed.
4. Fry the Chicken
Heat oil in a deep pan or wok to 350°F (175°C). Use enough oil to submerge the chicken pieces—about 2-3 inches deep.
Remove the chicken from the marinade, letting excess drip off. Dredge each piece in cornstarch, pressing gently to ensure full coverage. Shake off the excess. The coating should be thin and even.
Carefully lower the chicken into the oil in batches. Overcrowding drops the oil temperature, resulting in greasy, soggy coating. Fry until pale golden, about 3-4 minutes. Remove and drain on a wire rack.
Here’s where the magic happens. Let the chicken rest for 5 minutes while you bring the oil temperature up to 375°F (190°C). Fry the chicken again in batches until deeply golden and shatteringly crisp—another 2-3 minutes. This second fry is what creates the restaurant-quality crunch.
Air fryer method: Preheat to 400°F (200°C). Spray the chicken strips lightly with oil. Arrange in a single layer and cook for 10-12 minutes, flipping halfway through. The texture won’t match deep-frying, but it gets respectably crispy.
5. Make the Sauce & Toss
Heat 2 tablespoons oil in a large pan or wok over high heat. Add the sliced onions and bell peppers. Stir-fry for 1-2 minutes until slightly softened but still crisp. Add 1 teaspoon garlic and 1 teaspoon ginger—cook for 30 seconds until fragrant, but watch carefully. Burnt garlic turns bitter and ruins the dish.
Add your prepared sauce mixture and bring it to a bubble. Stir in the cornstarch slurry and cook until the sauce thickens and turns glossy—about 1 minute. It should coat the back of a spoon.
Turn off the heat. Add the fried chicken and toss quickly to coat. You want every piece glazed but not swimming. Sprinkle with roasted cashews and spring onions. Serve immediately—this dish waits for no one.
Achieving the Perfect Crispy Chicken: Frying Techniques
The difference between soggy and shatteringly crisp comes down to oil temperature management. When chicken hits oil that’s too cold—below 325°F—the coating absorbs grease rather than sealing. Too hot—above 400°F—and the exterior burns before the interior cooks through.
Deep frying remains the gold standard for a reason. The oil creates an instant seal around the cornstarch coating, trapping moisture inside while the exterior dehydrates and crisps. That initial seal is what prevents the chicken from becoming greasy.
For the air fryer method, the key is surface area and oil application. Spray the chicken pieces with oil rather than brushing it on—this creates tiny droplets that promote even browning. And don’t stack the pieces. Air needs to circulate around each strip for maximum crispiness.
The first time I made this dish, I skipped the second fry. Big mistake. The chicken looked golden but turned limp within minutes of hitting the sauce. That second high-heat fry essentially “sets” the crust, creating a barrier that resists moisture longer.
Crafting the Signature Dragon Sauce
The sauce is where this dish lives or dies. Too thick and it clumps; too thin and it slides right off the chicken. You’re aiming for a consistency that coats each strip in a glossy, even layer.
Start with your aromatics. Cooking the ginger-garlic paste in hot oil releases fat-soluble aromatic compounds that water alone can’t extract. Those 30 seconds of sizzling create a flavor foundation that permeates the entire sauce.
The red chili paste brings more than heat. Kashmiri chilies contain high levels of capsanthin—the pigment responsible for that characteristic red color. They also contribute a subtle fruitiness that rounds out the sauce’s flavor profile.
Sugar isn’t optional here. It counterbalances the vinegar’s acidity and tempers the chili heat. More importantly, sugar promotes caramelization in the sauce, contributing to that glossy, lacquered appearance.
The cornstarch slurry is your thickening agent. When heated, the starch granules swell and burst, creating a network that traps water molecules. This gives the sauce body without making it gummy. Add it gradually while stirring to prevent lumps.
⚠️ Common Mistakes to Avoid for Dragon Chicken Success
Overcrowding the pan during frying is the number one culprit for soggy chicken. When too many pieces hit the oil at once, the temperature plummets. Instead of searing, the chicken steams in its own moisture. Work in batches of 5-6 pieces at most.
Under-marinating produces bland chicken. That 30-minute minimum isn’t optional—it’s the difference between seasoned meat and chicken that tastes like nothing until you hit the sauce.
Burning the aromatics ruins everything. Garlic goes from fragrant to acrid in seconds. Add it to hot oil, count to 30, then move on. If it browns, you’ve gone too far.
Saucing too early is a classic error. If you toss the chicken while the sauce is still actively boiling, the coating breaks down faster. Remove the pan from heat, wait 30 seconds, then toss. The residual heat is plenty.
Skipping the cornstarch coating results in smooth, slippery chicken with no crunch. That cornstarch layer creates the jagged surface area that makes the coating so appealing.
Variations & Serving Suggestions
For a vegetarian version, substitute paneer or firm tofu cut into similar-sized strips. Press the tofu for 30 minutes first to remove excess moisture—this ensures it crisps rather than steams. Paneer needs no pressing, but pat it dry before coating.
Shrimp works beautifully, though it cooks faster. Reduce frying time to 2-3 minutes total and skip the second fry—shrimp doesn’t need it.
If heat is a concern, reduce the chili paste by half and add a tablespoon of ketchup for sweetness and body. It’s not traditional, but it creates a family-friendly version that still delivers on flavor.
Serve Dragon Chicken as an appetizer with toothpicks, or make it a meal alongside vegetable fried rice or Hakka noodles. A simple hot and sour soup rounds out a complete Indo-Chinese spread.
Storage & Reheating Tips
Leftover Dragon Chicken keeps in the refrigerator for up to 3 days in an airtight container. The coating will soften—there’s no way around it—but the flavors continue to develop.
For reheating, forget the microwave. It turns crisp chicken into rubber. Instead, use your oven or air fryer. Preheat to 375°F (190°C) and heat for 10-12 minutes until the exterior crisps back up and the internal temperature reaches 165°F.
Freezing works for the fried chicken pieces alone, before saucing. Freeze them in a single layer on a baking sheet, then transfer to a freezer bag. Reheat directly from frozen in a 400°F oven for 15-20 minutes. Make fresh sauce when serving—frozen and reheated sauce separates badly.
💡 Pro Tips for Dragon Chicken Mastery
Mise en place matters more here than in most dishes. Once you start frying, there’s no time to measure ingredients or chop aromatics. Have everything prepped and within arm’s reach before the oil heats.
Use a thermometer for the oil. Guessing leads to either greasy chicken or burnt coating. A clip-on candy thermometer or instant-read works fine.
Let the chicken rest between fries. Those 5 minutes allow the interior moisture to redistribute, preventing the coating from becoming soggy from steam released during the second fry.
Taste your chili paste before adding it to the sauce. Dried chilies vary wildly in heat. What was mild last time might be scorching this time.
Don’t walk away from the aromatics. Garlic burns silently. Stand at the stove, spatula in hand, and pull the pan off heat the moment you smell that fragrant bloom.
Frequently Asked Questions (FAQ)
+Why does my dragon chicken turn soggy after adding sauce?
The coating likely wasn’t crispy enough to begin with, or the sauce was too thin. Ensure you double-fry the chicken for maximum crunch, and let the sauce thicken properly before tossing. Adding the chicken to a bubbling sauce also breaks down the coating faster—remove the pan from heat first.
+Can I use chicken thighs instead of breasts?
Absolutely. Thighs have more fat, which means they stay juicier during frying. Cut them into similar-sized strips and follow the same process. The cooking time stays the same since the pieces are small.
+How do I know when the chicken is fully cooked?
The internal temperature should reach 165°F (74°C). Since the strips are thin, this happens quickly—usually during the first fry. If you’re unsure, cut into one piece. The meat should be opaque throughout with no pink remaining.
+Can I skip the double frying step?
You can, but you’ll sacrifice texture. Single-fried chicken stays crisp for maybe 5 minutes before the sauce softens it. That second high-heat fry creates a sturdy crust that holds up longer. For air frying, the single-stage method works fine since you’re not submerging in sauce immediately.
+How long does dragon chicken last in the fridge?
Properly stored in an airtight container, it keeps for 2-3 days. The crispiness fades, but the flavors actually improve overnight. Reheat in the oven or air fryer—not the microwave—to restore some texture.
+What can I serve with dragon chicken?
Classic pairings include vegetable fried rice, Hakka noodles, or a simple hot and sour soup. For a lighter meal, serve it alongside stir-fried vegetables or a crisp cucumber salad to cut through the richness.
Dragon Chicken (Indo-Chinese Restaurant Style)
Ingredients
Method
- Deseed dried chilies and soak in boiling hot water, for about 15 to 20 mins. Drain the water and add them to a grinder. Blend with fresh water to a smooth paste. This makes 4 tablespoons chili paste.
- Cut chicken to thin stirps of ½ inch by 2 to 3 inch and add to a mixing bowl.
- Add salt, ginger garlic paste, soya sauce, black pepper or chili paste, vinegar (omit to use sambal oelek). Mix well and cover. Rest for 20 mins while you prepare the other ingredients.
- In a small bowl, stir soya sauce, maggi tomato sauce, sugar, red chili paste, vinegar (omit to use sambal oelek). Taste test to adjust salt and vinegar to your preference. Optionally for a slightly saucy version – In another small bowl, stir together cornstarch and water.
- Make the sauce
- Fry the chicken
- Assemble Dragon Chicken
Nutrition
Notes
- For optimal doneness, ensure the chicken reaches an internal temperature of 165°F (75°C) and has a golden-brown exterior for the perfect texture.
- To prevent the sauce from breaking, maintain a gentle simmer and avoid high heat once the chicken is added; this helps keep the sauce smooth and cohesive.
- If you prefer a milder dish, start with half the amount of chili paste and gradually add more to taste, ensuring you don’t overwhelm the flavors.
- For a quicker marinade, 30 minutes will suffice to infuse the chicken with flavor, although letting it sit for 2 hours or overnight will yield a richer taste.
- Store any leftovers in an airtight container in the fridge for up to 3 days; reheat gently on the stovetop over low heat to maintain the chicken’s tenderness and prevent drying out.