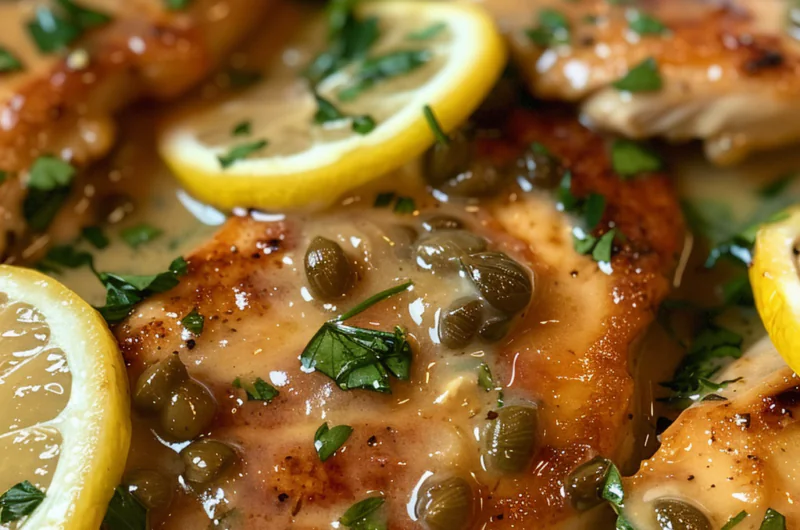
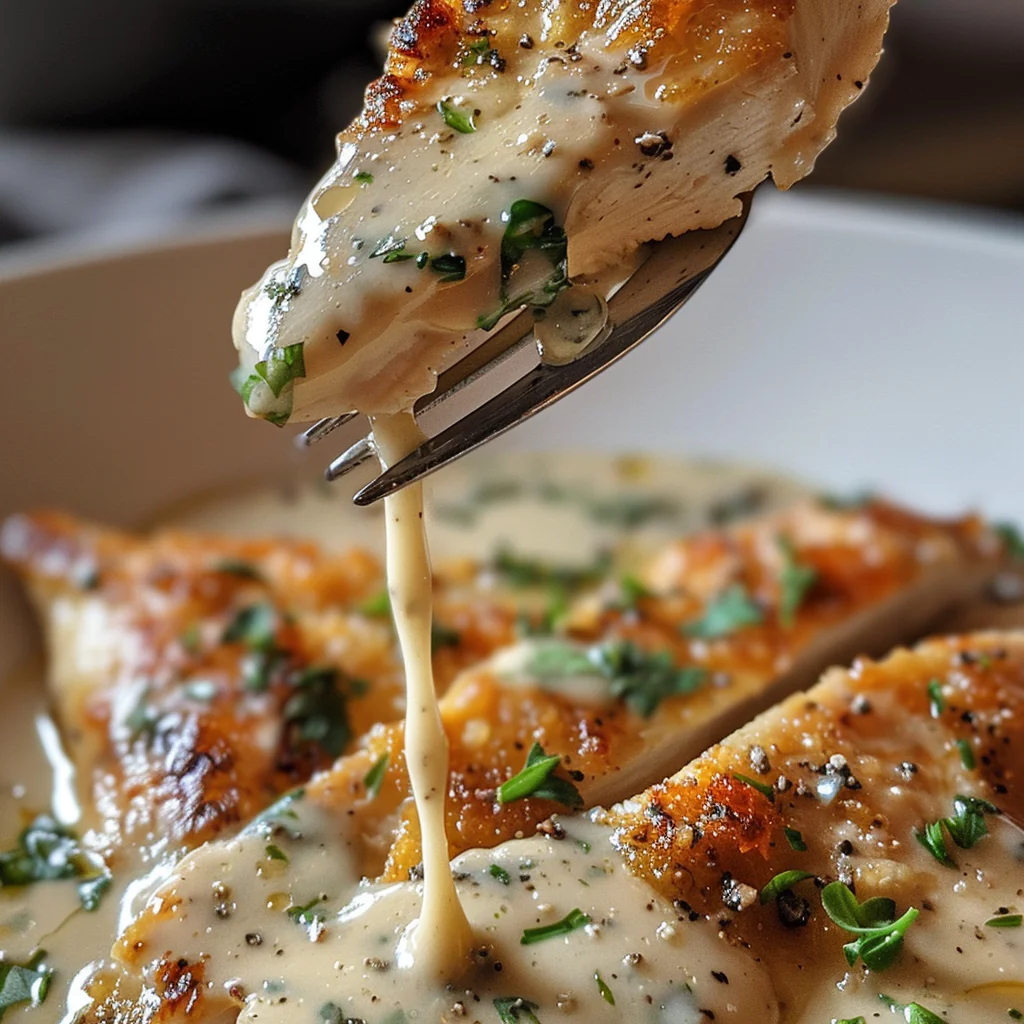
Golden, pan-seared chicken breasts simmered in a velvety lemon-butter sauce with briny capers—ready in 30 minutes for a weeknight dinner that feels decidedly un-weeknight.
📋 In This Article
- Introduction
- Why This Recipe Works: The Secret to Restaurant-Quality Piccata
- Essential Ingredients: Building Your Creamy Lemon Garlic Piccata
- Step-by-Step Instructions: Crafting Your Creamy Lemon Garlic Piccata
- Pro Tips for Piccata Perfection: Elevating Your Dish
- Serving Suggestions: What to Pair with Your Piccata
- Common Mistakes to Avoid: Ensuring Your Piccata Success
- Variations & Dietary Adaptations: Customizing Your Piccata
- Storage & Reheating: Enjoying Leftovers
- Frequently Asked Questions (FAQ)
Introduction
Let’s be honest: weeknight dinners often fall into a rut. Creamy Lemon Garlic Chicken Piccata with Capers is the antidote to boring chicken. It hits that elusive trifecta: it’s fast enough for a Tuesday, impressive enough for guests, and packs the kind of bold, bright flavor that wakes up your palate. We’re talking about tender, pounded chicken cutlets that get a quick sear in a hot pan, followed by a pan sauce built on the savory fond left behind.
The magic is in the contrast. You get the richness of heavy cream and butter cut sharply by the acidity of fresh lemon juice and the salty pop of capers. It’s a lesson in balance—acid versus fat, crunchy versus tender. While traditional Piccata skips the cream, this version leans into indulgence without losing the dish’s signature snap. It’s the kind of meal that begs to be served with crusty bread to mop up every last drop of sauce.
Why This Recipe Works: The Secret to Restaurant-Quality Piccata
This isn’t just tossing ingredients into a pan. Creamy Lemon Garlic Chicken Piccata with Capers works because of a few specific culinary principles that we leverage to maximize flavor.
First, we use flavor layering. We start by searing the chicken, which triggers the Maillard reaction—the chemical process that gives browned food its distinctive savory depth. Those sticky, browned bits stuck to the bottom of the pan (the fond) are pure concentrated flavor. By deglazing the pan with liquid, we dissolve that fond back into the sauce, ensuring nothing goes to waste.
Second, there’s the garlic infusion. Sautéing minced garlic in the residual fat releases its aromatic oils, creating a base that permeates the entire dish. Finally, the sauce relies on emulsification. The heavy cream acts as a stabilizer, allowing the lemon juice and butter to blend into a silky, cohesive texture rather than separating into a greasy mess. The result? A sauce that clings to the chicken and pasta rather than pooling at the bottom of the plate.
Essential Ingredients: Building Your Creamy Lemon Garlic Piccata
To get this right, you need the right building blocks. Here’s how the components come together:
The Chicken
- Boneless, skinless chicken breasts: We pound these thin. A thicker breast takes too long to cook through, leaving the exterior overcooked and dry before the center is done.
- All-purpose flour: A light dredge creates a barrier that promotes even browning and helps the sauce adhere to the meat. For a gluten-free option, almond flour or a 1:1 gluten-free blend works perfectly.
- Salt and black pepper: Essential for seasoning the meat directly. Don’t skimp here.
The Sauce Base
- Butter and olive oil: We use a mix. Oil prevents the butter from burning at the high heat required for searing, while butter adds a necessary nutty richness.
- Fresh garlic cloves: Minced fine so they dissolve into the sauce, providing a background hum rather than a raw bite.
- White wine (or chicken broth): The deglazing liquid. Wine adds acidity and complexity; broth keeps it simple and family-friendly.
The Finishers
- Heavy cream: This transforms a standard Piccata into a creamy version. It buffers the acid from the lemon, creating a velvety mouthfeel.
- Fresh lemon juice and lemon zest: Use both. The juice provides the acid kick, while the zest contains the essential oils that provide a floral, bright aroma without the sourness.
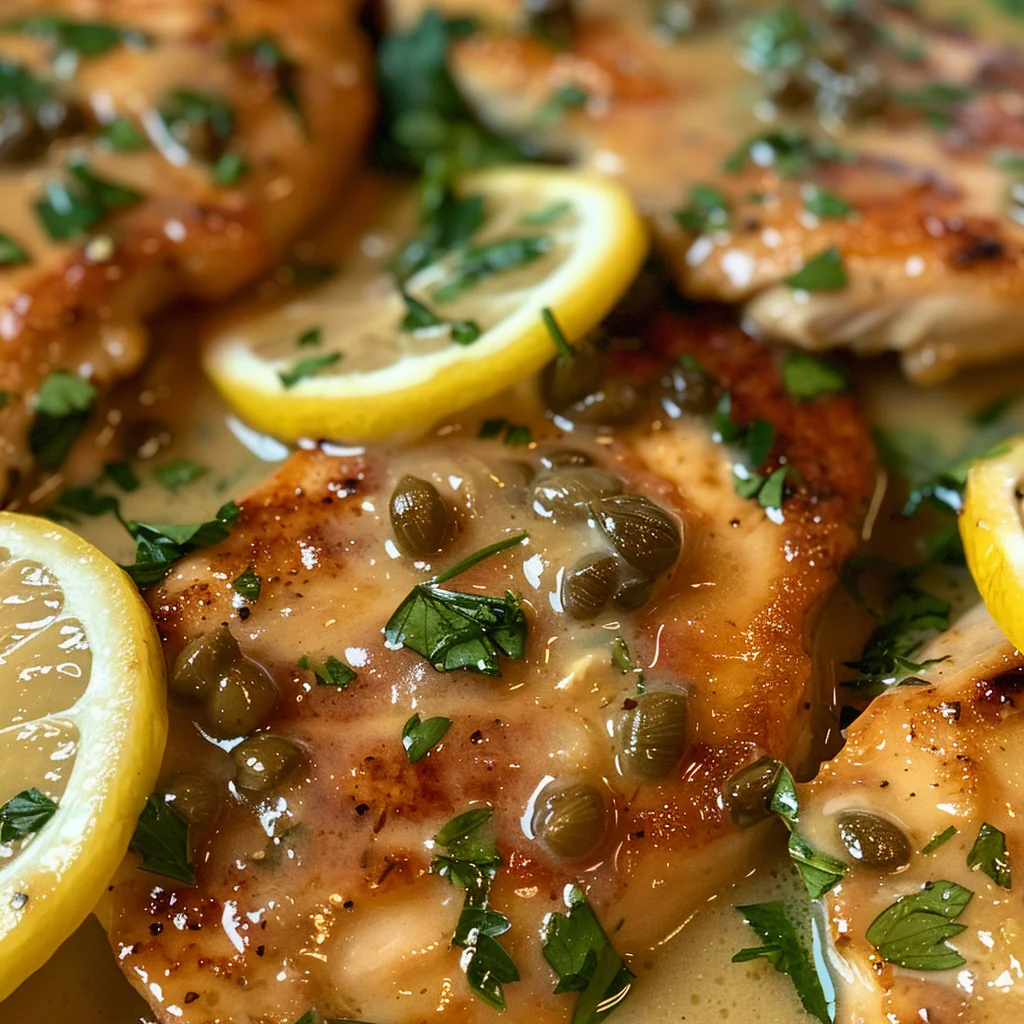
- Capers: These are non-negotiable. Rinse them to remove excess brine, but don’t skip them—they provide the briny punch that cuts through the cream.
- Fresh parsley: More than a garnish, it adds a fresh, herbal note that lightens the heavy dish.
Step-by-Step Instructions: Crafting Your Creamy Lemon Garlic Piccata
- Pound the Chicken: Place boneless, skinless chicken breasts between two sheets of plastic wrap. Use a meat mallet to pound them to an even 1/2-inch thickness. This isn’t just about thinness; it’s about surface area. More surface area means more crust and more contact with the pan, translating to better flavor.
- Dredge and Season: Season both sides generously with salt and black pepper. Dredge lightly in all-purpose flour, shaking off the excess. Too much flour creates a gummy coating; we just want a light dusting to aid browning.
- Sear the Chicken: Heat 1 tablespoon of olive oil and 1 tablespoon of butter in a large skillet over medium-high heat. Once the butter foams and sizzles, add the chicken. Don’t crowd the pan—do it in batches if needed. Sear for 3-4 minutes per side until golden brown. Transfer to a plate.
- Build the Aromatics: Reduce heat to medium. Add a bit more oil if the pan is dry. Add fresh garlic cloves and sauté for 30 seconds. You want fragrant, not burnt. Burnt garlic is bitter and ruins the sauce.
- Deglaze: Pour in 1/2 cup of white wine (or chicken broth). Scrape the bottom of the pan with a wooden spoon to release the fond. Let it simmer for 2 minutes to cook off the raw alcohol smell.
- Create the Sauce: Stir in 1 cup of heavy cream, the juice of 1 lemon, and 1 tablespoon of capers. Bring to a gentle simmer. Let this reduce for 3-5 minutes until it coats the back of a spoon. The reduction concentrates flavors and thickens the texture naturally.
- Finish and Combine: Return the chicken to the pan, turning to coat in the sauce. Let it warm through for 2 minutes. Remove from heat. Stir in a final tablespoon of cold butter (mounting the sauce) for extra gloss and richness. Sprinkle with fresh parsley and serve immediately.
💡 Pro Tips for Piccata Perfection: Elevating Your Dish
Getting the ingredients is half the battle; technique is where the magic happens.
- Temperature Matters: Use a heavy-bottomed pan or cast iron skillet. These retain heat, ensuring the temperature doesn’t plummet when the chicken hits the pan. A pan that loses heat results in steamed, gray chicken.
- The Emulsification Trick: If your sauce looks oily, remove the pan from the heat before whisking in the cream. High heat can break the emulsion, causing the fat to separate. Keep it gentle.
- Don’t Overcook: Because the chicken is pounded thin, it cooks fast. Use a meat thermometer to pull it at 165°F. Carryover cooking will finish the job.
- Caper Handling: Some chefs fry the capers in oil before making the sauce for a crispy texture. For this recipe, we add them directly to the liquid for a softer, briny bite that infuses the sauce.
- Resting: Let the chicken rest on the plate while you make the sauce. This allows the juices to redistribute, so they don’t run out the moment you cut into it.
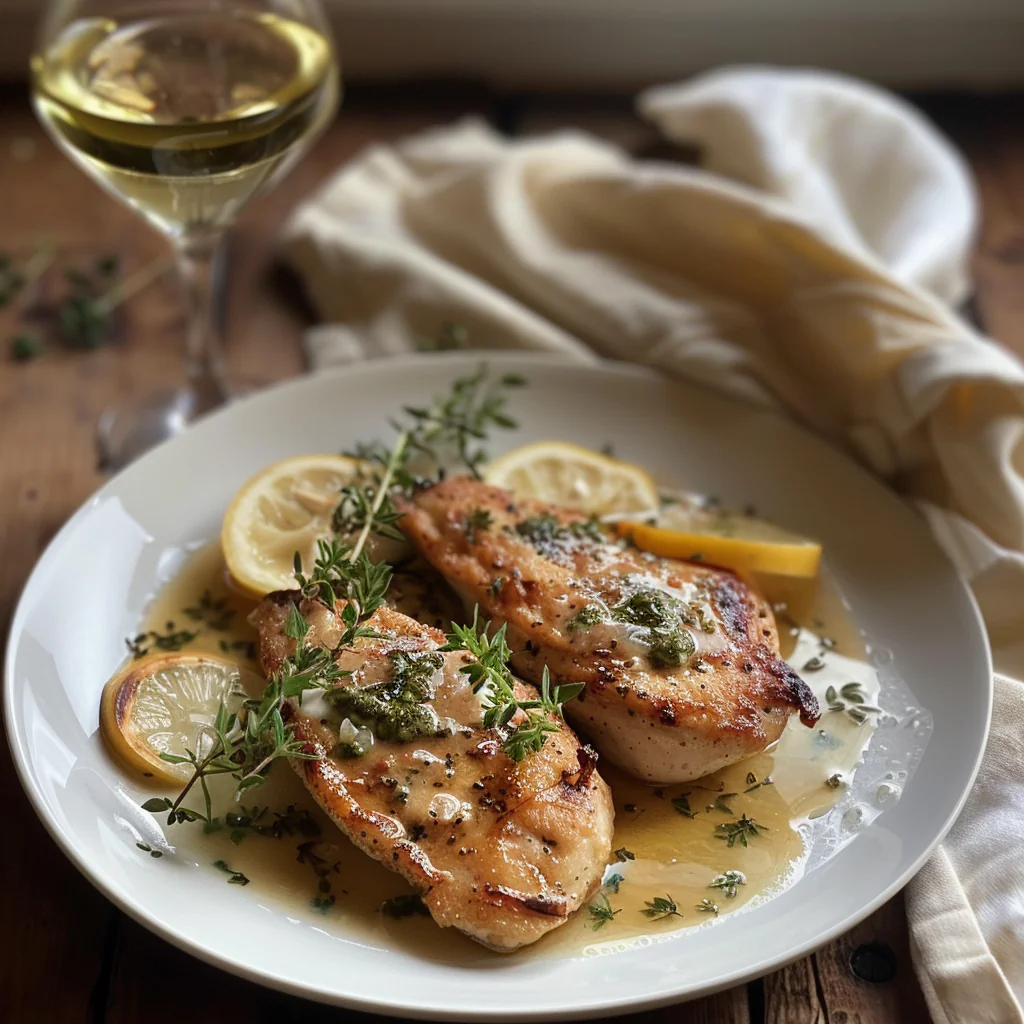
Serving Suggestions: What to Pair with Your Piccata
The sauce is the star here, so you need a vehicle for it.
- Pasta: Angel hair or linguine is classic. The thin strands wrap around the sauce perfectly.
- Vegetables: Roasted asparagus or Brussels sprouts provide a bitter contrast to the creamy lemon sauce. Alternatively, steamed broccoli works well.
- Starch: Crusty bread is non-negotiable for mopping up the remaining sauce. A garlic bread side turns this into a carb-lover’s dream.
- Wine Pairing: A crisp Sauvignon Blanc or Pinot Grigio mirrors the acidity in the sauce. Avoid heavy reds, which will clash with the lemon and capers.
⚠️ Common Mistakes to Avoid: Ensuring Your Piccata Success
Even simple dishes have pitfalls. Here’s how to dodge them:
- Overcrowding the Pan: This is the number one error. If you crowd the pan, the temperature drops, and the chicken steams in its own juices instead of searing. You lose the crust and the fond. Cook in batches.
- Uneven Thickness: If one part of the breast is thick and another thin, you’ll have dry meat and raw meat. Pounding ensures uniform cooking.
- Adding Acid Too Early: If you add lemon juice to a boiling cream sauce, it might curdle. Add the lemon juice when the cream has reduced slightly and the heat is manageable.
- Soggy Breading: If you don’t shake off the excess flour, it turns into paste in the pan. A light dusting is all you need.
- Not Tasting the Sauce: Capers and broth are salty. Taste the sauce before adding extra salt. You might not need it.
Variations & Dietary Adaptations: Customizing Your Piccata
This recipe is a blueprint. Adapt it to your needs.
- Protein Swaps: Veal piccata is the traditional route, often more tender. For seafood lovers, salmon piccata works beautifully—just adjust the cooking time. Chicken thighs offer more fat and flavor but take slightly longer to cook.
- Dairy-Free: Substitute heavy cream with full-fat coconut milk. It changes the flavor profile slightly but maintains the creamy texture. Use nutritional yeast for a cheesy umami kick.
- Gluten-Free: Swap all-purpose flour for almond flour or cornstarch. Cornstarch will make the sauce slightly glossier, so use sparingly.
- Spicy Kick: Add a pinch of red pepper flakes to the garlic sauté for a Piccata Arrabbiata vibe.
- Artichokes: Add drained, marinated artichoke hearts along with the capers for a heartier texture and tangy flavor.
Storage & Reheating: Enjoying Leftovers
Creamy Lemon Garlic Chicken Piccata with Capers stores well, but the texture changes slightly. The sauce may thicken in the fridge.
- Refrigeration: Store in an airtight container for up to 3 days. The flavors often meld and improve overnight.
- Reheating: Reheat gently. High heat will break the cream sauce. Warm it in a saucepan over low heat, adding a splash of chicken broth or water to loosen the sauce if it’s too thick. Microwave reheating often leads to hot spots and broken sauces, so a stovetop is best.
- Freezing: You can freeze it, but cream sauces can separate upon thawing. If you plan to freeze, make the sauce without cream, freeze, and add fresh cream when reheating.
Frequently Asked Questions (FAQ)
+Why is my chicken piccata dry?
You likely overcooked it. Because the cutlets are thin, they only need 3-4 minutes per side. Use a meat thermometer to pull at 165°F immediately. Also, ensure you pound the chicken evenly so the thin parts don’t dry out while the thick parts cook.
+Can I make chicken piccata without capers?
Yes, but you lose the signature briny flavor that defines Piccata. If you skip them, add a little extra salt and a splash of white wine vinegar or pickle juice to mimic that acidic, salty punch.
+What is the difference between chicken piccata and chicken francese?
They are very similar, but the dredge differs. Chicken Piccata is dredged in flour (or nothing) and uses capers. Chicken Francese is dipped in flour, then egg, then fried, creating a puffier, eggier crust, and typically skips the capers.
+How do I know when the chicken is done?
The most accurate method is a meat thermometer. Insert it into the thickest part of the cutlet. It should read 165°F. If you don’t have a thermometer, cut into the thickest piece; the juices should run clear, and the meat should be opaque throughout, not pink.
+Can I use milk instead of heavy cream?
You can, but the sauce will be much thinner and less velvety. Milk also has a lower fat content, making it more prone to curdling when mixed with lemon juice. For the best texture, stick to heavy cream or a half-and-half blend.
Creamy Lemon Chicken Piccata
Ingredients
Method
- Heat 2 tablespoons butter and 2 tablespoons of oil in a large skillet over medium high heat. (If the chicken breasts are overly thick, pound them to be thinner. Cooking time will be shorter.) Salt and pepper each side of the chicken breasts.
- Dredge the chicken in the flour.
- Put the chicken breasts in the skillet. Cook for about 3 minutes on each side, or until it is cooked throughout and no longer pink. Remove from the skillet and set aside on a plate.
- Turn the heat to medium low. Add broth, juice from both lemons, heavy cream, and capers. Bring the sauce to a boil and return to medium low heat. Test the sauce and season with salt and pepper as needed. Allow the sauce to cook and bubble for about 3 minutes.
- Serve the chicken over cooked pasta and spoon the sauce over both. Sprinkle with fresh chopped parsley.
Nutrition
Notes
- For perfectly cooked chicken, aim for an internal temperature of 165°F; the chicken should be golden brown on the outside and no longer pink in the center.
- To avoid a broken sauce, ensure your cream is at room temperature before adding it to the skillet, and stir gently while it simmers.
- If you're short on time, use pre-sliced chicken breasts from the store to skip the pounding step and reduce cooking time.
- For a lighter version, substitute half of the heavy cream with Greek yogurt; it will provide creaminess without being overly rich.
- Leftovers can be stored in an airtight container in the fridge for up to 4 days; reheat gently on the stove over low heat to maintain the sauce's creaminess.